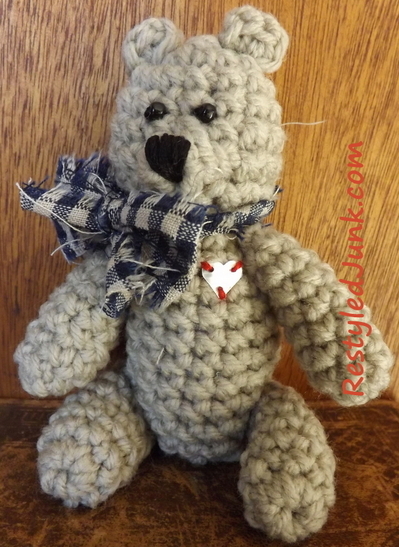
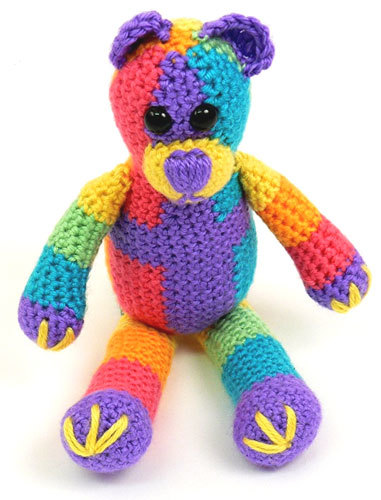
Rainbow Teddy Bear
With six different bright colors, this rainbow teddy bear is far from boring. Use this bear crochet pattern to create a toy for any boy or girl who loves bright colors. This toy or amigurumi crochet pattern is for intermediate level.
Find this and other fun amigurumi patterns at "19 Free Amigurumi Crochet Patterns"!

MATERIALS:
- Caron International's Simply Soft Brites (100% acrylic; 5 oz/142 g, 350 yds/320 m):
#9610 Grape (A), 1 skein
#9604 Watermelon (B), 1 skein
#9605 Mango (C), 1 skein
#9606 Lemonade (D), 1 skein
#9607 Limelight (E), 1 skein
#9608 Blue Mint (F), 1 skein
- One crochet hook size US G-6 (4.25 mm), or size to obtain gauge
- Polyester fiberfill
- Stitch marker
- Yarn Needle
- 2 black animal eyes or buttons – 12mm diameter
FINISHED MEASUREMENTS
Bear measures approximately 10"/25.5 cm tall
GAUGE
Gauge is not critical for this project.
STITCHES USED
Chain (ch)
Double crochet (dc)
Half double crochet (hdc)
Single crochet (sc)
Slip stitch (slip st)
Treble crochet (tr)
SPECIAL TERM
sc2tog: Single crochet 2 together – Insert hook in next stitch, yarn over and pull up a loop, (two loops on hook), insert hook in next stitch, yarn over and pull up a loop (three loops on hook), yarn over and draw through all three loops on hook.
SPECIAL TECHNIQUE
Double-ring method — Holding the yarn a few inches from the end, wrap twice around your fingers. Remove rings from fingers and grip two rings and tail firmly between middle finger and thumb. Insert hook through center of ring and draw up a loop. Yarn over and draw through loop on hook. Work stitches of first round in the rings. Pull gently, but firmly, on tail to tighten ring.
NOTES
1. One skein of each color will make 3 or more bears.
2. If the bear is for a small child, do not use buttons or animal eyes. For safety, embroider eyes.
3. Firmly stuff the pieces of the bear as you crochet.
4. Gauge is not critical for this project. However work tightly to create a firm fabric, and so that stuffing will not show through stitches.
5. Bear is worked in the round. The rounds are not joined.
6. Place marker to indicate beginning of round. Move marker up as each round is completed.
7. To change color, work last stitch of old color to last yarn over. Yarn over with new color and draw through both loops on hook to complete stitch. When working head and body, carry colors not in use loosely across wrong side of work. When working arms and legs, fasten off old color.
HEAD & BODY
With C, form a ring using the double-ring method (see above).
Round 1: Work 6 sc in ring—6 sts.
Round 2: With C, 2 sc in next st; change to D, 2 sc in next st; change to E, 2 sc in next st; change to F, 2 sc in next st; change to A, 2 sc in next st; change to B, 2 sc in next st; change to C—12 sts.
Round 3: *Sc in next st, 2 sc in next st; change to next color; repeat from * around—18 sts.
Round 4: *2 sc in next st, sc in next 2 sts; change to next color; repeat from * around—24 sts.
Round 5: *Sc in next 4 sts; change to next color; repeat from * around.
Round 6: *Sc in next 3 sts, 2 sc in next st; change to next color; repeat from * around—30 sts.
Rounds 7–10: Sc in next 5 sts; change to next color; repeat from * around.
Round 11: *Sc in next 3 sts, sc2tog; change to next color; repeat from * around—24 sts.
Round 12: *Sc in next 4 sts; change to next color; repeat from * around.
Round 13: *Sc in next 2 sts, sc2tog; change to next color; repeat from * around—18 sts.
Round 14 and 15: *Sc in next 3 sts; change to next color; repeat from * around.
Note: In Round 16, work first 3 sts with C, next 4 sts with D, next 3 sts with E, next 4 sts with F, next 3 sts with A, and next 4 sts with B.
Round 16: *Sc in next 5 sts, 2 sc in next st; repeat from * around—21 sts.
Note: Continue changing colors as established.
Begin firmly stuffing head and body and continue to stuff as you go.
Round 17: Sc in next 2 sts, *2 sc in next st, sc in next 6 sts; repeat from * once more, 2 sc in next st, sc in last 4 sts—24 sts.
Round 18: *Sc in next 7 sts, 2 sc in next st; repeat from * around—27 sts.
Round 19: Sc in next 3 sts, *2 sc in next st, sc in next 8 sts; repeat from * once more, 2 sc in next st, sc in last 5 sts; change to A in last st—30 sts.
Note: Work Rounds 20–23 with A only.
Rounds 20 and 21: Sc in each st around.
Round 22: *2 sc in next st, sc in next 9 sts; repeat from * around—33 sts.
Round 23: Sc in each st around.
Note: In Round 24, re-establish color sequence as for head, working 6 sts of each color.
Round 24: Sc in next 5 sts, *2 sc in next st, sc in next 10 sts; repeat from * once more, 2 sc in next st, sc in last 5 sts—36 sts.
Note: Continue changing colors as established.
Rounds 25–29: Sc in each st around.
Round 30: *Sc in next 4 sts, sc2tog; repeat from * around—30 sts
Round 31: *Sc in next 3 sts, sc2tog; repeat from * around—24 sts.
Round 32: *Sc in next 2 sts, sc2tog; repeat from * around—18 sts.
Round 33: *Sc in next st, sc2tog; repeat from * around; change to C in last st—12 sts.
Note: Work remaining rounds with C only. Fasten off all other colors.
Round 34: (Sc2tog) around—6 sts.
Round 35: *Skip next st, slip st in next st; repeat from * 2 more times.
Fasten off.
MUZZLE
With D, form a ring using the double-ring method (see above).
Round 1: Work 5 sc in ring—5 sts.
Round 2: 2 sc in each st around—10 sts.
Round 3: *Sc in next st, 2 sc in next st; repeat from * around—15 sts.
Round 4: Sc in each st around.
Round 5: *Sc in next 2 sts, 2 sc in next st; repeat from * around—20 sts.
Fasten off, leaving a long tail for sewing.
EARS (make 2)
With A, ch 6.
Round 1: (Sc, hdc) in second ch from hook, dc in next ch, tr in next ch, dc in next ch, (hdc, sc) in last ch—7 sts.
Fasten off, leaving a long tail for sewing.
ARM (make 2)
Note: Make first arm in color sequence: 5 rounds with A, 5 rounds with B, 5 rounds with C, and 4 rounds with D.
Make second arm in color sequence: 5 rounds with A, 5 rounds with F, 5 rounds with E, and 4 rounds with D.
With first color, form a ring using the double-ring method (see above).
Round 1: Work 5 sc in ring—5 sts.
Round 2: 2 sc in each st around—10 sts.
Round 3: *Sc in next st, 2 sc in next st; repeat from * around—15 sts.
Round 4: Sc in each st around.
Round 5: *Sc in next 3 sts, sc2tog; repeat from * around; change to second color in last st—12 sts.
Rounds 6–8: Sc in each st around.
Round 9: *Sc in next 4 sts, sc2tog; repeat from * around—10 sts.
Round 10: Sc in each st around; change to third color in last st.
Rounds 11–14: Sc in each st around.
Round 15: Sc in each st around; change to fourth color in last st.
Round 16: Sc in next 8 sts, sc2tog—9 sts.
Round 17: Sc in next 3 sts, sc2tog, sc in last 4 sts—8 sts.
Round 18: Sc in each st around.
Round 19: (Sc2tog) around—4 sts.
Fasten off leaving a long tail for sewing. Lightly stuff arm and flatten top.
LEG (make 2)
Note: Make first leg in color sequence: 8 rounds with A, 6 rounds with B, 6 rounds with C, and 5 rounds with D.
Make second leg in color sequence: 8 rounds with A, 6 rounds with F, 6 rounds with E, and 5 rounds with D.
With first color, form a ring using the double-ring method (see above).
Round 1: Work 6 sc in ring—6 sts.
Round 2: 2 sc in each st around—12 sts.
Round 3: *Sc in next st, 2 sc in next st; repeat from * around—18 sts.
Round 4: *Sc in next 2 sts, 2 sc in next st; repeat from * around—24 sts.
Round 5: Sc in each st around.
Round 6: *Sc in next 2 sts, sc2tog; repeat from * 3 more times, sc in last 8 sts—20 sts.
Round 7: *Sc in next st, sc2tog; repeat from * 3 more times, sc in last 8 sts—16 sts.
Round 8: Sc in each st around; change to second color in last st.
Round 9: Sc in each st around
Rounds 10–14: Sc in each st around; change to third color in last st of Round 14.
Round 15: Sc2tog, sc in next 14 sts—15 sts.
Round 16: Sc in each st around.
Round 17: Sc in next 6 sts, sc2tog, sc in next 7 sts—14 sts.
Round 18: Sc in each st around.
Round 19: Sc in next 10 sts, sc2tog, sc in next 2 sts—13 sts.
Round 20: Sc in each st around; change to fourth color in last st.
Round 21: Sc in next 3 sts, sc2tog, sc in next 8 sts—12 sts.
Round 22: Sc in each st around.
Round 23: Sc in next 8 sts, sc2tog, sc in next 2 sts—11 sts.
Round 24: Sc in next 6 sts, sc2tog, sc in next 3 sts—10 sts.
Lightly stuff leg.
Row 25: Flatten opening; working through both thicknesses, sc in each st across.
Fasten off leaving a long tail for sewing.
FINISHING
Using photograph as a guide, with A and yarn needle, embroider straight stitch nose and mouth onto muzzle. Using long tails, sew muzzle to front of head, sew ears to sides of head, sew arms to sides of body (at Round 17), and sew legs to bottom of body.
Using yarn needle, weave in ends.
Read NextMini Teddy Bear Crochet Pattern
Your Recently Viewed Projects
Thanks for your comment. Don't forget to share!
kmcox928 9104440
Feb 23, 2012
Hello, While I think this is adorable, am not seeing the rainbow pattern in this color scheme. I would have thought it to be in more of a rainbow pattern.
george371 5284666
Oct 24, 2010
I just made this and found row 16 of the body needs 21 stitches, which the pattern says nothing about increasing. Follow the note about it and you will have increases to the 21 stitches. Great to use up your bright colored yarns. It is so cute. Hope
Member 3750563
Mar 08, 2010
Hola Lindo el osito me gusto el colorido ademas no es tan dificil de realizarlo. Muchas gracias. Besos.
kmcox928 9104440
Feb 23, 2012
Unfortunately, I do not speak or read Spanish very well. Sorry :-(.
BeckySue
Mar 10, 2016
Member 3750563 said Hi nice people. I like the colorful little bear. It's not so hard to do. Thank you very much. Kisses.
BeckySue
Mar 10, 2016
A mi me gusta tambien este osito tan colorido. Tengo poco experiencia en crochet, por eso busco patrones como estos para hacer. Sin embargo, prefiero hacer de veces un osito de puro cafecito.
Garrison813
Jan 22, 2010
Love this pattern. I used the 6 rainbow colors of the gay coalition and he is absolutely adorable. The only thing the pattern does not say to do is make sure you use bobbins to keep the different colors from getting tangled up while working. You work with all six colors at the same time and with bobbins it was much easier.
Report Inappropriate Comment
Are you sure you would like to report this comment? It will be flagged for our moderators to take action.
Thank you for taking the time to improve the content on our site.