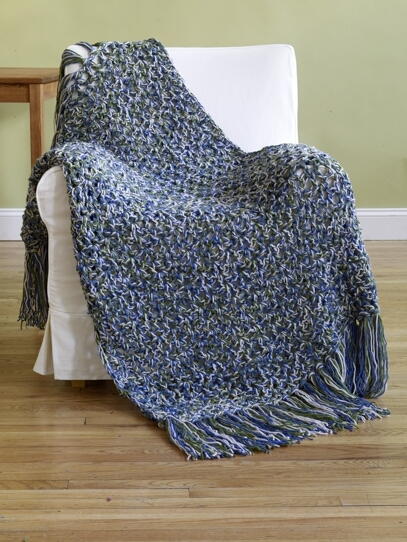
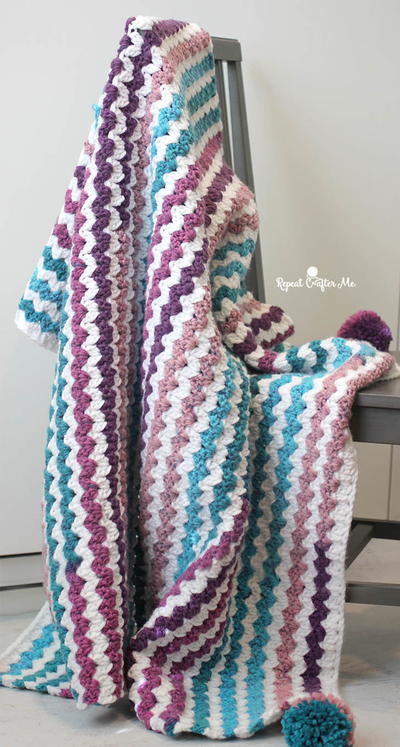
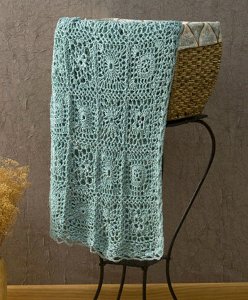
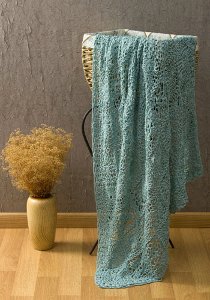
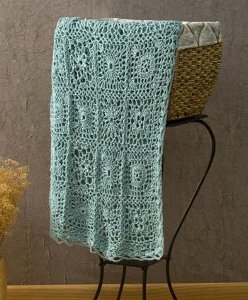
Andante Crochet Throw
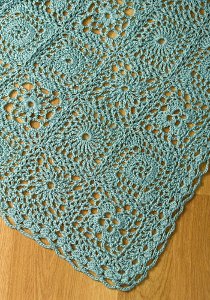
Learn how to crochet the Andante crochet throw with this free, easy to crochet afghan pattern from Caron Yarns, featuring decorative joined squares. This elegant lacy afghan would look beautiful on your bedspread or laying over your living room couch. While it's striking as a solid colored afghan, you could also use two colors to give it a unique look. This is a more advanced pattern, but is a great challenge for any level of crochet fan!
Materials:
- US H-8 (5mm) crochet hook, or size to obtain gauge
- Yarn needle
- Naturally Caron Spa yarn in Ocean Spray: 2008 yards (1836 m), about 8 skeins
- Pattern
Gauge: Each square = 5 1/2 x 5 1/2"/14 x 14 cm.
Special Stitches:
- beg-Cl: Beginning cluster— Yarn over, insert hook in indicated space, yarn over and pull up a loop, yarn over and draw through 2 loops on hook, *yarn over, insert hook in same space, yarn over and pull up a loop, yarn over and draw through 2 loops on hook; repeat from * once more, yarn over and draw through all 4 loops on hook.
- Cl: Cluster—Yarn over, insert hook in indicated space, yarn over and pull up a loop, yarn over and draw through 2 loops on hook, *yarn over, insert hook in same space, yarn over and pull up a loop, yarn over and draw through 2 loops on hook; repeat from * 2 more times, yarn over and draw through all 5 loops on hook.
- square-join: Ch 1; holding neighboring square close to work with WS of current square and neighboring square facing each other, *slip st in corresponding ch-3 sp of neighboring square, ch 1.
Instructions:
Blanket measures approximately 47 x 58"/119.5 x 147.5 cm
Squares are joined to neighboring squares while working the last round (joining round). In joining round, when working along a side of the square that neighbors another square, work square-join instead of ch-3 for each ch-3 sp (including corners) along the side to join the square to the neighboring square.
Throw consists of 80 squares, 15 each of squares 1, 2, 4, and 5, and 10 squares each of squares 3 and 6.
Square 1 (Make 15)
- Chain 5; join with slip st in first ch to form a ring.
- Round 1: Ch 4 (counts as dc, ch 1), [dc in ring, ch 1] 7 times; join with slip st in 3rd ch of beg ch.
- Round 2: Ch 3 (counts as dc here and throughout), 2 dc in same st as join, *2 dc in next ch-1 sp, dc in next dc, 2 dc in next ch-1 sp, 3 dc in next dc; repeat from * 2 more times, 2 dc in next ch-1 sp, dc in next dc, 2 dc in next ch-1 sp; join with slip st in top of beginning ch—32 dc.
- Round 3: Slip st in next dc, ch 6 (counts as dc, ch 3), dc in same st as join, *[ch 1, sk next dc, dc in next dc] 3 times, ch 1, sk next dc, (dc, ch 3, dc) in next dc; repeat from * 2 more times, [ch 1, sk next dc, dc in next dc] 3 times, ch 1; join with slip st in 3rd ch of beginning ch.
- Round 4: Ch 3, *5 tr in next ch-3 sp, dc in next dc, [ch 1, dc in next dc] 4 times; repeat from * 2 more times, 5 tr in next ch-3 sp, dc in next dc, [ch 1, dc in next dc] 3 times, ch 1; join with slip st in 3rd ch of beginning ch. Work Round 5 of first square without any joining.
- Round 5 (joining round): Ch 1, sc in same st as join, ch 3, *sk next 2 tr, (sc, ch 3 or square-join, sc) in next tr (corner made), ch 3 or square-join, sk next 2 tr, sc in next dc, [ch 3 or square-join, sc in next dc] 4 times, ch 3 or square-join; repeat from * 2 more times, sk next 2 tr, (sc, ch 3 or square-join, sc) in next tr (corner made), ch 3 or square-join, sk next 2 tr, sc in next dc, [ch 3 or square-join, sc in next dc] 3 times, ch 3 or square-join; join with slip st in first sc. Fasten off.
Square 2 (Make 15)
- Chain 6; join with slip st in first ch to form a ring.
- Round 1: Ch 5 (counts as tr, ch 1 here and throughout), [tr in ring, ch 1] 19 times; join with slip st in 4th ch of beginning ch.
- Round 2: Ch 1, sc in same st as join, [ch 3, sc in next tr] 19 times, ch 3; join with slip st in first sc.
- Round 3: (Slip st, ch 5, tr, ch 1, tr, ch 1, tr) in first ch-3 sp, ch 1, *[dc in next ch-3 sp, ch 1] 4 times, (tr, ch 1, tr, ch 1, tr, ch 1, tr) in next ch-3 sp, ch 1; repeat from * 2 more times, [dc in next ch-3 sp, ch 1] 4 times; join with slip st in 4th ch of beginning ch.
- Round 4 (joining round): Slip st in first ch-1 sp and next tr; (slip st, ch 1, sc, ch 3 or square-join, sc) in next ch-1 sp (corner made), ch 3 or square-join, sk next ch-1 sp, [sc in next ch-1 sp, ch 3 or square-join] 5 times, *sk next ch-1 sp, (sc, ch 3 or square-join, sc) in next ch-1 sp (corner made), ch 3 or square-join, sk next ch-1 sp, [sc in next ch-1 sp, ch 3 or square-join] 5 times; repeat from * around; join with slip st in first sc. Fasten off.
Square 3 (Make 10)
- Chain 6; join with slip st in first ch to form a ring.
- Round 1: Ch 2, beg-Cl in ring, ch 5, [Cl in ring, ch 5] 7 times; join with slip st in top of beginning ch.
- Round 2: Slip st in first ch-5 sp, ch 9 (counts as tr, ch 5), tr in same ch-5 sp, *(dc, ch 5, dc) in next ch-5 sp, (tr, ch 5, tr) in next ch-5 sp; repeat from * 2 more times, (dc, ch 5, dc) in next ch-5 sp; join with slip st in 4th ch of beginning ch.
- Round 3: Slip st in first ch-5 sp, ch 3 (counts as dc), (2 dc, ch 3, 3 dc) in same ch-5 sp, *ch 1, 5 dc in next ch-5 sp, ch 1, (3 dc, ch 3, 3 dc) in next ch-5 sp; repeat from * 2 more times, ch 1, 5 dc in next ch-5 sp, ch 1; join with slip st in top of beginning ch.
- Round 4 (joining round): Ch 1, sc in same st as join, ch 3 or square-join, sk next 2 dc, (sc, ch 3 or square-join, sc) in next ch-3 sp (corner made), ch 3 or square-join, sk next 2 dc, sc in next dc, ch 3 or square-join, [sc in next dc, ch 3 or square-join, sk next dc] twice, sc in next dc, ch 3 or square-join, *sc in next dc, ch 3 or square-join, (sc, ch 3 or square join, sc) in next ch-3 sp (corner made), ch 3 or square-join, sk next 2 dc, sc in next dc, ch 3 or square-join, [sc in next dc, ch 3 or square-join, sk next dc] twice, sc in next dc, ch 3 or square-join; repeat from * around; join with slip st in first sc. Fasten off.
Square 4 (Make 15)
- Chain 4; join with slip st in first ch to form a ring.
- Round 1: Ch 1, [sc in ring, ch 5] 4 times; join with slip st in first sc.
- Round 2: Slip st in first ch-5 sp, ch 1, (sc, hdc, dc, 3 tr, dc, hdc, sc) in each ch-5 sp around; join with slip st in first sc.
- Round 3: Slip st in next hdc, (slip st, ch 1, sc) in next dc, *ch 3, sk next tr, (sc, ch 3, sc) in next tr, ch 3, sc in next dc, ch 3, sc in next dc; repeat from * 2 more times, ch 3, sk next tr, (sc, ch 3, sc) in next tr, ch 3, sc in next dc, ch 3; join with slip st in first sc.
- Round 4: Slip st in first ch-3 sp, ch 5 (counts as dc, ch 2), *(dc, ch 3, dc) in next ch-3 sp, ch 2, dc in next ch-3 sp, ch 2, (dc, ch 2, dc) in next ch-3 sp, ch 2, dc in next ch-3 sp, ch 2; repeat from * 2 more times, (dc, ch 3, dc) in next ch-3 sp, ch 2, dc in next ch-3 sp, ch 2, (dc, ch 2, dc) in next ch-3 sp, ch 2; join with slip st in 3rd ch of beginning ch.
- Round 5 (joining round): (Slip st, ch 1, sc) in first ch-2 sp, ch 3 or square-join, (sc, ch 3 or square-join, sc) in next ch-3 sp (corner made), *[ch 3 or square-join, sc in next ch-2 sp] 5 times, ch 3 or square-join, (sc, ch 3 or square-join, sc) in next ch-3 sp (corner made); repeat from * 2 more times, [ch 3 or square-join, sc in next ch-2 sp] 4 times, ch 3 or square-join; join with slip st in first sc. Fasten off.
Square 5 (Make 15)
- Chain 6; join with slip st in first ch to form a ring.
- Round 1: Ch 1, [sc in ring, ch 5] 12 times; join with slip st in first sc.
- Round 2: Slip st in first ch-5 sp, ch 6 (counts as dc, ch 3 here and throughout), dc in same ch-5 sp, (dc, ch 3, dc) in each ch-5 sp around; join with slip st in 3rd ch of beginning ch.
- Round 3: (Slip st, ch 6, dc) in first ch-3 sp, *[ch 3, (sc, ch 3, sc) in next ch-3 sp] twice, ch 3, (dc, ch 3, dc) in next ch-3 sp; repeat from * 2 more times, [ch 3, (sc, ch 3, sc) in next ch-3 sp] twice, ch 3; join with slip st in 3rd ch of beginning ch.
- Round 4 (joining round): (Slip st, ch 1, sc, ch 3 or square-join, sc) in first ch-3 sp (corner made), [ch 3 or square-join, sc in next ch-3 sp] 5 times, ch 3 or square-join, *(sc, ch 3 of square-join, ch 3) in next ch-3 sp (corner made), [ch 3 or square-join, sc in next ch-3 sp] 5 times, ch 3 or square-join; repeat from * around; join with slip st in first sc. Fasten off.
Square 6 (Make 10)
- Chain 5; join with slip st in first ch to form a ring.
- Round 1: Ch 3 (counts as first dc here and throughout), work 15 dc in ring; join with slip st in top of beginning ch.
- Round 2: Ch 3, dc in same st as join, *dc in next dc, 2 dc in next dc; repeat from * 6 more times, dc in next dc; join with slip st in top of beginning ch.
- Round 3: Ch 5 (counts as tr, ch 1), (tr, ch 1, tr, ch 1, tr) in same st as join, ch 1, *[sk next dc, dc in next dc, ch 1] twice, sk next dc, (tr, ch 1, tr, ch 1, tr, ch 1, tr) in next dc, ch 1; repeat from * 2 more times, [sk next dc, dc in next dc, ch 1] twice; join with slip st in 4th ch of beginning ch.
- Round 4: Slip st in first ch-1 sp, next tr, and next ch-1 sp, ch 6 (counts as dc, ch 3), dc in same ch-1 sp, *ch 1, sk next tr, dc in next tr, [ch 1, dc in next dc] twice, ch 1, dc in next tr, ch 1, sk next ch-1 sp and next tr, (dc, ch 3, dc) in next ch-1 sp; repeat from * 2 more times, ch 1, sk next tr, dc in next tr, [ch 1, dc in next dc] twice, ch 1, dc in next tr, ch 1; join with slip st in 3rd ch of beginning ch.
- Round 5 (joining round): (Slip st, ch 1, sc, ch 3 or square-join, sc) in first ch-3 sp (corner made), [ch 3 or square-join, sc in next ch-1 sp] 5 times, ch 3 or square-join, *(sc, ch 3 or square-join, sc) in next ch-3 sp (corner made), [ch 3 or square-join, sc in next ch-1 sp] 5 times, ch 3 or square-join; repeat from * around join with slip st in first sc. Fasten off.
- Continue making and joining Squares 1–6, arranged as shown in the assembly diagram.
Border
- With RS facing, join yarn with slip st in any corner ch-3 sp of throw.
- Round 1: Ch 5 (counts as dc, ch 2), (dc, ch 2, dc, ch 2, dc) in same ch-3 sp, *[(dc, ch 2, dc) in next 6 ch-3 sps, dc in next ch-3 sp (before square-join), ch 2, dc in next ch-3 sp (after square-join)] across to next corner ch-3 sp, **(dc, ch 2, dc, ch 2, dc, ch 2, dc) in corner ch-3 sp; repeat from * around ending last repeat at **; join with slip st in 3rd ch of beginning ch.
- Round 2: (Slip st, ch 1, sc) in first ch-2 sp, *(dc, ch 3, dc) in next ch-2 sp, sc in next ch-2 sp; repeat from * to last ch-2 sp, (dc, ch 3, dc) in last ch-2 sp; join with slip st in first sc.
- Round 3: Slip st in each st to first ch-3 sp, (slip st, beg-Cl, ch 5, Cl, ch 5, Cl) in first ch-3 sp, (Cl, ch 5, Cl) in each ch-3 sp around, working (Cl, ch 5, Cl, ch 5, Cl) in each corner ch-3 sp; join with slip st in beg-Cl.
- Round 4: Slip st in first 2 ch of first ch-5 sp, (slip st, ch 1, sc) in 3rd ch of first ch-5 sp, *ch 7, sc in 3rd ch of next ch-5 sp; repeat from * around, ch 7; join with slip st in first sc. Fasten off.
- Using yarn needle, weave in ends.
Read NextCaron Cakes Cluster V-Stitch Blanket
Your Recently Viewed Projects
Thanks for your comment. Don't forget to share!
zahrashrfi 3390123
Aug 30, 2018
I'm sorry but you mention that we should start the border on the Right Side...so does it continue that way? Why? BTW thank yiu fir this beautiful pattern)))
Editor Dana
Aug 31, 2018
Hi there! It does look like the entire border is worked right side facing! Some folks mentioned in the comments below they had trouble with the border---some of their issues and troubleshooting might also help! Good luck!
elocin1104 2800379
Aug 27, 2018
This throw looks so beautiful and intricate. It would be amazing if you use a different color for each square. I think this would take me awhile to get done, but it would be amazing in my home. This would also be a great housewarming gift for anyone. Thank you for the great pattern!
princess6860504
Jun 01, 2017
This throw will be so perfect on my king size bed, draped on my king size bedspread which has pale blue, taupe, and a pale aqua color. I can envision cuddling up with this on those days where Mama wants to lay down to recharge her battery. Six different motifs combine to create a work of art! And just 8 balls of yarn to buy!
Lynn K
Apr 24, 2017
Beautiful! I love that there are different patterns for the squares and that it has such a light and dainty look. The photo looks so lovely that I am sure that it is going to look wonderfuly elegant and feel so good to wear that I am going to make this Throw to wear as a Shawl or a Wrap, lol!
Sterling Trinity
Apr 20, 2017
I think throw is 8 squares across by 10 down. Start in top right hand side with square 1 and attach 2 then 3 to the left, then 1,2,3,1,2. So first row, from the right is 21321321, second row, from right is 54654654, repeat rows ending with second row. This is what I can gather from the photos.
Editor Dana
Apr 24, 2017
Hi there! In the materials list, the word "pattern" links to an image of the assembly chart! I'll also put the image URL in this comment. Just copy and paste it into a new tab in the browser: https://www.favecrafts.com/master_images/Crochet/Andante-Crochet-Throw-Pattern.jpg I hope that helps! -Dana from FaveCrafts
Sterling Trinity
Apr 20, 2017
Can you please upload the assembly chart and add it to your pattern notes?
Nthatcher 2798984
Apr 19, 2017
Where is the chart that shows how to arrange the squares? Could you please add it to here? Thanks. The blanket is beautiful!
Winnie
Feb 18, 2017
How many ounces of yarn are required for the Andante Crochet Throw? Thanks
Editor Dana
Feb 20, 2017
Hi there! I checked the Ravelry website and it looks like the project takes 2008 yards (1836 m), which is about 24oz of DK yarn if my math is correct! I hope that helps! -Dana from FaveCrafts
wrodgers1954 17873 89
Oct 02, 2013
I am making a wrap that is very similar to this afghan. It is a little difficult at first but the more I worked it the better it got. Make sure your counting is correct so it will stay square on each of the individual squares. It would be easier to piece together individually rather than piecing as you go.
renelouw90
Dec 25, 2012
I would love to crochet this pattern, can you tell me how much yarn I need to buy? and do you know if there is any online website where i can buy this yarn to have it delivered in South AFrica? thanks
quarterhoarder 252 0471
Apr 25, 2013
This pattern shows 24 oz of yarn used. Caron Spa yarn comes in 3 oz skeins so, you'll need 8 skeins of Caron Spa. If using another yarn, you would need 2,008 yards or 1,840 meters. You may want to buy a little more just in case.
wrodgers1954 17873 89
Oct 02, 2013
You should be able to order this yarn through the caron site. Go to caron.com and look through the yarns.
Fab411
Sep 20, 2012
You're not reading the entire pattern and that is causing you problems. I think you are missing the definition of "square-join" under the heading "Stitches Used." Also, if you click on the underlined word Pattern, you will get a diagram of how to arrange the squares.
nitcrock 1388149
Apr 27, 2012
It's beautiful! I love the feel of the Caron Spa. I have been croxheting for 40 years and have no problem reading directions. Then came this pattern. Like many others, I find the instructions for joining impossible to understand. I would really like to do a join as you go so that there is no ridge between the blocks, but at this point in ttime, I'm stymied. One of the comments apparently from the designer indicattes that this pattern was "tech tweaked." Maybe TPTB need to recheck the original against the "tweaked " pattern to see if tthe was an error in transcription.
pepsibanks 2821975
Apr 15, 2012
I love the pattern. It would be helpful to have a video showing how the joining works. I can follow instructions pretty well, but this joining thing is throwing me for a loop :-)
mischief
Mar 14, 2012
NIGHTMARE INSTRUCTIONS Tried doing this one Caron their designers as well as their writers should try communicating As in the below comment I am an experienced crocheter I've won ribbons in fairs with my work as well as teaching a a former shop owner Square is definetly a nightmare Round the way it is written doesn't even connect I gave this some time worked it up again - as written no connection I even worked it out in crochet shorthand No go Now if Caron wants to pay me to write it up as it should be I might consider it If you like the EFFECT of this afghan make or grannies you like in the colors of yarn you like crochet them together The squares here are Find your own squares you'll be a lot happier and save yourself a lot of grief frustration with the way these directions are…Read More written So much crochet so little time who needs the agravation Go on to the next project Happy Hooking
Melissa Ryan
Dec 13, 2012
@mischief: Thank you for your comment. I'm sure Caron would appreciate that their pattern is causing problems. You can reach them at www.caronyarns.com and request that the pattern be evaluated. Thanks again and good luck!
mischief
Mar 06, 2012
Very pretty pattern As an experienced crocheter I suggest the beginners crochet all the squares first then assemble It will be more enjoyable less frustrating The comment on the schematic is a good one Caron should have put the yarn requirements in at the beginning of the pattern It's also better to use the same weight of yarn through any project especially for the beginner As you become more experienced it will be easier to use different weights Different weights of yarn affect the size of the motif I myself prefer doing one piece projects afghans filet crochet etc Do not like the repetitiveness of making the same motif However this one is tempting me Will copy pattern put on my possibilities list Wait Will make it up for my friend who has terminal cancer She loves green the one I wanted to do isn't working up as I had hoped…Read More Happy Hooking I'm starting this today Suggestion on the yarn amount Find another afghan pattern you like that is similar only more dense purchase the amount of yarn with similar weight for that one use if for this one Plus I always buy about more yarn especially if in dye lots
sheila7519 9530897
Dec 19, 2011
I have printed this pretty pattern Adante Throw, but am not told how much yarn to buy.
editorKS
Dec 20, 2011
Hi, sheila7519 9530897. If you have specific questions about the pattern or materials, your best bet is to contact the pattern designer directly (specified in the byline). Good luck! --Editors of FaveCrafts
JennyBee1
Oct 28, 2011
@bumblecruise 4520485, We suggest you try contacting the pattern designer directly for help. The designer is specified in the byline. You can also try posting your question to our site's Facebook page; hopefully a fellow crafter can assist! Here is the link: http://www.facebook.com/FaveCrafts --Editors of FaveCrafts
bumblecruise 45204 85
Oct 27, 2011
trying this pattern but little confused on joining round. do i fasten off after the round before the joining round in order to complete the 15 squares? or is the joining done as you go?
claire210 4301212
Aug 13, 2011
How many skeins of caron joy yarn would be needed to complete this pattern?
wintermyst
Dec 19, 2011
hello claire, this is how i'd figure the difference as they are different weights of yarn. joy is #4 or worsted weight 138y/2.5oz ball spa is #3 or sports weight 251yd/3oz ball Pattern calls for 24oz of spa so that would be 24oz/3oz= 8 balls. 8balls * 251yrds = 2008 yards of yarn. 2008 yards / 138yds of joy =14.55 balls of Joy I would buy an extra ball or two to be safe.
CreativityGoddess
Aug 11, 2011
Hi MMCM - This is how we received the pattern from the designer. If you have further questions about the pattern, we suggest contacting the designer directly. You can find her contact information on her website here: http://www.kimanedesigns.net/ Hope this helps! -The editors of FaveCrafts
Kim Guzman
Apr 01, 2012
Well, not exactly. This is the pattern after it's been tech edited. It's not my original version.
MMCM
Aug 11, 2011
SCHEMATICS MISSING - Beautiful afhgan, but schematics are very important. It's the translation of a written instruction, which almost al "crocheters" can read.... Please, please, provide schematics.... I would just love to crochet it. warm regards
woodallcathi 50072 73
Oct 21, 2010
i havent crochet this throw yet but i love the different designs .i am a beginner but i am going to try this ,
troystweets
Aug 29, 2010
to Crafter: I believe if you follow the pattern (click on the link to see the assembly diagram), you'll start by making square #4 then #5 and join it as you go along... Someone correct me if I'm mistaken. This is my first afghan and I'm trying to figure this out at the same time.
dottymcd 0354461
Oct 03, 2015
In reading through the pattern (I have not started it yet)... I believe you start in the bottom left hand corner and working blocks 1 through 6 and then 1 2. Next you move up to the next row starting with block 4.
Crafter 4677177
Aug 15, 2010
If I am making 15 squares how do I square join in the directions for square 1?
Report Inappropriate Comment
Are you sure you would like to report this comment? It will be flagged for our moderators to take action.
Thank you for taking the time to improve the content on our site.