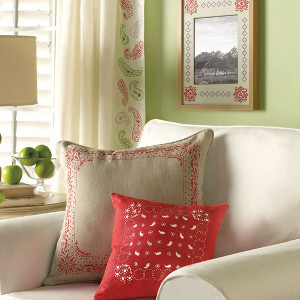
DIY Paisley Room Decor
One simple DIY room decor idea is to stencil in some paisley! This DIY Paisley Room Decor adds a country feel to your home. These intricate little paisley designs are surprisingly simple to pull off, and they look great on any surface. Stencil in some paisley on throw pillows, curtains, and plain walls. You won't want to stop paisley-fying your room once you discover how easy these room decor ideas really are, and how few supplies they require. Did somebody say paisley party?

Materials:
- Martha Stewart Crafts ® 2oz Multi-Surface Satin Acrylic Craft Paint - Spring Pasture
- Martha Stewart Crafts ® 2oz Multi-Surface Satin Acrylic Craft Paint - Hydrangea Purple
- Martha Stewart Crafts ® 2oz Multi-Surface Satin Acrylic Craft Paint - Easter Egg
- Martha Stewart Crafts ® 2oz Multi-Surface Satin Acrylic Craft Paint - Summer Linen
- Martha Stewart Crafts ® 6oz Tintable Fabric Medium
- Martha Stewart Crafts ® Spray Paint Kit-Satin Finish
- Martha Stewart Crafts ® Foam Pouncers Set - 6pc
- Martha Stewart Crafts ® Stencil Tape
- Martha Stewart Crafts ® Stencil Brush Set - 3pc
- Martha Stewart Crafts ® Bandana Paisley Laser-Cut Stencils
- Room accessories of your choice
- Brush basin or container for water
- Paper towels
- Foam plate
- Scissors
Instructions:
Preparation
- If preparing wood: basecoat, allow to dry, sand smooth and reapply base color. If preparing fabric, prewash and dry being careful not to use fabric softeners or dryer sheets.
- Wash glass in warm soapy water to thoroughly clean; rinse well and allow to dry.
- Moisten paper towel with rubbing alcohol and wipe over cleaned glass to remove any remaining dirt, grease or soap film. Allow to dry.
- Position stencil on glass surface or fabric surface where desired; tape or hold in place to stencil.
- Foam Pouncer Tool Technique – Squeeze a small amount of paint onto foam plate. Load the flat bottom edge of the foam pouncer with paint by dabbing into the puddle of paint. Dab a few times more on a clean spot on the foam plate to ensure you have the entire foam pouncer loaded properly. Holding the foam pouncer as you would a pencil, begin dabbing straight up and down over the opening of the stencil. Continue painting until the entire design area has been painted. Set foam pouncer aside in container of water for cleaning. While paint is still wet, neatly and carefully lift stencil by peeling away from the surface. NOTE: Be careful not to drag stencil while removing it as your painted design may be blurred.
- Continue adding stencil design over surface until desired effect is achieved.
- Set completed project aside for 1 hour to thoroughly dry.
Curing
- All glass surfaces painted with Martha Stewart Crafts Multi-Surface Acrylic Craft Paint should be cured to increase the paint’s durability on glass or ceramic surfaces. Follow either the Bake to Cure Technique or the Air Cure Technique.
- Bake to Cure Technique – Set dry stenciled glassware into cool oven. Set oven to 350°F and bake for 30 minutes. Glass must heat gradually with the oven to avoid breakage. Do NOT place glass in a hot oven. After 30 minutes, turn the oven off. Allow glass to cool completely in oven. Wait 72 hours before using. NOTE: Glitter Paints should not be baked to cure; only use air cure technique when painting with glitter paints.
- Air Cure Technique – Air dry completed project for 21 days before using. NOTE: Glitter Paints should not be baked to cure; only use air cure technique when painting with glitter paints.
- Heat Setting to Cure Technique – Allow your decorated fabric to air dry 24 hours then heat set using either one of two recommended methods.
- Dryer Method – Turn garment inside out; place item in dryer for 30 minutes on highest setting allowed for the type of fabric used.
- Iron Method – Place decorated item right side up on ironing board; cover with dry pressing cloth. Set iron to highest setting allowed for fabric used. Place dry iron (no steam) on area pressing for 30 seconds, lift iron moving to another area until all sections are heat set.
- When creating stenciled fabrics for pillows or curtains, no worries if the desired shade of fabric is not available. Simply start with a white or off while fabric and paint it a color using the Martha Stewart Spray Paint System. Substitute the spray medium with Martha Stewart Crafts Fabric Medium when mixing the paint to be used in the sprayer. If the fabric nap is raised when dry, lightly sand to remove any fabric fuzzies.
- NOTE: mix two parts paint with one part Martha Stewart Crafts Fabric Medium before silkscreening. Using fabric medium will help keep the decorated fabric soft when dry.