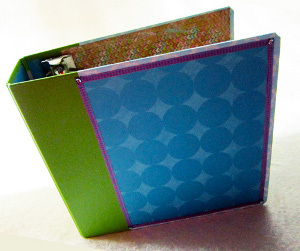
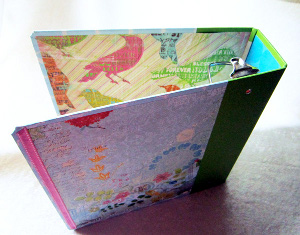
Scrappy Collage Notebook
Translate your collage craft ideas into something you can use day after day. Cover a binder in your own unique design and watch your Scrappy Collage Notebook come to life. Use pieces of your favorite papers and products from PLUS America to form an unexpected design.

Materials:
- 8.4 mm PLUS America Double Sided Adhesive Glue Tape
- 4mm PLUS America Adhesive Glue Tape
- Naked Project Binder
- Westcott Premium Trim Air Titanium Paper Trimmer, 12”
- 6 sheets of 12” scrapbook paper (each sheet should be a different pattern)
- Bone folder
- Ruler
- Scissors
- 1 yd and 1/4” ribbon
- .25 yd and 3/8” ribbon
- 4 sequins
Instructions:
- Measure and cut six 2” wide strips of paper using your paper trimmer.
- Run a line of 8.4mm tape along the bottom edge of the front cover. Position strip of paper and press firmly in place. Use your bone folder to fold the paper over the edge of the binder. Add a line of 8.4mm tape along the inside bottom edge of the front cover and press firmly into place. Use your bone folder to tuck in the edges. Secure edges with a dot of the 4mm tape. Repeat this procedure fro the top of the front cover.
- Run a line of 8.4mm tape along the side edge of the front cover that has not already been covered with paper. Press the 3rd strip firmly into place. Trim excess with scissors. Use your bone fold to fold the paper over the edge of the binder. Add a line of 8.4mm tape along the inside of side section of the front cover. Press paper firmly into place.
- Repeat Steps 2 and 3 for the back cover.
- Measure and cut two 8.5” X 11” pieces of paper. Run 8.4mm tape along the edges of the first sheet and across its center. Center the paper over the front cover. Press firmly into place. (You may measure and use a ruler for exact placement, but I simply “eye balled” it.) Run 8.4mm tape along the edges of the second sheet and across its center. Center the paper over the back cover.
- Measure and cut 11” X 12” piece of paper. Run 8.4mm tape along the edges of the paper and across its center. Center the paper over the inside of the front cover. Press firmly into place.
- Measure and cut a 3” X 11” piece of paper and a 1” x 11” strip of the same paper. Run 8.4mm tape along the edges of the first piece and center it inside the spine of the notebook. Press firmly into place. Run 8.4mm tape along the edges of the smaller strip of paper and center it inside the spine under the edge of the D-ring.
- Measure and cut a 10” X 11” piece of paper. Run 8.4mm tape along the edges and center of the paper. Center it inside the back cover and press firmly into place.
- Measure and cut two 11” pieces and two 9” pieces of 1/4 “ ribbon. Run the 4mm tape along the edges of the large paper centered on the front cover. Firmly press the 11” pieces into place vertically and the 9” pieces into place horizontally. Add a dot of 4mm tape at the four corners and firmly push the sequins into place.
- Measure and cut one 11.25” piece of 3/8” ribbon. Run the 4mm tape along the outer edge of the back cover and press firmly into place.
- Use your notebook for organizing favorite craft projects you’ve printed off the Internet or for recipes you treasure.

Read NextReverse Collage Tea Tray