Layered T shirt Rehab
Learn how to turn an old t-shirt new again with this awesome tutorial for layered t-shirt rehab. Using a technique similar to reverse applique, Jennifer Juniper teaches us how to update our closet with a layered look.

Materials:
- 2 T-shirts
- Paper
- Chalk
- Scissors
- Needle
- Thread
- Sewing Machine (optional)
Crafter's Note: I have a problem… All my shirts grow holes near the bottom, in the tummy area. I’ve come up with many ideas as to why this happens (leaning against the counter to wash dishes might be the culprit). What in the world do you do with these shirts with all the tiny holes? Cut out the offending parts and layer it!
Steps:
- Begin with two t-shirts, I chose the outer shirt one size larger.

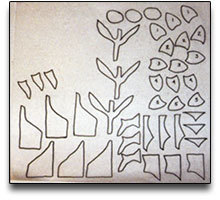
- Free-hand a leafy sort of design (or hearts, or stars, or smiley faces...) on a sheet of computer paper. Cut out the design like this:

- Lay your stencil onto the outer t-shirt and rub the chalk over the open spaces - Yes, I stole this sidewalk chalk from my poor children.


- Cut out the design with your scissors (*tip: it's easier to do this by cutting a snip out of the center of the leaf first, then work your way out to the edges.)

- My friend from www.JoyBeadworks.blogspot.com , thought of this, and is so amazingly brilliant! Using a q-tip, dab bleach along the edges of the cut out leaves. (Line the shirt with a newspaper to protect the back first)

- You end up with these aged-looking edges that make my heart sing! (La, la, la!) Now, quit singing and rinse her off and dry her a bit before moving on to the next step.

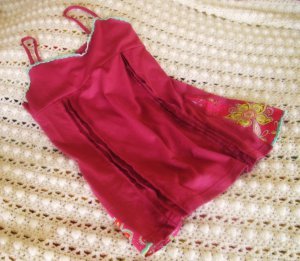
- Layer the two shirts together and sew the leaves around the edges. You can sew this by hand with embroidery thread, or use the machine instead. Some contrasting hot pink thread with the gray and orange was just the ticket!

- Now, stand around a take pictures of yourself in your cute new Layered T! Imagine the color combos! The designs! The possibilities!


Read more about Jennifer, author of this craft tutorial, a Featured Craft Designer at FaveCrafts!
Read NextAsymmetrical Autumn Poncho
Your Recently Viewed Projects

Thanks for your comment. Don't forget to share!
michelledelis
Jun 20, 2012
when you layer the shirts and sew the leaves are you sewing the two shirts together?
amythyst
Oct 26, 2011
This is a great idea, even for t-shirts that are new. I envision using fabric scraps or cut up, contrasting colored t-shirts to layer under the cutouts and not having to wear two shirts ( I live in a warm climate).
newtosew
Jan 12, 2011
I signed up just to save this project i can't wait to try this on all of my bleached tshirts. Your insturctions are great and funny too thanks
resew
Oct 28, 2010
I can't wait to try this! looks really cool, it almost reminds me of Gap's style clothes, hip and cool! thank you.
Hope Studios
Apr 29, 2010
I sewed it at the leaves only and haven't had any issues though it has been washed.
PHYL PEEK
Feb 28, 2010
wow i have been wanting help with bleached spots in places you wouldn't put a patch over to hide it like in the middle of your bossom front and center. this will do the trick nicely especially on my expensive and favorite oprah t shirt i got for xmas. ppeek
PR Momma
Feb 28, 2010
Great Inspiration. Good for extending the life of Kids clothes. I can cut apart the shirt going under to add long sleeves and design to my son's shirts. The layered look is all the rage with elementary school kids.
Crafter 4086533
Feb 16, 2010
Great idea and I have a bunch of shirts that I can use I would like to add my cents worth on the bleach technique slightly diluted bleach will also work and is a little better for the fabric Also I recently read that you should add non chlorine oxygen bleach to the rinse water to neutralize the chlorine I have also used vinegar in the water with pretty good results I did a shirt many years ago and it still looks good and has no yellow spots from residual chlorine and the fabric fibers have not rotted or weakened on the bleach areas If you like to 'finger paint' use softscrub cleanser or regular powdered cleanser on a wet area and wear rubber or plastic gloves to smear it all around till you start to see whitened areasthen rinse and enjoy your 'distressed' effect Don't you just love doing 'designer'…Read More effects at home for next to no
another northern c rafter
Jan 26, 2010
I like this idea and I'm going to try it out. I'm always getting holes in shirts or stains, so now I can use that to make a fashionable article. thank you
CynsSensations
Jan 25, 2010
Great Idea! I've been wanting a new way to salvage stained t-shirts besides trying to stencil over the stain... Thanks.
wenwen4
Jan 25, 2010
To make the sewing easier on the machine, I will sew the design before cutting away the top layer tee. I don't use the bleach then, but have embellished with fabric paint.
Katz1952
Jan 24, 2010
In step 7 are you sewing the 2 shirts together at the leaves only? If so do you need to tac it anywhere else
Crafter 15603
Jan 24, 2010
love all things recycled. what a great new makeover for an old T! Kat at httpwww.katrinehome.com
Report Inappropriate Comment
Are you sure you would like to report this comment? It will be flagged for our moderators to take action.
Thank you for taking the time to improve the content on our site.