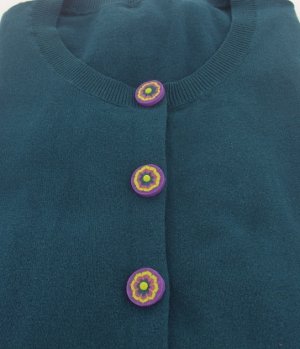
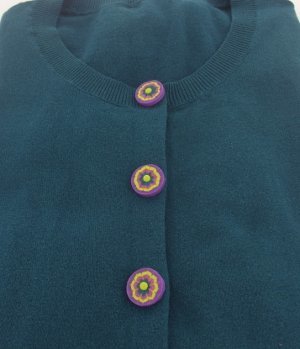
DIY Clay Buttons
Jazz up an old sweater with these cute DIY Clay Buttons from Polyform. These polymer clay crafts look like tiny flower blossoms, but the sky's the limit when it comes to what colors you want to use. A new set of buttons is a simple, inexpensive way to freshen up your wardrobe. This tutorial also has some must-read tips on garment care and pearl embellishments. Great for adding a splash of color to a solid cardigan, these DIY buttons are perfect for hats, purses, sweaters, and much more.
Materials:
- 1 block Premo! Accents: Magenta Pearl - 2 oz
- 1 block Premo! Accents: Peacock Pearl - 2 oz
- 1 block Premo! Accents: Purple Pearl - 2 oz
- 1 block Premo! Sculpey®: Wasabi - 2 oz
- Clay Conditioning Machine
- Sculpey® Etch ‘N Pearl
- Sculpey® Super Slicer
- Cardigan Sweater
- Sew On Snaps- Size 2
- E-6000 Industrial Strength Adhesive
- Artway Circle Frames Shape Set
- Cornstarch or talcum powder and applicator
- Craft Knife
Video:
Instructions:
-
Condition 1/2 package Peacock Blue Pearl and 1 full package of all remaining colors.
-
With large Etch 'N Pearl tool, make one Wasabi pearl for each button. Following the baking instructions on the package and bake for 10 minutes. Allow to cool completely and remove from baking surface. If there is extra clay around the pearl edges, use a craft knife to remove. Set aside.
-
Shape 1/2 bar Peacock Blue clay into 2" long log. With Clay Conditioning Machine, roll out a sheet of Magenta Pearl on a #1 (thickest) setting. Cover log with two even layers of Magenta Pearl. Repeat double layers with Wasabi and Purple Pearl to make bulls-eye cane. Reduce cane to 3/4" diameter by rolling on work surface, starting from the center of log and working your way to the ends. Using Super Slicer, slice 3/8" thick slices, one for each button.
-
Using 22 mm button frame with open circle, press in cane slice. Using pointed end of small Etch 'N Pearl tool, drag lines on button front, alternating from the center to edge and edge to center to make spiderweb pattern. Use pushing tool to push button out of frame. Press prebaked Wasabi pearl in center. Repeat to make as many buttons as needed. Bake according to manufacturer's instructions. Allow to cool completely before handling.
- With cardigan buttoned up, pull over your head and unbutton just as many buttons as need for opening — probably one or two. Cut these buttons off. Keeping sweater buttoned, glue clay buttons on original buttons. For buttons at neckline, glue one half of snap to clay button back and glue the other half to the sweater where original button was placed.
Tips:
- Make baked pearls with the Etch 'N Pearl tools on a ceramic tile or clay-dedicated baking surface. Lay clay sheet on baking surface. Dip concave end of tool in water. Press concave end through clay sheet onto baking surface. Lift up clay sheet and pearl will stick to baking surface. Repeat for as many pearls as you need. After baking, remove extra clay from edge with craft knife.
- Even if your sweater was originally machine washable, clay buttons will last longer and look nicer if you hand-wash and lay flat to dry.
Read NextShell Paint Palette
Your Recently Viewed Projects

Thanks for your comment. Don't forget to share!
georgiewtts
Apr 28, 2013
Gorgeous ....is this clay the same as fimo, I have quiet a bit of fimo, so would like to use it up to save $$$. Thanks Jennifer x
Report Inappropriate Comment
Are you sure you would like to report this comment? It will be flagged for our moderators to take action.
Thank you for taking the time to improve the content on our site.