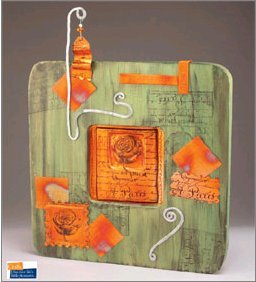
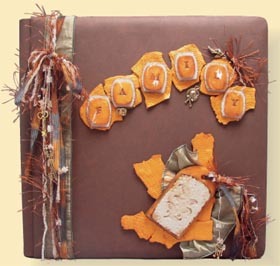
"Altered Art" Scrapbook Cover
Using leather and clay, conjure up some altered art and make your own scrapbook cover from AMACO. You will have a totally unique scrapbook unlike anything sold in stores!
Materials:
- 13" x 13" Faux Leather Scrapbook Cover (Brown shown here)
- FIMO® Soft Polymer Clay — One 2 oz. pkg. each of White (0) and Translucent (014); Two 2 oz. pkgs. of Gold (11)
- AMACO® Flexible PolyBlade Cutting Blade
- AMACO® Pasta Machine (or PolyRoller)
- AMACO® Texture Plates
- Monogram Alphabet Rubber Stamp Set (#3902) and Foliage Engraving Leaf (#A2554D) from Rubber Stampede® (a division of Delta Technical Coatings, Inc.)
- Antiquing Medium in Apple Butter Brown from Plaid® Folk Art™
- Glass, Metal, and More™ Premium Permanent Glue from Beacon Adhesive Co.
- Size #8 Shader Style Paintbrush
- Drinking Straw
- Index Cards
- Baking Sheet (dedicated to polymer clay use)
- Home Oven or Dedicated Toaster Oven
- 5" Square of Burlap Fabric
- Wired Edge Willow Green Satin Ribbon, 11/2" Wide x 30" Long
- Assorted Antique Gold Toned Metal Charms (shown here: hat, shoe, purse and assorted size keys)
- Decorative Yarns or Fibers in Assorted Styles and Earth-Tone Colors 36" Long
- Foam Plate
- Freezer Paper
- Masking Tape
Notes:
- For best results read all instructions before starting.
- Peheat to 265 degrees.
- Once used for polymer clay, baking sheets and other tools should not come in contact with food.
Steps:
- With plastic coated side up, cover work surface with freezer paper. Tape corners to hold in place while working. Condition 1/2 pkg. of Translucent FIMO®, kneading it until warm and pliable then repeat using 1/4 pkg. of White FIMO® then 11/4 pkg. of Gold FIMO®. Place Gold onto covered work surface and roll with PolyRoller to create a 1/4" thick sheet. Roll both Translucent and White to create a 1/16" thick sheet. Place White and Translucent sheets onto Gold and roll to join, expelling any air pockets that may be trapped between the layers. Cut excess around edges, lay at center and lightly roll to join.
- With fingers and palms, roll the layered sheet to create a “jelly roll” style rope. Roll with palms on work surface to lengthen the rope and expel any trapped air bubbles. Fold in half, bringing ends together, twist a few times, then roll with palms to create a rope again. Repeat as needed, taking an occasional test slice of the rope to check for marble-like effect desired. TIP: Don’t work the clay too much as this will blend colors together completely, eliminating the marbled effect shown here on “FAMILY” tiles. Once desired color effect is achieved, roll with palms to make a thick, quarter sized “log” of clay.
- Roll log lightly with PolyRoller against work surface, flattening side edges while creating a long rectangular shape. Cut 6-8 slices approximately 1/8" thick. Place onto index cards and use fingers to shape outer edges if needed. Roll with PolyRoller to smooth top surface, removing any cut lines that may be visible. Rubberstamp as shown with letters “F-A-M-I-L-Y”.
- To make the tag, roll remaining “marbled” clay to create a flat sheet 1/4" thick. Use cutting blade to cut a 21/8" x 33/4" rectangle. Place onto index card. Bend flexible cutting blade to cut curved top edge of tag. Twist drinking straw to cut and remove hole in top of tag.
- Place index cards carrying all marbled clay pieces onto baking sheet and bake for 30 minutes at 265°F (130°C). Let cool.
- Condition remaining 3/4 pkg. of White FIMO® and roll into a thin sheet 1/16" thick. Place texture plate on top clay and roll to embed “tin-type” plate pattern into clay. Lift clay to release from work surface. Cut a 17/8" x 3" rectangle for accent piece on top of tag. Bend flexible cutting blade and cut arched top edge (see photo). Place onto an index card then rubberstamp leaf pattern at center.
- Knead excess White FIMO® then roll into a 1/16" sheet again. Place “shell-like” plate pattern into clay and roll to embed the pattern. Remove plate and lift clay to release from work surface then replace. Place cooled “F-A-M-I-L-Y” tiles on top. Cut, leaving a small White border around each letter. Bend flexible cutting blade to cut curved side edges (see photo). Remove letter tiles and place cut White pieces onto index cards.
- Place index cards carrying all White FIMO® pieces onto baking sheet and bake for 30 minutes at 265°F (130°C). Let cool. Pour a small amount of Apple Butter Brown antiquing medium onto foam plate. Dip flat edge of paintbrush into the medium then lightly brush over letter tiles and stamped tag accent piece. Let set briefly then wipe with paper towel to remove excess. Color will remain only in stamped or embedded areas. Brush side edges of letter tiles, White border pieces and stamped tag accent piece to highlight. Let dry. Glue letter tiles onto border pieces and tag accent to top of marbled clay tag.
- Condition remaining 3/4 pkg. of Gold clay and roll with PolyRoller to create a thin flat sheet (approx. 1/16" thick). Place burlap on top and roll again to add a textured background. Reposition as needed to texture entire sheet. Tear sheet into strips then into smaller pieces, overlap smaller pieces and lightly roll on top to create background for letters and tag. TIP: If needed, replace burlap on top and roll again. Place onto index card and bake on baking sheet for 30 minutes at 265°F (130°C).
- To assemble cover, center the ribbon along side edge of scrapbook cover and wrap ends to inside. Beginning on inside of cover, center 3-4 strands of decorative yarns and fibers over ribbon, close cover then tie a bow on cover front (see photo). Cut 3-4 strands of fiber and yarn 12" long then fold in half to create a loop. Insert loop through front side of hole at top of tag. Bring ends through loop and pull to cinch tightly at top of tag.
- Refer to photo to glue clay pieces to cover. Cut remaining wired edge ribbon into 2 pieces. Fold ends under 1/2", concealing raw edge and wire ends, then glue under tag. Glue charms to cover as needed for accent. Cut 2-3 strands of fiber and yarn 6" long, tie a knot at center, tie one or more charms to strand ends and glue to cover (shown here above “L”). Tie any remaining charms to hang from other fiber or yarn strand ends. Lay flat until glue is dry.
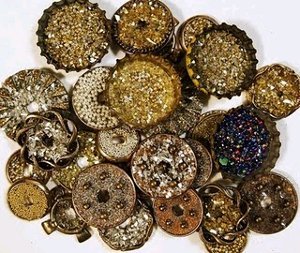
Read NextGlittery Buttons
Your Recently Viewed Projects
Thanks for your comment. Don't forget to share!
Report Inappropriate Comment
Are you sure you would like to report this comment? It will be flagged for our moderators to take action.
Thank you for taking the time to improve the content on our site.