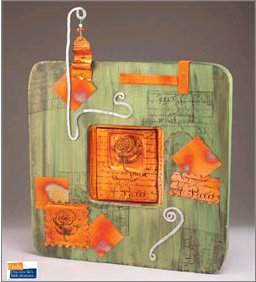
Garden Frame
Create an altered art garden frame from AMACO using metal embossing, stamp art and wire mesh.
Materials:
- AMACO® Rub ’n Buff®: Jade, Ebony
- AMACO® ArtEmboss® Pure Metal Sheets: Copper, Light
- AMACO® WireMesh®: Copper
- AMACO® WireForm® WireRod Modeling Wire, 1/16" Diameter
- AMACO® Fun Wire™: Clear/Silver (24 Gauge)
- AMACO® Metal Stamp Art Ink Pad: Black
- AMACO® Texture Plates
- AMACO® ArtEmboss® Tool Set
- ProvoCraft: Memory Frame 31/8" x 31/8"
- Therm o Web: Peel and Stick
- Double-Sided Tape Sheet
- Rubberstamps: Hero Arts, ARTPRINTS™: Paris Rose (#K2399)
- Acrylic Spray Sealer, Matte Finish
- Sand Paper, Fine Grit
- Tack Cloth
- Soft Cloth
- Fun Foam Sheet (or old magazine)
- Decorative Edge Scissors
- Hammer
- Round Nose Jewelry Pliers
- Wire Cutters
- Small Glass Beads
- Ruler
- Jumbo Craft Stick
- Scissors
- 1/16" Hole Punch
- Heat Gun
- Baking Sheet
- Double Sided Tape
- Recipe Card (or cardstock)
- E-6000 Glue
Instructions:
- Apply Jade Rub ’n Buff® to frame and dowel stand using soft cloth. Buff using clean edge of cloth. Apply Ebony to highlight then buff again. Let dry. Spray with acrylic sealer.
- Remove cardboard insert from center of frame, place onto ArtEmboss® Copper sheeting, trace using stylus then cut a Copper piece the same size. Stamp Copper and frame as shown. Set ink briefly with heat gun. Place Copper on fun foam sheet (or magazine) and emboss stamped image using stylus. For best results turn from back to front until desired results are achieved.
- Stamp a second piece of Copper. Set ink with heat gun. Cut portions of the stamped image out using decorative edge scissors. For rose “postage stamp” square, cut, leaving a slight border around image edges. Cut two 3/4" x 21/4" pieces for rectangle and hanging metal tag shown. Place on fun foam. With texture plate on top, rub plate with jumbo craft stick to imbed pattern into metal. Place all ArtEmboss® Copper pieces onto baking sheet and heat with heat gun to change original color tones.
- Add additional dimension to rose “postage stamp” by cutting two pieces of cardstock 1/4" smaller than Copper (rose) square on all sides. Apply tape sheet to cardstock pieces to adhere together, then attach to back side of Copper. Turn right side up. Smooth outer border beyond cardstock with flat edge of stylus.
- Insert ArtEmboss® Copper in center of frame, replace cardboard backing. Bend armature modeling wire to create decorative hanger. Hammer flat on a smooth, concrete surface or acrylic punch board.
- Hanging tag. Fold corners to middle on back side of one 3/4" x 21/4" stamped ArtEmboss® Copper piece to create a tag shape. Use rounded side edges of stylus to bend wave-like ripples as shown. Punch a 1/16" hole near top (folded) end. Slip beads onto 5" length of 24 gauge Clear Silver Fun Wire™, loop ends, and attach to tag and armature wire hanger. Wrap Fun Wire™ ends. Cut excess.
- Cut four 11/2" WireMesh® Copper squares and two 1" x 21/4" long strips. With ruler providing a straight edge, use stylus to draw a line 1/4" from each 21/4" side edge of strips. Fold outer edges to overlap at center. Heat treat with heat gun to change color tones on all mesh.
- Apply double sided tape sheet to WireMesh® squares and strips and attach as shown. Glue remaining Copper ArtEmboss® and armature wire to frame.
Read NextAltered Book Tips and Inspiration