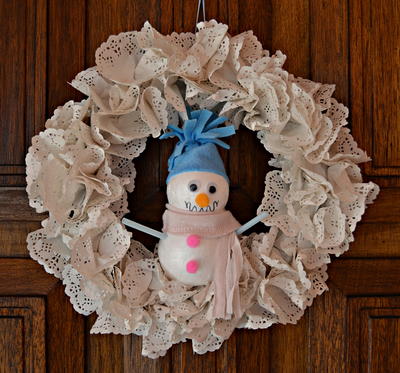
Welcome Winter Snowman DIY Wreath
Make a snowman craft idea that will welcome each and every one of your winter guests.

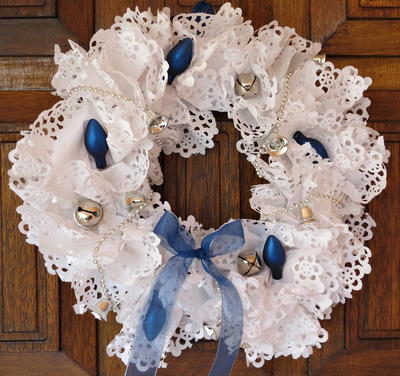
Say hello to the cold, chills, and snowy days this winter when you learn how to make a wreath for your front door. This totally charming and easy snowman craft idea shows you how to transform a Styrofoam ball and some doilies into a way-too-cute snowman wreath that will easily welcome winter guests into your home.
In the Designer's Words: "Dear old Frosty melted away in the summer months, but winter is here and he is back! This craft combines two of winter’s favorite things, i.e. a “snow”-covered wreath and a snowman. Add the wreath to your front porch and make sure that your guests know that Frosty is very happy to see the winter again! Come out, come out, he is ready to have some fun!"
Estimated Cost$11-$20
Time to CompleteIn an evening
Primary TechniqueDIY Craft

SeasonWinter
Project TypeMake a Project
Materials List
- Grapevine twig ring with a diameter of 9”
- Pack of white round paper doilies with a diameter of 4”
- 10” of 0.2” wide light blue double faced satin ribbon
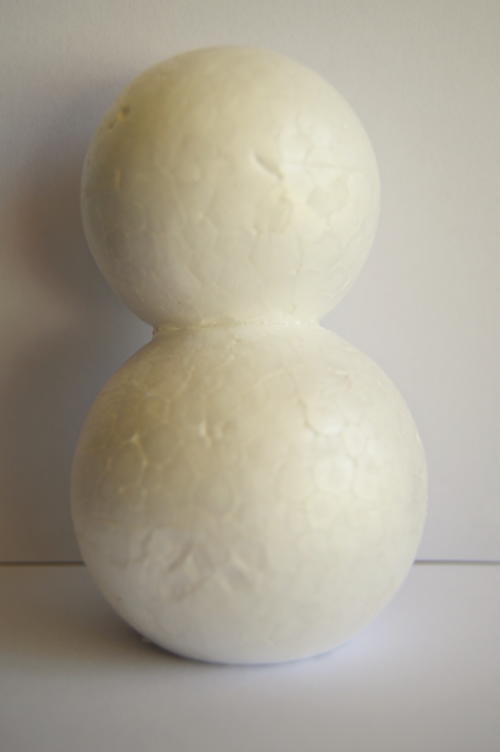
- Polystyrene ball with a diameter of 65mm for the snowman’s body
- Polystyrene ball with a diameter of 55mm for the snowman’s head
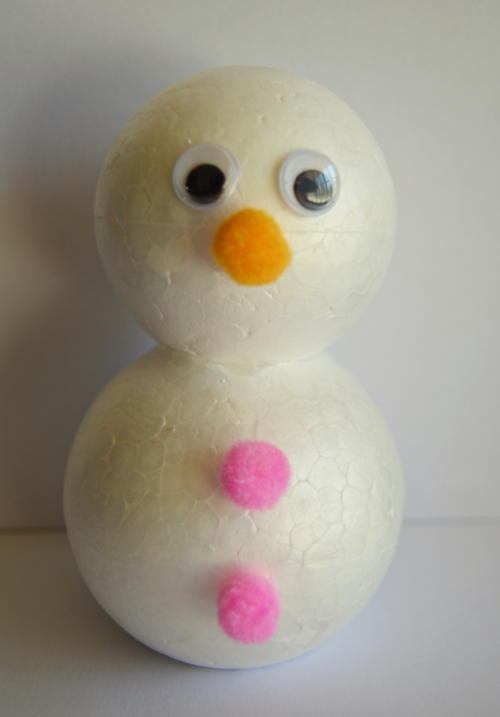
- Pair of 10mm wiggle eyes
- Any old T-shirt that can be used to make a scarf
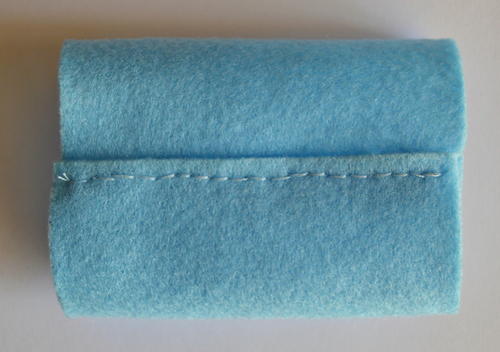
- 6.4” x 3.4” strip of light blue felt
- Two small round pink pompoms
- Small round orange pompom
- Two light blue plastic drinking straws
- Artline 210 Fineliner black pen
- Acrilex Cola air dry polystyrene glue
- Sharp knife
- Sewing needle and blue thread
- Hot glue gun and glue sticks
Instructions
-
Use the knife to cut a small piece off the bottom of the 65mm ball, so that the snowman will be able to stand. Also cut a small piece from the top of the 65mm ball, as well as from the bottom of the 55mm ball, so that the snowman’s head will be able to fit onto the body.
-
Use the polystyrene glue to secure the head to the body and allow to dry for two hours before continuing with the rest of the steps.
-
Make a loop with the ribbon and hot glue it to the top of the wreath.
-
Fold a paper doily in half, then pinch it in the center and ruffle it up towards the centre of the doily to form a flower. Add a drop of hot glue to the twig ring and glue the centre of the doily flower to the ring.
-
Add the second doily in the same way, gluing it right next to the first. Keep adding doily flowers until the twig ring has been covered.
-
Glue the snowman’s eyes and orange pompom nose in place. Also glue the two pink pompoms to his body.
-
Use the Artline pen to add a squiggly mouth ~ he is cold, isn’t he?
-
Cut each straw to a length of 1.6”. Use the knife to make a small opening on each side of the snowman’s body and glue the arms to the body.
-
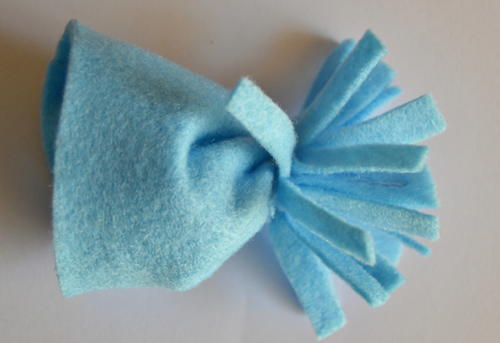
Make the snowman’s hat:
- Put the two shorter sides of the blue felt one on top of the other and then use the needle and thread to stitch the two shorter sides together.
- One third from the top, crumple the felt together, tightly wind thread around the crumpled felt and secure with a knot.
- Cut small incisions in the top of the hat.
- Glue the hat to the snowman’s head. -
From the old T-shirt, cut a 20” long strip from the seam of the shirt to make a scarf. At both ends of the strip cut from the T-shirt, make small incisions, so that it will look as if the scarf has fringes. Drape the scarf around the snowman’s neck.
-
Hot glue the snowman to the bottom of the wreath.
Read NextBlue and White Paper Doily Wreath
Your Recently Viewed Projects
Thanks for your comment. Don't forget to share!
Marilyn B
Nov 16, 2017
Cute little snowman and thanks for the easy instructions. Has anyone made this using a modification as suggested below with using the snowtex as a texturing? I could see using soap powder mixed with white glue for a similar effect. I might make the mouth a simple smile, rather than wriggly, so it doesn't resemble a ghost, but that's just me! And making the hat and scarf from your stash of fabric remnants is a great idea too....thanks for sharing that!
shilohdana
Sep 30, 2017
I like the snowman wreath, especially the use of doilies, but I might make a few changes to the snowman. I would use SnowTex to add texture to the Styrofoam balls instead of leaving them as is and would use real buttons, beads for eyes and maybe a toothpick painted orange for the nose-or make one out of clay and paint it orange. I might opt for a little top hat (I have one in my stash) and a scarf made from a piece of fabric and maybe fashion arms from twigs. It is a very cute idea and a great thing to customize for one's own tastes!
mulberrygalprinces s
Sep 28, 2016
Next to Santa, snowmen are my favorite holiday figures.i have quite a collection of them. Ornaments, lights, music boxes, figurines, plates, mugs, but not one wreath. This will be my first one. It's so cute too. It seemed a lot of materials when I glanced at the list but they are not expensive and I can substitute some. The tip off of an orange crayon makes a great nose. A few inches of red yarn, crouched makes a cute scarf and adds color.
Report Inappropriate Comment
Are you sure you would like to report this comment? It will be flagged for our moderators to take action.
Thank you for taking the time to improve the content on our site.