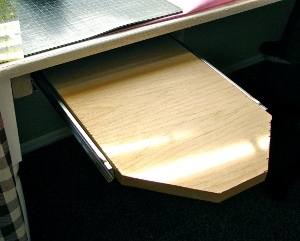
DIY Slide-Out Ironing Board
Hiding your ironing board has never been easier! Watch this video and learn how to make a slide-out ironing board that you can stow under your sewing table or desk. This is a great project for crafters lucky enough to have a sewing room...and is a thrifty and space-saving alternative to those who are living in small apartments or who don't have much room in their laundry room to do ironing. Easy to make, this DIY Slide-Out Ironing Board is a great way to save space around your home and make your life easier.

Materials:
- Wooden board, at least 1 inch thick
- Side-mounting drawer slide set (50 Lb load bearing or greater), 4 inches SHORTER than length of ironing board
- 2×4, cut into 3 pieces: two sides (the length of your drawer slides) and a back (width of ironing board +4 in.)
- Long screws
- Electric drill, drill bit, miter saw
- Staple gun, heat-resistant fabric, quilting cotton (optional, for non-removable ironing board cover)
Supply Tips:
- You’ll need a piece of real wood that’s at least one inch thick. Don’t buy MDF, because that can swell and warp when you iron with steam. The length and width of this board is up to you, and is only limited by the size of the table you’re attaching it to, and the length of drawer slides you can purchase. My sewing table is only 20 inches deep, so my board can’t be any longer than that. If you’re buying the board new from a home improvement store, save yourself some time by asking them to cut it to the length you want. You’ll have to cut the angled corners yourself.
- Also pick up a 2×4. You’ll want to cut two pieces that are the length of your drawer slides. The width should be okay, as long as it’s between 3-4 inches. Unless you have a built-in table that sits flush against the wall, you will also need to cut a piece to be the false back. This should be the width of the ironing board plus 4 inches (because it must screw into the back ends of the other two boards); it gives the drawer slides something to stop against. Again, most big home improvement stores will make these cuts for you if you ask.
- You’ll also need a set of side-mounting drawer slides. These can be purchased at any home improvement store. Lowe’s carries them in lengths up to 30 inches. Choose slides that are about 4 inches shorter than the length of your ironing board. That allows you to angle the ends of the ironing board. Also pay attention to the load rating, I’d recommend choosing slides that have at least a 50 Lb. rating.
- Finally, you’ll need screws that are long enough to go through the 2×4 and into the underside of the table– without poking through the top of the table.
Video:
Instructions:
- I’m using an electric compound miter saw to cut the angled ends on my ironing board. You could also use a handsaw and a miter box. I am making my cuts four inches down, at a 45 degree angle.
- Next you need to decide whether you want a permanent or removable ironing board cover. If you want a permanent one, use a staple gun to attach your fabrics now, wrapping them tightly around the board and stapling on the underside. If you want a removable one, I’ll be making a tutorial later to show you how. Take the time to trace your ironing board on a sheet of wrapping paper to use as a pattern.
- Now we’ll attach the drawer slides to the long segments of 2×4. You’ll be attaching the pieces with the drawer stop at top, the ones with the wiggly rectangle piece. Mark three of the holes with a pen, then pre-drill the marks with a drill bit. Replace the drawer slide and attach with the screws provided in the kit.
- You need to decide if you want a permanent or removable cover for your board. If you’d like it to be permanent, staple the fabrics directly to the underside of the board using a staple gun. If you’d like a removable one, you can find a tutorial for it by clicking here.
- Next we’ll attach the other two pieces to the sides of the ironing board. They need to sit against a straight edge, so attach below the angled cuts. Again, mark and drill, then attach the screws.
- My table is built-in, so I don’t need to add a false back, but you probably will. Simply screw the last length of 2×4 to the back of the other two pieces. Remember, the piece with the wiggly rectangle should be at the front and top, so screw the back board onto the opposite end.
- Now it’s a good idea to check your work now by testing the drawer slides. The metal bars should fit over the wheels, and your board should slide back and forth easily. Don’t worry if your front drawer stop doesn’t seem to be working, it needs to be upright for gravity to do the job.
- Now I’m going to pre-drill holes to mount my 2×4′s to the underside of my table. You can get the tips of the screws started to make mounting easier.
- If your table is free-standing, you might find it’s easiest to flip the table upside down. Otherwise, you can crawl underneath and screw upward into the table. Make sure that the edge of the ironing board doesn’t stick out when the board is pushed all the way in. Double-check to make sure your screws aren’t piercing the top of your table.
- Insert your ironing board into the slots and you’re all done. Should you ever decide to remove your ironing board, simply unscrew the 2×4′s and the table top will have no visible marks.
Up Next:
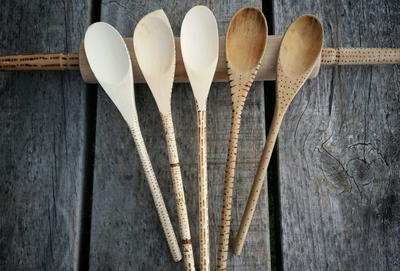
Read NextDIY Burned Wood Kitchen Utensils
Your Recently Viewed Projects
Thanks for your comment. Don't forget to share!
Marilyn B
Jan 23, 2017
I can tell you this is a really practical idea because so much of sewing is ironing as you go for the best result. I used to keep the ironing board next to my sewing table, but it is a pain to keep jumping up, and I still do, but I now use two of those portable padded boards and I wish I had the set up to make this project! It would save tons of time and is so efficient. I think you could just make a top cover and just have it overhand with weights in lieu of a removable cover.
woozle0116 1571713
May 19, 2012
I know this is something I could use. I'm trying to make room where there is none in my sewing room
Ms Tyger
Mar 25, 2012
If you don't want to cut your own ironing board, find a small table top one from a thrift shop. Take off the legs and then mount appropriately. I appreciate crafting, however I do believe in recycling and re purposing other stuff. Love the idea!
georgiewtts
Apr 12, 2013
Thanks ms tyger...I've got one hanging behind my sewing room door which I don't usually bother with..I often swipe my arm acros my table and use any spot that's clear, great idea ill put it right beside me under the table opposite my sewing machine, we have some soft closing drawer thingies from our new kitchen overhaul left over. So it's a go. Cheers to Maureen for the brains and ms Tyger for more brains te he!!! Xxx
brendajane
Jan 21, 2012
Fantastic, Thank you so much for sharing with all of us. This is really neat.
Report Inappropriate Comment
Are you sure you would like to report this comment? It will be flagged for our moderators to take action.
Thank you for taking the time to improve the content on our site.