Bold Diamond DIY Pinboard
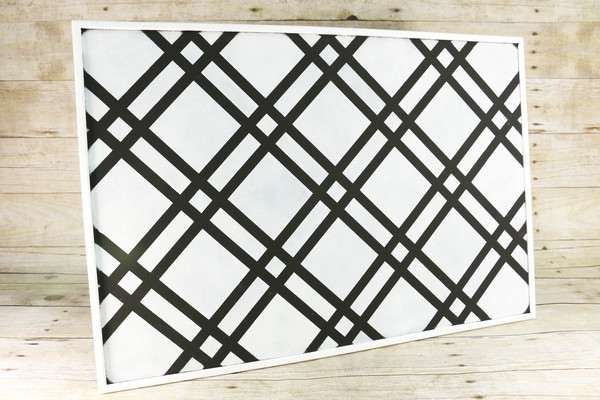
Make your own stylish board for notes and photos with the Bold Diamond DIY Pinboard. DIY home decor couldn't be easier with this project, which only requires basic painting supplies to complete it. You can change up the colors of this project based on your DIY home decor ideas and what you want it to match. Black and white is such a classic color scheme, so you may decide to stick with it. Painting crafts that double as DIY home decorating projects aren't usually this easy, but you can't deny how simple this one is to do.
Primary TechniquePainting

For more great home decor craft projects from Stencil Ease®, check out 13 DIY Home Decor Ideas.
Materials:
- Stencil Ease® Cornelius Wall Painting Stencil
- Stencil Ease® Repositionable Adhesive Spray
- Ikea® VÄGGIS Noteboard, White
- DecoArt® Americana® Acrylic Paint, White Wash
- DecoArt® Americana® Acrylic Paint, Black
- Shurtape Technologies LLC Frog Tape®
- Stencil Ease® 5/8” Stencil Brush, White Bristle
- Standard 3 inch paint brush
- Paper Towels
- Paper or Plastic Plate
- Tape off the outer border of the Ikea® VÄGGIS Noteboard using the Frog Tape®.
- Paint the cork with the Black DecoArt® Americana® Acrylic Paint using your standard paint brush.
- Let the paint dry.
- Spray the back of the Stencil Ease® Cornelius Wall Painting Stencil very lightly with the Stencil Ease® Repositionable Adhesive Spray and let the adhesive dry.
- Apply the stencil to the surface of the noteboard.
- Adhere painters tape to the corkboard under each triangle registration mark and mark them.
- Pour some of the DecoArt® Americana® White Wash Acrylic Paint onto the plate.
- Load your Stencil Ease® 5/8” White Bristle Stencil Brush with White Wash DecoArt® Americana® Acrylic Paint and then swirl the brush onto your paper towel until it seems like all of the paint is removed. This creates a dry brush and leaves the perfect amount of paint on your bristles. Using a dry brush prevents paint from seeping under the cut-outs of the stencil. This part of the process is essential if you would like clean/ crisp lines when you lift your stencil.
- Either stipple (lightly tapping over the stencil cut-outs) or swirl the paint onto the noteboard.
- You can immediately remove the stencil and line up the registration marks for your next repeat, either vertically or horizontally. The instructions on how to use the registration mark system are included with your stencil.
- Repeat this process until you have completely covered the board.
- Allow the note board to dry completely overnight.
For more information about Stencil Ease® or to purchase Stencil Ease® products, please visit www.stencilease.com.
Your Recently Viewed Projects

Thanks for your comment. Don't forget to share!
SissieSass
Jun 27, 2017
These boards are so easy to make. They keep the little pieces of scrap paper and post it notes from cluttering up the house and piling up in the corners of teenager's bedrooms. I love the idea of using frog tape because it keeps the paint from bleeding, and gives you crisp clean lines. These are great for offices too.
Report Inappropriate Comment
Are you sure you would like to report this comment? It will be flagged for our moderators to take action.
Thank you for taking the time to improve the content on our site.