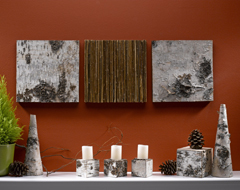
Bark and Twigs Wall Art
In seven steps you can make a whole wall ensemble. Bark and twigs wall art can be created with twigs, bark, acrylics and a few other materials.

Materials:
- STYROFOAM™ Brand Foam:
- Sheet: one 12" x 36" x 1" sheet; or three 12" x 12" x 1" squares
- Twigs, quantity varies according to thickness; straight twigs preferred
- Acrylic craft paint: black, brown
- Birch bark sheets**
- Paint brush
- Knippers or heavy-duty scissors
- Pruning clippers
- Low temperature glue gun and glue sticks
- Sawtooth picture hangers, three; or Velcro hangers
- Optional: If using 12" x 36" x 1" foam sheet, additional supplies include ruler, pencil, serrated knife, old candle, dental floss
(**Available at www.barkcanoe.com )
Instructions:
- If using 12" x 12" x 1" squares, skip to Step #2. Using ruler and pencil, score foam sheet to create three, 12" x 12" squares. Wax serrated knife with an old candle. Holding foam sheet firmly on a flat surface, extend one end and cut across the score line, using knife like a saw. Or, try dental floss: Stand the sheet on its edge and hold a 20" length of dental floss along the scored line, positioning one hand at the bottom of the board and the other at the top; draw the dental floss down through the foam sheet along the scored line.
- Paint edges of foam sheets black, and paint ¼" on top edge of foam sheets, too.
- Using knippers or heavy-duty scissors, cut pieces of birch bark to measure 12" x 12".
- Attach the birch bark to the fronts of two squares of STYROFOAM™ brand foam, using a generous amount of low temperature glue. Use weights (such as a heavy book) to hold the bark tight to the surface while the glue hardens.
- Paint the front of remaining foam square brown; let dry.
- With pruning clippers, cut twigs to 12" long. Using low-melt glue, glue twigs to foam square until the entire surface is covered. Let dry. Carefully trim uneven edges.
- Use Velcro tabs to hang on the wall. Or, glue sawtooth picture hanger to back. For additional hold, insert and glue two straight pins through holes in sawtooth picture hanger.
®™* Trademark of The Dow Chemical Company ("Dow") or an affiliated company of Dow
Read NextDip Dyed Macrame Wall Hanging