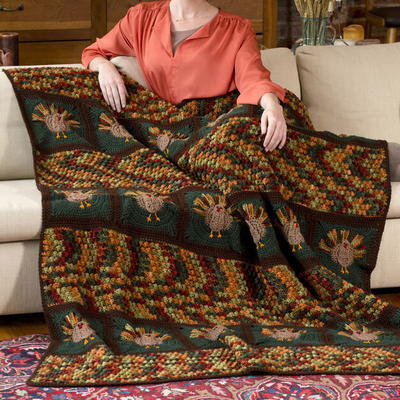
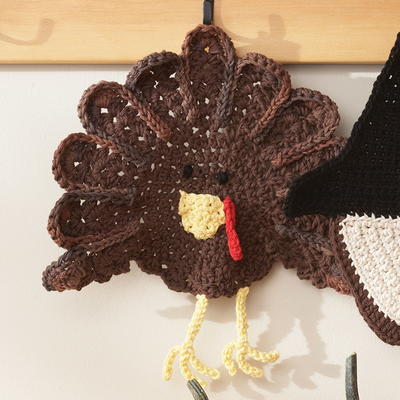
Pilgrim's Favorite Turkey Throw

This Thanksgiving craft idea is just what you need for curling up and relaxing after your holiday feast. You will love adding this Pilgrim's Favorite Turkey Throw to your Thanksgiving decor. Perhaps you could take a hint from the first Thanksgiving and create specials blankets to share with your friends. This is the season of sharing and being thankful, so make sure this Thanksgiving craft idea gets plenty of good use. You and your family will look forward to using Pilgrim's Favorite Turkey Throw year after year.
Primary TechniqueCrochet

SeasonFall
Knitting Needle Size10 or 6 mm
Materials:
- RED HEART® Super Saver®: 1 skein 360 Café A; 9 skeins 981 Fall B; 2 skeins each 633 Dark Sage C and 365 Coffee D; 1 skein each 254 Pumpkin E and 376 Burgundy F
- Susan Bates® Crochet Hook: 6mm [US J-10].
- Yarn needle
Abbreviations:
- A, B, C, etc. = Colors A, B, C, etc.
- ch = chain
- dc = double crochet
- dtr = double treble crochet
- hdc = half double crochet
- mm = millimeters
- sc = single crochet
- st(s) = stitch (es)
- tr = treble crochet
- yo = yarn over
- * or ** = repeat whatever follows the * or ** as indicated
- [] = work directions in brackets the number of times specified.
Instructions:
Turkey Square (Make 18)
- With A, ch 3; join with a slip st to join to form a ring.
- Round 1-Body Rear: Ch 1, 8 sc in ring; join with a slip st in first sc.
- Round 2: Ch 1, 2 sc in each sc around; join – 16 sc.
- Round 3: Ch 1, [sc in sc, 2 sc in next sc] 8 times; join – 24 sc.
- Round 4: Ch 1, [sc in 2 sc, 2 sc in next sc] 8 times; join with B in first sc – 32 sc. Fasten off A.
- Round 5A-Feathers: With B, [ch 6; sc in 2nd ch from hook and next 4 ch, slip st into next sc] 16 times. Fasten off B.
- Round 5B: With right side facing, attach C in same sc as last slip st; ch 3, 2 dc in next sc, [dc in next sc, 2 dc in next sc] 7 times; TURN – 24 sts.
- Round 5C (Wrong Side): Ch 3, skip first dc, dc in next dc, 2 dc in next dc, [dc in next 2 dc, 2 dc in next dc] 7 times working last dc in top of ch-3; turn – 32 sts.
- Round 6 (Right Side): Ch 1, [sc in 3 dc, 2 sc in next dc] 8 times working last sc in top of ch-3 – 40 sc; [2 sc across top of feather, ch 1, 2 sc across top of feather] 8 times – 40 sts over feathers = 80 sts total; join with a slip st to top of first sc.
- Round 7: (Note: “st” = sc or ch.) Ch 1, sc in first 4 sc, hdc in next 2 sc, dc in next 2 sc, tr in next sc, (2 dtr, ch 2) all in next sc, * 2 dtr in next st, tr in next st, dc in next 2 sts, hdc in next 2 sts **, sc in next 8 sts, hdc in next 2 sts, dc in next 2 sts, tr in next st, (2 dtr, ch 2) all in next st; repeat from * to last 4 sts, end at **; sc in last 4 sts; join. Fasten off.
- Round 8: Attach D in any corner ch-2 space; (ch 3, dc, ch 1, 2 dc) all in corner space, * dc in each st to next corner ch-2 space **, (2 dc, ch 1, 2 dc) all in corner space; repeat from * around, end at **; join with a slip st in top of ch-3. Fasten off.
Body Front (Make 18)
- With A, ch 9; sc in 2nd ch from hook and in each ch across; turn – 8 sc.
- Round 1: Beginning at top of head, ch 1, 2 sc in first sc, sc in next 4 sc, hdc in next sc, dc in next sc, 3 dc in next sc; working on opposite side of beginning ch, 3 dc in first ch, dc in next ch, hdc in next ch, sc in next 4 ch, 2 sc in next ch; join with a slip st in first sc. Fasten off.
- Sew Body Front onto Body Rear at center of square. Embroider legs and beak with E.
- Wattle: With F, ch 1. Fasten off. Attach to face. Make 2 French knot eyes with D.
Strips
- Sew squares together to form 3 horizontal strips of 6 squares each.
- Top Edging-On all 3 strips -Row 1: With right side facing, attach D at top right-hand corner; ch 1, 28 sc across first square, [27 sc across next square] 5 times; turn – 163 sts.
- Row 2: Ch 1, sc in each sc across. Fasten off.
- Bottom Edging: Work same as for Top Edging across bottom of each strip.
Texture Pattern - on 2 Strips Only
- Row 1 (Right Side): With right side facing, attach B in first st of Edging; ch 1, sc in each sc across; turn.
- Row 2: Ch 1, sc in first sc, * tr in next sc, sc in next sc; repeat from * across; turn.
- Row 3: Ch 1, sc in each st across; turn.
- Row 4: Ch 1, sc in first 2 sc, * tr in next sc, sc in next sc; repeat from * to last sc; sc in last sc; turn.
- Row 5: Repeat Row 3.
- Repeat Rows 2-5 until there are a total of 29 rows. Fasten off.
- Repeat Texture Pattern on bottom of same 2 strips. Sew strip of squares with Edgings only in between strips with textured sections as pictured.
Outside Edging
- With right side facing, attach D at top righthand corner; ch 1, work sc evenly around all 4 sides and work 3 sc in each corner; join with a slip st in first sc; TURN. Repeat last round on the wrong side. Fasten off. Weave in ends.
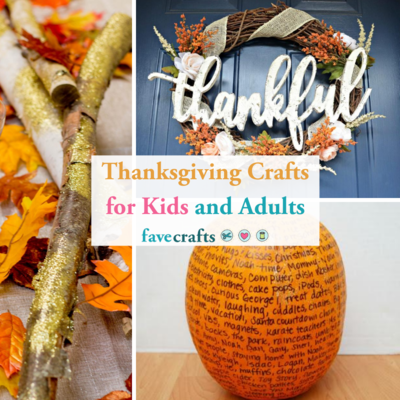
More Crafty Ideas For You
As experienced crafters ourselves, we understand the satisfaction that comes from creating a beautiful Pilgrim's Favorite Turkey Throw. For those who enjoy this craft project, we have a few recommendations for your next creative endeavor.
If you are looking to build on your skills and take your crafting to the next level, consider trying your hand at creating a set of matching Thanksgiving-themed placemats to complement your turkey throw. This project will challenge you to work on your precision and attention to detail while also allowing you to showcase your unique style and creativity.
For those who enjoy giving handmade gifts to loved ones, why not create a personalized Thanksgiving-themed pillow using the same techniques and materials as your Pilgrim's Favorite Turkey Throw? This project allows you to spread holiday cheer and warmth to friends and family while also practicing your crafting skills.
And for those who are looking to switch things up and explore new crafting techniques, consider making a festive Thanksgiving wreath to display on your front door or above the mantel. Using a mix of autumn colors, textures, and embellishments, you can create a one-of-a-kind piece that will welcome guests and set the tone for the holiday season.
We hope these craft project ideas inspire you to continue your creative journey and explore new possibilities within the world of crafting. Happy crafting!
Read NextRepurposed Thanksgiving Blocks