Wet Embossing, or How to Heat Emboss
Learn how to heat emboss with the tips and tricks in this tutorial.

Learn how to heat emboss! What is embossing? Embossing actually refers to an extensive variety of artistic techniques. In this article, we will focus on heat embossing, also known as wet embossing.
Heat embossing, or wet embossing, is a technique for creating a raised design on paper crafts. Take a stamped image to the next level by turning it into a textured motif!
Have you ever wanted to learn how to emboss? Learn about the wonderful technique and a few tips and tricks for how to heat emboss. Once you have this technique under your belt, the cards and layouts you produce will have a wonderful texture and shine.
Add new versatility to your stamped images when you heat emboss them!
How to Heat Emboss
Materials
- Stamp(s): Any rubber stamp will do, but extremely detailed or etched stamps don’t emboss well.
- Thick Paper, such as cardstock: Almost any type of paper is a good surface to wet emboss upon even vellum.
- Pigment Ink or Embossing Ink: This is a slow drying ink that will hold embossing powder until you are ready to heat it with a heat gun.
- Embossing Powder: Looks like glitter, but this is a special powder that will melt and rise when heated
- Heat Gun: Gently blows very hot air that will melt embossing powder. Be careful not to touch any metal tips of heat guns.
- Tongs
- Heat-Resistant Surface
- Sheet of Computer Paper: to catch excess powder.
- Optional: Small detail brush to dust away excess powder.
Instructions
1. Ink your stamp with the embossing ink pad, then stamp the image on your thick paper.
Make sure entire surface of the stamp is covered with the ink. Thick paper works best as it is more durable and less likely to curl, but you can experiment with papers like vellum, too! You want to use an embossing ink pad as opposed to a regular ink pad because the embossing ink does not dry as quickly. This allows you time to sprinkle your powder so it sticks to the ink, and you will get a sharper raised image as well.
Clear embossing ink is the most popular, but you can use any other color; the stamped image will take on the same color as the embossing powder, not the ink.
2. Once you have stamped your image, sprinkle a generous amount of embossing powder on it.
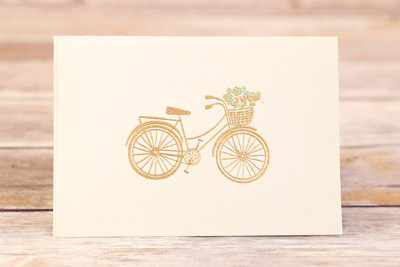
Embossing powder comes in a variety of colors. You can use clear embossing powder if your aim is just to give your paper some texture, or select any available color for a beautiful stamped image. This card features gold embossing powder.
Make sure the image is completely covered. Dump excess embossing powder back into the container. You can do this by shaking the powder gently onto a sheet of computer paper, rolling it up, and creating a funnel back into the jar. Make sure there are no stray flecks of powder on the card where they shouldn't be. You can even use a small detail brush to dust them off, taking care not to brush the stamped image.
3. Use your heat gun to heat emboss the image.
This is the fun part! Watch the stamped image change before your eyes. If you have stamped your image on a smaller piece of paper, you will want to hold the paper with tongs when you heat the image so you don't burn your hand. You'll also want to move the heat gun across the paper so you do not burn the paper from holding it in the exact same spot too long. Think of moving a hair dryer across your hair; if you hold it in one space too long, you'll burn your scalp!
Allow the heat gun to warm up for a minute or so. Hold it about six inches from the paper and a perpendicular angle so it is focused directly on the image, not angled as though to blow the powder away. Pass the gun across the paper until the stamped image changes: you should be able to see the powder set into a clear and shiny raised line. The powder will go from a dull finish to a very glossy one signaling you that your embossing is done.
Note: You can overheat the embossing. If your embossed image is cracking use less time to heat. If your embossing is uneven or still powdery you need to apply more heat to melt.

4. Enjoy!
You might want to allow the page to cool for a bit once you've finished. You can color in the stamped image with gel pens, markers, or any other precision coloring tool. The blue flowers in the basket of the bicycle image were colored with a gel pen.


BONUS: Debossing
If you melt a puddle of embossing powder and stamp an image into it, it is called debossing. You don’t have to stamp the melted embossing powder to create some fun. Try adding embellishments to the mix! Remember that melted embossing powder is hot enough to burn skin until it cools off completely.