How To Make Burnt Bag Designs
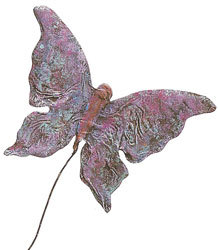
Learn how to use paper bags to create lovely designs with a unique burning technique from Heidi Borchers of Inspired at Home. Two examples shown with this technique are a textured butterfly and an autumn leaf.

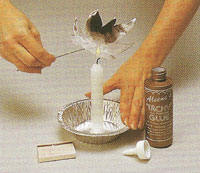
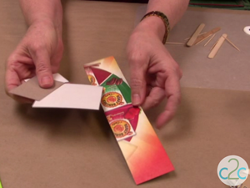
Transfer desired pattern to grocery bag. Cut along outside of pattern line to create a square or rectangle around pattern. Cut out second matching square or rectangle. Cut a 10” length of 18-gauge florist wire. Glue the two grocery bag pieces together with at least 1” of one end of the wire sandwiched between the layers of bag. This will create a “handle” for you to hold on to while burning the design. (This wire may become part of your design element or you can cut off the excess wire once your design is complete.) Let glue set for a few minutes then cut along pattern line. You will now have a double thickness of brown bag cut into design of your choosing with the wire glued in between.
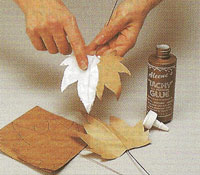
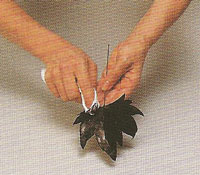
Now that your design is cut out, spread a fairly thick layer of Aleene’s® Original Tacky Glue® on 1 side of the design piece. While the glue is still wet, hold the design (glue side down) directly over a candle flame. Hold the design as close to the flame as possible, but don’t snuff out the candle. Continually move the design around over the flame until all of the glue is black and sooty. The burning process takes 1-1/2 to 2 minutes and produces a little smoke. Keep a pan of water handy should any of the brown bag catch flame. However, this should not happen if you have spread glue over the entire surface and you keep the design continually moving in the flame.
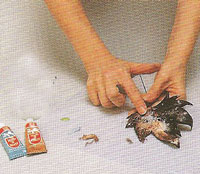
Using a soft cloth, gently wipe away the soot. If any brown bag shows through, this indicates that the glue is not completely burned. So, hold the piece over the flame again to finish the burning process. To create a textured surface, use the fabric to gently press texture into the glue, slightly ruffling the surface as you wipe away the soot. Repeat process on reverse side. Let dry overnight.
You can either sponge paint the surface of your design with acrylic paint or use Rub ‘n Buff to create metallic highlights on your design.
Heidi’s Designer Tip: A plumber’s candle (from the hardware store) is the best to use for this technique as it is designed to burn with a taller flame than regular candles. Just place a few drops of wax in an aluminum bowl and attach the candle.
For more great projects like this, check out our collection of 20+ Brown Paper Bag Crafts!


Thanks for your comment. Don't forget to share!
tbdhob 0604504
Jan 02, 2012
I made Butterfly burnt bag plant stakes for a christmas gift and it truly is unique looking. I used gold antique rub n buff and they looked like tin butterflies. Nice gift.
Niclorax
Sep 09, 2010
I originally found out about this technique from Aleene's Big Book of Crafts, I have used it for many different things. Jewelry, embelishments for scrapbooks and cards, I include pieces in flower arangements, i've even incorporated it into my pinatas. LOVE THIS TECHNIQUE
Report Inappropriate Comment
Are you sure you would like to report this comment? It will be flagged for our moderators to take action.
Thank you for taking the time to improve the content on our site.