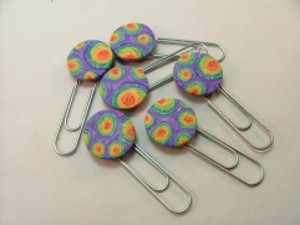
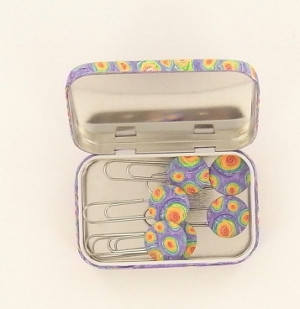
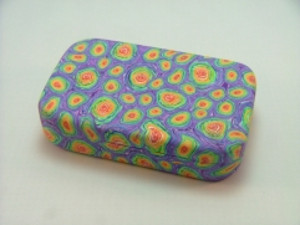
Rainbow Swirl Paperclip Tin
This Rainbow Swirl Paperclip Tin from Polyform Products is a great gift to make for anyone on your list. It's easy to assemble and perfect for those who are just starting with clay crafting.
Materials:
- Premo! Sculpey®: Cadmium Red Hue - 2 oz-- 1 block
- Premo! Sculpey®: Orange - 2 oz-- 1 block
- Premo! Sculpey®: Cadmium Yellow Hue - 2 oz-- 1 block
- Premo! Sculpey®: Green - 2 oz-- 1 block
- Premo! Sculpey®: Purple - 2 oz-- 1 block
- Premo! Sculpey®: Ultramarine Blue Hue - 2 oz-- 1 block
- Premo! Sculpey®: White - 2 oz-- 2 blocks
- Premo! Accents: Translucent - 2 oz-- 2 blocks
- Clay Conditioning Machine
- Sculpey Acrylic Roller
- Sculpey® Super Slicer
- Altoids® Tin
- Large Paperclips with decorative ends
- Crafter's knife
- 1” Circle cutter
- Industrial strength glue
- Ruler
Instructions:
Do not use unbaked clay on unprotected furniture or finished surfaces. Start with clean hands and work surface area. Good work surfaces include wax paper, metal baking sheet, or disposable foil. Knead clay until soft and smooth. For best results, clean your hands in between colors. Shape clay, pressing pieces together firmly. Bake on oven-proof glass or metal surface at 275 °F (130 °C) for 15 minutes per 1/4" (6 mm) thickness. For best baking results, use an oven thermometer. DO NOT USE MICROWAVE OVEN. DO NOT EXCEED THE ABOVE TEMPERATURE OR RECOMMENDED BAKING TIME. Wash hands after use. Baking should be completed by an adult.
-
Begin by preheating oven to 275 °F (130 °C). Test temperature with oven thermometer for perfectly cured clay. For best results, condition all clay by running it through the clay dedicated pasta machine several passes on the widest setting. Fold the clay in half after each pass and insert the fold side into the rollers first.
-
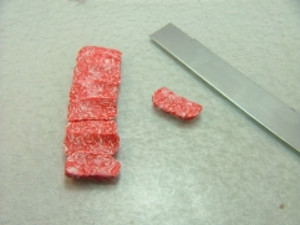
Cut approximately a 1/16 section off of the red, white and translucent clay blocks. Use the Super Slicer to chop them up finely. Compress all of the pieces together and form into a snake. Twist the snake to marble the colors together somewhat. Then compress the snake into a block.
- Repeat step 1 with the other colors:
- Orange – use a1/8 of a section off of the Orange, white and translucent clay blocks.
- Cadmium Yellow - use a 1/8 of a section off of the Yellow, white and translucent clay blocks.
- Green – use a 1/4 of a section off of the Green, White and Translucent clay blocks.
- Ultramarine Blue – use a 1/3 of a section off of the Blue, White and Translucent clay blocks.
- Purple – use a 1/2 of a section off of the Purple, White and Translucent clay blocks. When you have made the block of purple cut it in half and save half for the next project.
-
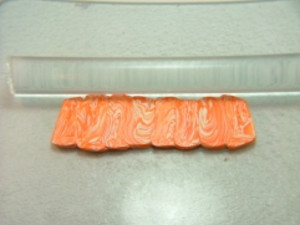
After all of the colors are formed into blocks, make them into sheets. Using the Super Slicer, cut each block into even pieces to make a 5 inch long strip from each. Then use the Acrylic Roller to flatten the strip.
-
Flatten each strip into a sheet using the #4 setting on the Clay Conditioning Machine. Each sheet should still be about 5 inches wide by varying lengths, getting longer with each color since you used different amounts of clay for each color.
-
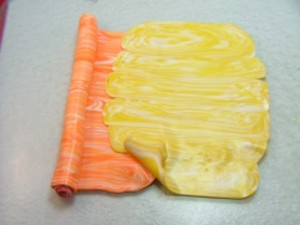
Starting with the Cadmium Red, roll into a jelly roll. Overlap each color slightly as it is added. Cadmium Red, Orange, Cadmium Yellow, Green, Ultramarine Blue and Purple in that order forming a cane.
-
Reduce the cane to 3/4 inch diameter, then cut it in half and reduce one of the halves to 1/2 inch. Cut that in half then reduce one of the halves to 1/4 inch. You will end up with 3 canes with different diameters.
-
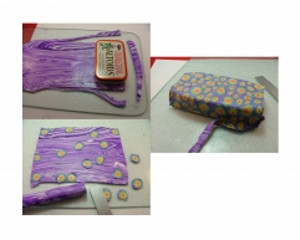
Measure your tin so that you will know how large to make the clay sheet to cover it.
-
Using the reserved Purple clay and using the Clay Conditioning Machine, make a sheet of clay big enough to cover the tin. For example, for this project I am using a standard Altoids® tin. It is approximately 3 3/4 inch long by 2 3/8 wide and 3/4 inch tall. You will need a sheet that is at least 4 1/2 inch wide by 6 3/4 inches long. Flatten this sheet to the #4 setting on your pasta machine.
-
Using the Super Slicer, slice off thin slices from the different size canes. Place them randomly on the sheet in a pleasing pattern until the sheet is completely covered.
-
Use the Acrylic Roller to make it as smooth as possible.
-
Turn the sheet over and lay it pattern side down. Using the Super Slicer, cut one end straight and lay the tin so that the back edge is against this straight edge. Gently lift the sheet up and over the tin. Using the Super Slicer, trim the clay so the back edge is even with your first cut.
-
Fold up the sides and trim. Using your Acrylic Roller smooth the sheet completely onto the tin, making sure to pop any air bubbles that might be trapped underneath.
-
Next use your Craft Knife to trim around the hinges on the backside so that your tin will be able to open smoothly.
-
Using the flexible blade from the Super Slicer Set, run it all the way around the tin, staying flush with the underside of the top half of the tin.
-
Bake at 275 °F (130 °C) for 25 to 30 minutes. Let clay cool completely.
-
Sand with wet/dry sand paper. Start with 400, then 800 and finish with 1000. You will end up with a smooth satiny finish.
-
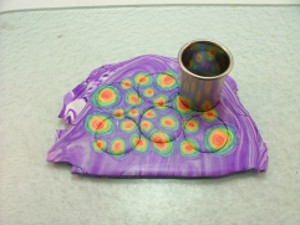
To make the paper clips use the remaining Purple clay and the canes. Using the Clay Conditioning Machine on the #1 setting, make a sheet of Purple clay approximately 3 inch by 5 inches.
-
Using the Super Slicer, slice off thin slices from the different size canes. Place them randomly on the sheet in a pleasing pattern until the sheet is completely covered.
-
Use the Acrylic Roller to make it as smooth as possible.
-
Use your circle cutter to cut out circles from the sheet.
-
Bake them at 275 °F (130 °C) for about 25-30 minutes. Let clay completely cool.
-
Sand with wet/dry sand paper. Start with 400, then 800 and finish with 1000. You will end up with a smooth satiny finish.
-
Pop off the decorative embellishments, leaving the back of the embellishments on the paperclips.
-
Next glue the circles onto the pad of the paper clip with industrial strength glue, such as E6000® crafter's glue.