Personalized DIY Desk Accessories
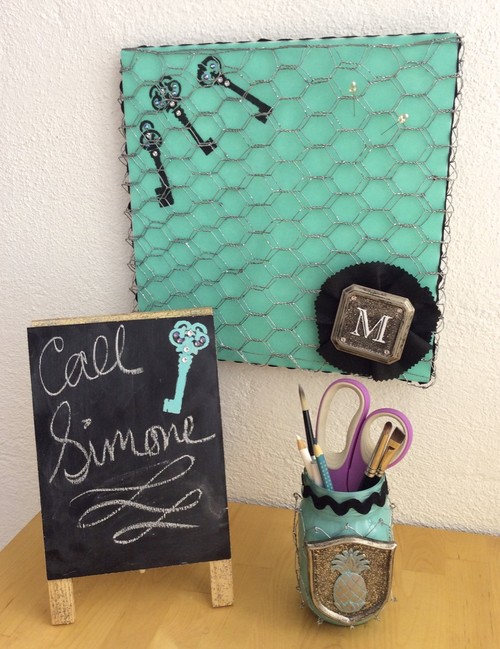
These Personalized DIY Desk Accessories is perfect for staying organized in style! If you're looking for an excuse to do more work, home office organization ideas will really help. The embellished chalkboard sign is great for quick daily reminders and the handy pen holder is great for keeping the clutter off your desk. The bulletin board features custom crystal pins and chicken wire for posting cards without the use of pins. This craft project is quick and easy to make. Once you start working on these DIY desk organization ideas, you'll be inspired to get to work. This can also become perfect gift for your friends at the office! Customize each desk set with fun and exciting colors and monograms!
Primary TechniqueGeneral Crafts

Pen Holder Materials:
- Mason Jar
- Plaid Folk Art Acrylic Craft Paint
- M-D Hobby & Craft Chicken Wire
- [Kree-ey-tiv] Die Cast Emblem – Pineapple
- Wrights Jumbo Rick Rack
- Plaid Martha Stewart Crafts Multi Surface Glitter – Disco
- Aleene’s Turbo Tacky Glue
- M-D Hobby & Craft Metal Working Gloves
- Paintbrush
Chalkboard Materials:
- Blank Sandwich Board Sign
- Plaid Martha Stewart Crafts Multi Surface Glitter
- Plaid Martha Stewart Crafts Multi Surface Chalkboard Acrylic Craft Paint
- Plaid Folk Art Home Décor Stencils – Skeleton Keys
- Prima Bead Swarovski Crystals
- iLoveToCreate Liquid Fusion Clear Urethane Adhesive
- Stencil Paintbrush
- Paintbrush
Bulletin Board Materials:
- Fairfield World Foamology Design Foam with Sticky Base
- Fairfield World Oly-Fun in Aqua
- Fairfield World Oly-Fun in Black
- M-D Hobby & Craft Chicken Wire
- Wrights Jumbo Rick Rack
- Plaid Martha Stewart Crafts Multi Surface Chalkboard Acrylic Craft Paint
- Prima Bead Swarovski Crystals
- [Kree-ey-tiv] Die Cast Monogram – “M”
- Plaid Martha Stewart Crafts Multi Surface Glitter – Disco
- Plaid Folk Art Home Décor Stencils – Skeleton Keys
- Aleene’s Turbo Tacky Glue
- iLoveToCreate Liquid Fusion Clear Urethane Adhesive
- Prima Bead Swarovski Crystals
- Plaid Folk Art Acrylic Craft Paint
- Stick Pins
- M-D Hobby & Craft Metal Working Gloves
- Stencil Paintbrush
- Paintbrush
Instructions
-
Pen Holder Instructions: Paint the inside of the jar in your desired color. Cut chicken wire to size with wire snips wearing metal working gloves. Apply glitter to chicken wire and let dry. Glue rick rack around jar neck with tacky glue. Embellish emblem by burnishing it with paint. Once dry apply glitter around the emblem design. Wrap jar in wire securing in the back with pliers. Twist around sharp tips of chicken wire with pliers. Peel and stick emblem in place.
-
Chalkboard Instructions: Apply chalkboard paint to sandwich board sign. Apply glitter to natural wood areas and let dry. Embellish the corner with the acrylic paint using the stencil. Once dry, apply crystals onto key design using urethane adhesive.
-
Bulletin Board Instructions: Peel backing from foam square to expose the sticky surface. Apply aqua Oly-Fun to the surface. Secure rick rack around perimeter of foam base with tacky glue. Use the stencil to embellish the corner of the board with chalkboard paint. Embellish the stenciled design further by applying crystals with the clear urethane adhesive. Cut chicken wire to size with wire snips wearing metal working gloves. Apply glitter to chicken wire and let dry. Wrap board in glittered chicken wire. Embellish emblem by burnishing it with paint. Once dry apply glitter around the monogram design and mark the corners with 4 crystals. Use pinking shears to cut a gathered border out of Oly-Fun to accent the monogram from behind. Glue the gathered border in place with tacky glue. Use the acrylic paint to accent the M in the monogram. Of course you could personalize this with any of the letters! Secure the emblem with gathered border onto the board using the built in adhesive strips. Create your own glamorous bulletin board pins by adding a crystal bead to a regular stick pin and securing with clear urethane adhesive.
Read NextSpace-Saving DIY Shoe Rack