Hairbrush Organizer Free Sewing Pattern
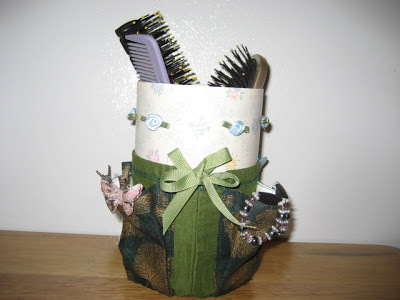
Keep your bathroom sink clean and free of all that clutter with this genius Hairbrush Organizer Free Sewing Pattern. Easy sewing patterns can really come in handy, especially when they're cute and practical. You can even throw some hair clips in this organizer so you're always prepared for a cute hairdo. Bathroom organization ideas can help you take control of both your space and your life. In just one day, you can clear out unnecessary items, throw away what you don't need and ultimately ease stress. Once you know where all of your hairbrushes and clips are, you'll be able to look good and get out the door in far less time.
Primary TechniqueSewing

Sewn byMachine
Materials:
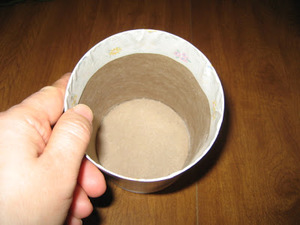
- Quaker Yellow Corn Meal canister 24 oz
- 6 small cloth flower accessory (Offray)
- Unused self-adhesive decorative covering (old or new)
- Unused cotton fabric (plain) (old or new)
- Unused cotton fabric (printed) (old or new)
- Sewing machine
- Threads and pins
- Tape measure and ruler
- Compass
- Paper and ballpen
- Super glue Loctite with brush on
- Ribbon Offray
- Yarn needle
- Glue gun and glue stick
Level of Difficulty – Easy
Instructions:
Cutting and Attaching of Decorative Covering
Apply Super glue at the bottom of the canister to attach the top cover.
- Body Decorative Covering --Make 8 ½ inches (L) X 13 ½ inches (W) rectangular shape on the decorative covering and then cut. Set it aside.
- Bottom Decorative Covering -- Make also a round shape with the same size as the bottom area on the decorative covering. Use the bottom part of the canister as pattern and then cut. Set it aside.
Provide ¾ inch allowance for the folding of the covering on the bottom part of the canister. The rest will be provided for folding the covering on the upper portion of the canister. Remove the backing as you attach the decorative covering on the side of the canister. Make some slit around the covering on both ends to fold it along the edges without obstruction. First, fold the body covering along the edges of the bottom area. Apply Super glue, if there is a need, to firmly attach the covering at the bottom. Second, remove the backing of the bottom covering to cover the bottom area. Third, fold the body covering along the edges of the upper portion. Apply Super glue, if there is a need, to firmly attach the covering inside the canister.
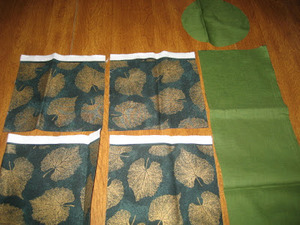
Cutting of Body and Bottom Cloth Coverings and Small Pockets
- Body Cloth Covering -- Make 6 inches (L) X 14 ½ inches (W) rectangular shape on a piece of plain cotton fabric and then cut. Set it aside.
- Bottom Cloth Covering -- Using a compass, set it to 2 1/2 inch margin to make a perfect round shape pattern on a piece of paper and then cut. Lay it on top of the same plain cotton fabric, mark it around with a ballpen, and then cut. Set it aside.
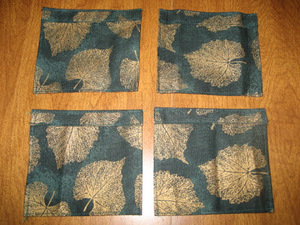
- Small Pockets -- Make 5 inches (L) X 20 inches (W) rectangular shape on a piece of printed cotton fabric and then cut. Fold this into half and then cut. Fold again the two into half and then cut. The 4 pockets should be of equal size. Set them aside.

Sewing of Body Cloth Covering
Determine the upper part and the bottom part of the plain fabric.
- Upper part -- Provide 2 /3 inch allowance when folding the edge on the upper part (width area). Fold it once only if the edge of the fabric is not loose, otherwise, provide an allowance for it by folding it twice, so to avoid having loose threads. Attach pins to securely hold the fold or run your fingers through the fabric to mark the fold and then sew it. Remove each pin as you slowly sew some area. Make a stitch design and I chose design #27 and sew it along the thread sewn already as a guide to make the sewing straight. This area is where you will insert a ribbon later.
- Bottom part – don’t sew it yet.
- Side part (length area) -- Provide ¼ inch allowance each on both sides when folding the two edges on the length side of the plain fabric. Fold it once only if the edge of the fabric is not loose, otherwise, provide an allowance for it by folding it twice, so to avoid having loose threads. Run your fingers through the fabric to mark the fold and then sew it. Set it aside.
Sewing of Small Pockets
Determine the upper part and the bottom part of the fabric.
- Bottom part -- Provide ¼ inch allowance when folding the bottom side of the pocket. Fold it only once, run your fingers through the fabric to mark the fold, and then sew.
- Side part -- Provide ¼ inch allowance when folding both sides of the pocket. Fold it once only, run your fingers through the fabric again to mark the fold, and then sew.
- Upper part – Lay the fabric on the table with the wrong side facing you. Provide 2/3 inch allowance when doing the first fold. Then pull the fabric towards you and fold it the second time. The first fold should be on top of the second fold. Turn it over facing the right side of the fabric. The measurement of the 2 folds on the front area of the pocket should be 2/3 inch. Attach pins to securely hold the fold and then sew both upper and bottom edges of the fold. Do the same procedure on other pockets.


Folding the Sides of the Pockets
Provide ½ inch allowance when folding the side of the pocket. First, pull the fabric towards the edge of the side and then fold. This will look like there are two folds. Attach pins to securely hold the folds. Do the same procedure on other side of the pocket. Do the same procedure on the other pockets
Sewing the Small Pockets on the Body Cloth Covering
Lay down the body cloth covering on the table and arrange each pocket on top of it. You can visibly see how much allowance can be allotted between 2 pockets. Measure each space in between two pockets and make adjustments, if possible, to have a uniform spacing for all pockets. Check also the allowance to be provided for the top and bottom areas before sewing and make adjustments, if there is a need. Fit the cloth covering around the canister to have a preview of the alignment. Provide ½ inch allowance on the lower part of the body cloth covering. The pocket should not be sewn beyond the 1/3 inch allowance of the upper part of the body cloth covering where you will insert the ribbon. Use pins to securely hold the pockets on the fabric.
- Side part -- Begin sewing the sides of the pocket first. Sew the side of the pocket, but don’t include the second fold. Run the sewing machine where the line of thread sewn first is and then cut the thread. Remove each pin as you slowly sew some area. Do the same procedure on the other side.
- Bottom part – Including the second fold now, run the sewing machine on the fabric and then cut the thread. Do the same procedure on the other pockets. The outcome measurement of each pocket is 3 1/2 inches (L) X 2 inches (W).
Sewing Both Ends of the Body Cloth Covering
After the pockets have been sewn, fit the body cloth covering around the canister again before sewing. Pull together both ends of the body covering and attach pins to securely hold the fabric and mark where you should start sewing. You have to make the last preview of the alignment before sewing. Remove the body cloth covering from the canister and start sewing from the upper part, but don’t include the 1/3 inch allowance where the ribbon will be inserted later. Remove each pin as you slowly sew some area.
Sewing of the Bottom Cloth Covering
Sew around the edge and provide a long allowance of thread before cutting it. Pull one thread to create a shearing on the fabric. Extend this shearing around the edge until it reaches the end of the fabric. Do not cut the thread yet. Don’t invert the body cloth covering. Insert the bottom cloth covering inside the body cloth covering. Make a trial and error how to adjust the shearing to fit into the bottom part of the body cloth covering before sewing. Use pins to securely hold both fabrics together while making adjustments. When everything is adjusted, begin sewing on the edge with the bottom cloth covering on top of the body cloth covering. Invert the body cloth covering and run the sewing machine again on the edge to hide the excess cloth and have a clean sewing. Be sure the bottom edge of the pocket is not included in sewing the bottom cloth covering.
Cut 30 inches of ribbon and insert it into one hole of the upper part using a yarn needle. Tie the ribbon twice. Using your glue gun, attach each small cloth flower accessory around the side of the decorative body covering with equal spacing. Arrange all the hair brush, comb, hair clips and it looks like this as shown below.
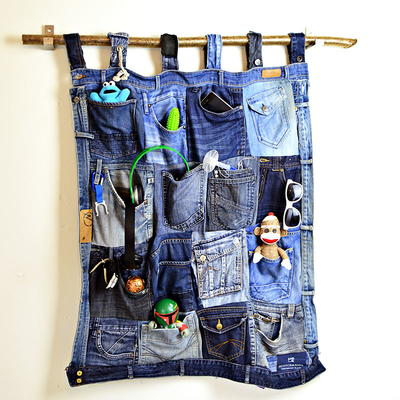
Read NextDenim Pockets DIY Organizer