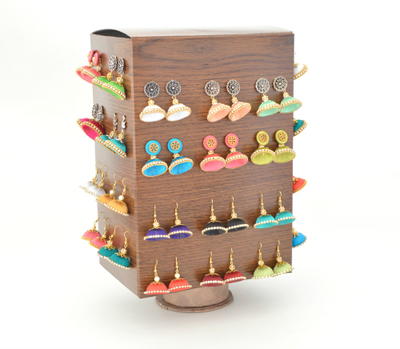
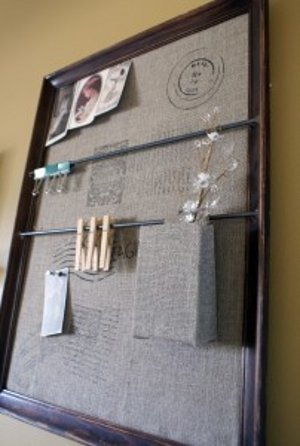
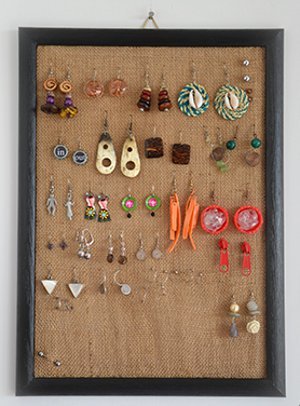
Framed Burlap Earring Organizer
Transform an old frame into this amazing Framed Burlap Earring Organizer. Burlap lends itself very well to earring organization, since the weaving often results in larger holes, perfect for earrings. This is a great way to reuse materials you may have around your home already and is a budget-friendly and decorative way to display your favorite earrings.

Materials:
- Picture frame (either a hanging or standing one, depending on where you want to keep it)
- Burlap (or other loosely woven fabric)
- Paint brush and paint (optional)
Instructions:
-
Remove the glass and backing from your frame. Discard the glass but keep the cardboard backing.

-
If you want to paint your frame, chances are you’ll need to do more than one coat, so start painting straight off.

-
If you paint thin coats, they will dry quickly so every so often while you’re preparing the rest of the display you can check it and add another coat.

-
Some versions of this project staple the fabric directly to the frame, but you need a heavy duty stapler for that, which I don’t have. If you do, just do that. If not, take the cardboard insert from inside your frame. If it’s slightly smaller than the inside of the frame, it won’t work so cut another piece of cardboard that fits in perfectly, otherwise everything will just fall right out. Measure 15 mm in from all four sides and draw lines.

-
Using a box cutter or scissors, cut out the center of the cardboard, leaving just the 15 mm wide border INTACT.

-
Cut open your burlap bag (or lay whatever fabric you’re using flat) and place the cardboard border over it. Cut all around the edges so you have a rectangle of fabric the same size as the cardboard.

-
Start stapling the burlap to one side of the cardboard border, then continue to the opposite side, holding the fabric taut. Then staple the other sides. Try to staple as close to the outer edge of the cardboard as possible so they will be hidden by the frame.

-
When you’ve stapled all around the edges, trim the bits of fabric that stick out beyond the cardboard.

-
Pop this new insert inside your frame with the cardboard border facing the back.

-
And start sticking your earrings in! Earrings with fish hooks are the easiest to just slip in. You can also use this for earrings with regular posts though you do have to reach around the back to put on the earring back.

-
Once you fill up your frame with earrings, you might notice the weight pulling the cardboard border from the edges of the frame’s inside. If this happens, just add a little glue to keep it in place.

Read NextDenim Pockets DIY Organizer
Your Recently Viewed Projects
Thanks for your comment. Don't forget to share!
princess6860504
May 30, 2017
All these upcycled DIY crafting ideas which use old picture frames are such fabulous ideas. This is suitable for a gift, in my opinion. When you have so much fun making all your own decor and your own gifts it becomes something much more personal to you. The burlap is just right for hanging all your French hook earrings. And when this frame is propped up on your dresser or hung on the wall it becomes a piece of art in itself.
franella
Mar 02, 2015
I buy damaged or broken frames at garage sales and repair them. I use hardware wire in the frame instead of burlap. The hardware wire allows you to put the little rubber keepers on the earring wire so that it's there when you need them. I use broken chains and buttons to make hanging devices. And I have several so that I can sort my earrings, arranging them in a collage fashion. The pic was hastily taken, but had to tell you about this version of the idea shown.
NATALYA 0576799
Mar 03, 2014
Hello everybody...I'm new one here...I love crafting and this page is so inspirational for me....I haven't done anything yet but I promise I will...I have so many ideas on my mind just don't have time to make them real... I have so many earings and this Burlap earing organizer is something that I really need to do...Wonderful and easy to make...at least looks like it....
Report Inappropriate Comment
Are you sure you would like to report this comment? It will be flagged for our moderators to take action.
Thank you for taking the time to improve the content on our site.