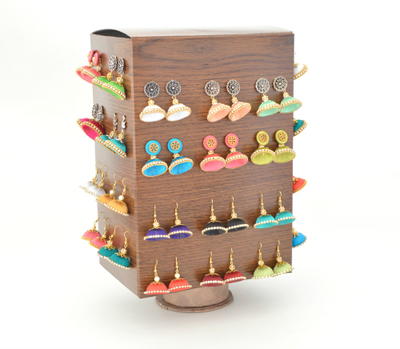
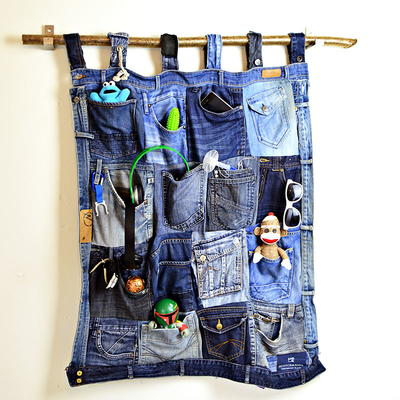
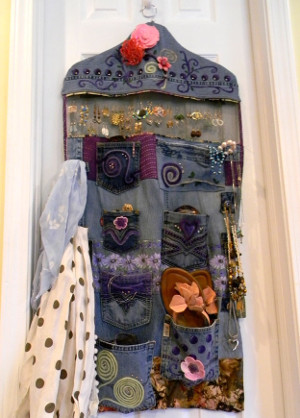
Clever Accessory Organizer
This Clever Accessory Organizer has it all: a screen for earrings, belt loops for scarves, buttons for necklaces, pockets for bracelets, zippers for sunglasses - you name it! Basically, this is the perfect DIY jewelry organizer for the crafter and recycling fanatic. Put your old jeans to good use with this great DIY jewelry holder. You'll have just as much fun decorating it as you will using it. Bring out your creativity and crafting supplies and let your inner fashionista/organizer run wild.

Materials:
- Assorted old jeans
- Assorted fabrics for piecing and the back
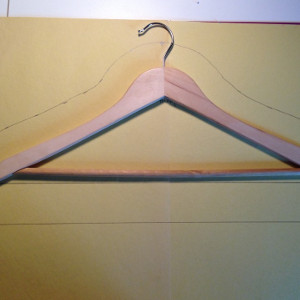
- Nice wood hanger
- Piece of batting for top part of hanger
- Piece of soft screen
- OPTIONAL EMBELLISHING…acrylic paints, wool yarn and needle felting supplies, bedazzler and studs
Instructions:
- Deconstruct jeans… Cut waistband with belt loops. Remove pockets and cut backs out. Cut off legs as high up as you can without cutting pockets.
- To make pattern for hanger, place a sturdy wooden hanger on paper and trace. (News paper works)
- Measure 1 1/2″ around outer edge of hanger and mark for cutting line.
- Draw a line along the bottom edge and mark 2 inches down and draw your cutting line.
- You will need three layers from pattern piece- jean, backing, and padding for middle layer (This is a recycled old mattress pad. You can use quilt batting.)
- Cut batting one inch shorter along the bottom straight edge.
- Layer padding, backing right side up, and jean layer right side down as shown above.
- Sew with 1/2″ seam allowance leaving 1/2″ open at top notch for hanger. Sew until 1 1/2″ from bottom edge.
- Trim batting and clip curves to turn smoothly.
- Cut a piece of soft screen the width of bottom edge of hanger cover by 6 inches long.
- Cut 2 pieces of trim 1 1/4″ by width of screen.
- Fold trim in 1/2 length wise, press, place on top and bottom of screen, and sew with 1/4″ seam allowance.
- Trim ends, even raw edges of material an raw edge of screen.
- Cut 2 pieces of trim 1 1/2″ * 6″.
- Fold in half length wise and then fold sides into middle, and iron.
- Place ends of screen in middle of fold so material will encase the ends.
- Sew along edge. Trim top and bottom.
- Now your screen will have a frame of material around it.
Embellishing
- Felting - Place your denim piece on the foam felting block and then be sure to use HEAVY felting needles with your wool yarn or fibers.
- Painting - Use a little foam circle stamp dipped in dark purple craft paint to add polka dots. Then go over with one side with lavender paint to give it some dimension.
- Bedazzling.
Finishing the Caddy
- Piece strips of jean and cotton fabrics to make a rectangle approximately 28″ * 21″ depending on hanger size. Make sure it is 1″ wider than bottom of hanger cover for seam allowance.
- Sew down belt loop strip along left side 1″ in. Make sure to use size 16 sewing machine needle (to prevent breakage). You can sew it down by hand with a blanket stitch. When sewing along right edge of belt loop strip do not sew belt loop down. Instead tack end of loop after sewing along right side between loops.
- Decide placement of pockets and buttons and sew.
- Iron under bottom edge of the front of hanger cover 1″ and sew to long edge of screen that has been framed with fabric. Leave 1/4″ of fabric showing.
- Fold 1″ and press along bottom edge of back of hanger cover and stitch. Stitch a 10″ length of ribbon 4″ in from sides of hanger cover on inside so tail end hangs down. (These will be used to tie back closed after hanger is added.)
- Cut lining to match front of pocket section.
- With right sides together pin along sides and bottom and sew with 1/2″ seams.
- Fold top down 1/2″ and press.
- Tuck screen between top layers and stitch.
Read NextDenim Pockets DIY Organizer
Your Recently Viewed Projects
Thanks for your comment. Don't forget to share!
Hannah
May 15, 2017
I have of these. I bought in a thrift store, but it's made of plastic. The problem with it is that it tears apart if it gets heavy. Another nice material for this is a thick blanket.
Report Inappropriate Comment
Are you sure you would like to report this comment? It will be flagged for our moderators to take action.
Thank you for taking the time to improve the content on our site.