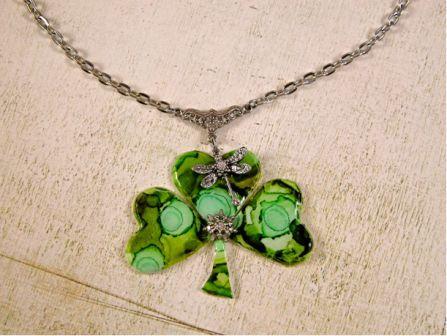
Lucky Clover Pendant Necklace
Swirls of green in friendly plastic make a lovely pendant in the shape of an irish shamrock symbol. Create this clover necklace from AMACO, perfect for St. Patrick's Day with a heart shape cutter and use for other easy jewelry ideas.
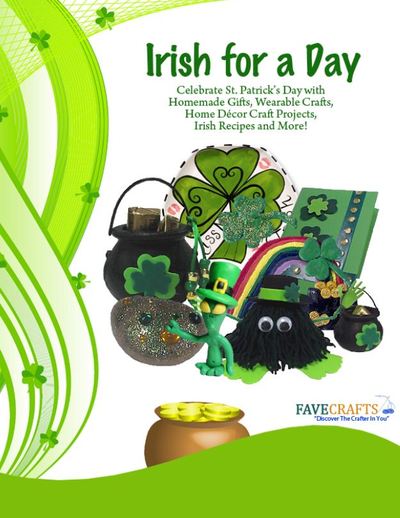
Find this project and many more St. Patrick's Day crafts in the 40-page St. Patrick's Day Crafts and Recipes eBook.

Materials:
- 3/4” Heart shape cutter (Keep in a small dish of ice cold water with a few drops of oil.)
- Craft knife
- Scissor
- Needle tool
- 7” Friendly plastic stick: 1 White/white,
- Adirondack Alcohol inks: Stream, Lettuce, Oregano, Butterscotch
- Alcohol blending fluid
- Rubbing alcohol
- Paintbrush
- Electric griddle set at 200 to 250 degrees
- Non-stick baking sheet
- Envirotex Lite, resin sealer, or any high gloss acrylic sealer
- Non-stick cookie sheet
- E6000 Glue
- Jewelry components and findings of your choice: chain, clasp, bead cap dragonfly connector, pendant connector, jump rings, and 3 small rhinestones.
Directions:
- Place the stick of plastic an a protected work surface. I start with a wash of the blending fluid over the plastic stick.
- In a random pattern apply drops of lettuce and butterscotch as your background colors. Allow the colors to blend together. Use your paintbrush to fill in any white areas that are left. Clean brush.
- Dip the brush into the rubbing alcohol and touch the plastic where you want to create white circles. These circles will resemble puddles.
- Mix a drop of stream and butterscotch together to create another shade of green dilute slightly with rubbing alcohol and using the brush apply within the white puddles.
- Continue this process until you have attained a pattern you are happy with.
- As the final application dip you brush into the rubbing alcohol and splash (splatter) the alcohol across the surface of the plastic. This helps to bread up the design a little more. Allow to dry completely.
- Pre-heat the griddle. Place the baking sheet onto the griddle. Place the plastic onto the baking sheet. Allow the plastic to soften.
- Remove the pan from the griddle. While the plastic is still warm, cut out three hearts by pressing the cutter into the softened plastic. Be sure to dip the cutter back into the cold water after each cut. This will help keep it from sticking to the plastic. Allow the plastic to cool. Note: You may place the pan under cold running water to speed the cooling process along.
- Use the needle tool to press under the edges of the cooled plastic to remove it from the pan. Pop out the ovals. If needed use the craft knife to cut around each one. With your scissor and cut a stem from the remaining plastic.
- Apply the Envirotex sealer following the manufactures instructions. Note: I like to place my pieces on a non stick cookie sheet. This way if there is any run off, it will be easy to remove later. Once I have the Envirotex mixed, I like to pour it into a small squeeze bottle. The application will be more precise and much easier. Blow softly, through a straw to pop any bubbles that remain. Allow the resin to dry at least 12 hours. If there has been any run off, remove the piece from the pan by pressing the needle tool under it and lifting it off the sheet. You can cut the excess that has run off with a scissor. Envirotex cures completely in 24 hours.
- Place a heart onto your non-stick sheet and heat along the point of the heart with your heat gun to soften the plastic. Now position the other two hearts on either side and press them up against the softened heart. This will form your Clover. Continue to apply heat over the clover, Then add the stem. Continue to heat for a few seconds to secure the bond. Allow to cool completely.
- Gather your jewelry components and findings, Position and glue the dragonfly along the top of the clover, so the loop of the dragon extends above the clover. This is going to be your connecting point. Glue on the bead cap and rhinestones. Allow the glue to dry.
- Assemble the necklace and attach to the Clover pendant using jump rings.
More St. Patrick's Day Jewelry (Celtic, Clovers, and Green):
Green Beaded Shamrock Necklace
Celtic Pendant Necklace Project
Read NextHow to Catch a Leprechaun
Your Recently Viewed Projects
Thanks for your comment. Don't forget to share!
Report Inappropriate Comment
Are you sure you would like to report this comment? It will be flagged for our moderators to take action.
Thank you for taking the time to improve the content on our site.