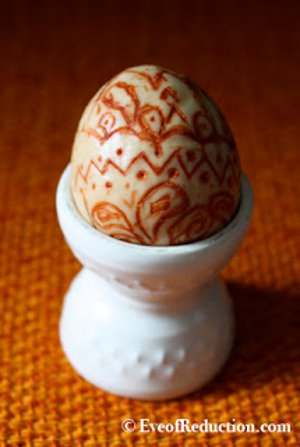
Carved Avocado Pit
This Carved Avocado Pit tutorial from Cristin Frank is a great way to use up that pesky pit after you've enjoyed your avocado. Great for spring decorations, these carvings are fun to show off and make great table decorations for an Easter brunch. Best of all, all you use to create your design is a paper clip, so you don't have to worry about sharp knives or tools. Simply create your design and let it show itself over time. This is a great project to do with your kids.
Materials:
- Avocado pit
- Paper clip
Instructions:
-
After removing the pit from the avocado flesh, wash and dry it.
-
Peel off the thin brown coating to reveal a light, nutty looking pit. Be careful not to jab into the under-layer. If you wait a day, the thin skin layer will start to peel as the pit shrinks a bit from dehydration.
-
Next, straighten a paperclip to use as a carving tool to make a design in the pit. Be sure to use enough pressure to score the top layer of the pit flesh.
-
In about ten minutes, the area where the paperclip dug into the pit will turn orange, revealing your design.
-
Over the next week, the pit will begin to turn brown, but the carved lines remain orange. Wait out the color change process until you're left with a brown and orange pit. It will look like an ancient artifact!
- The finished pit resembles an Easter Egg, so you may consider incorporating it as a holiday decoration since the seasons coincide. Or, you can twist an eye screw into the top to make a nature-inspired necklace for an Earth Day nature craft.
Read Next5 Minute Spring Bouquet