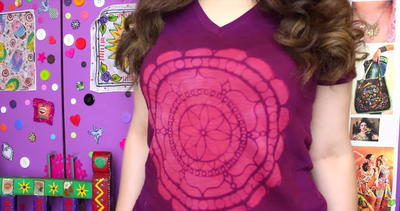
How To Make Your Own T Shirt Design
If you love clothes and collages, then do we have the craft for you. Make a collage and put it on your shirt. It is a one of a kind clothing design from Jacquard Products.

Materials:
- T-shirt (cotton or blend)
- Jacquard Dye-Na-Flow (Sun Yellow, Bright Green, Azure Blue)
- Jacquard Neopaque (Blue)
- Foam stamps (Casablanca, Fern, Butterfly from Plaid Enterprises, Inc.)
- Batik-EZ (from Crafter’s Pick)
- Images to Fabric (from Crafter’s Pick)
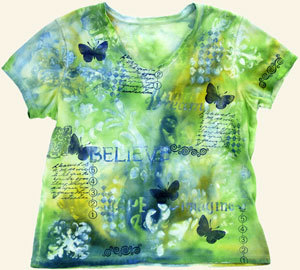
- Stencils (Canterbury Scroll, Dream, Believe, Imagine, Checkerboard Collection from Plaid Enterprises, Inc.)
- Pearl and blue fabric foils (or Jacquard Lumiere)
- Rubber stamps: (Numbers linked from Postmodern Design, Swirl Border from All Night Media, Collage Cube from Christine Adolph-Stampington)
- Iron
- 2" wash brush
- 1" stencil brush
- Freezer paper
- Scissors
- Spray bottle
- Disposable bowls or plates
- Paper towels
- Optional, but helpful: hairdryer, shirt board
Steps:
- Wash and dry t-shirt without using fabric softeners.
- Turn shirt inside out. Tear off then iron wax side of freezer paper to shirt working on one side of the shirt at a time. Cover entire inside of shirt with freezer paper. Trim off excess paper with scissors. Turn shirt right side out.
- Warm Batik-EZ by removing cap then placing in microwave for 10 seconds on medium high or sitting bottle in hot water for 20 minutes.
- Place shirt on flat protected work surface. Place scroll stencil diagonally across front of shirt. Pour batik medium onto a paper plate or bowl. Hold stencil down firmly with one hand while applying batik medium with stencil brush using a circular motion. Reposition stencil randomly onto shirt then apply more batik medium Stencil words randomly onto shirt around scroll.
- Apply batik medium to medallion foam stamp. Press stamp down very firmly on lower left corner of shirt. Apply more medium then stamp in a couple more places avoiding scroll and words.
- Turn checkerboard stencil on the diagonal for a diamond like effect. Place on shirt avoiding previously stenciled or stamped areas. Stencil a few checkerboard squares.
- Allow batik medium to dry then repeat process on back of shirt. Allow back of shirt to dry.
- Randomly brush water across shirt then immediately brush with Sun Yellow Dye-Na-Flow. Keep this random and cloud-like, adding water and misting with water. Remember if you scrub or wet batik resist areas they will soften. Paint both sides of the shirt in this manner. Allow shirt to dry.
- Stencil and stamp shirt with batik resist overlapping some images and placing some to one side as if a shadow. Stencil words and checkboard. Stamp butterfly, fern and medallion. Allow one side of shirt to dry before applying to second side. Allow batik resist medium to completely dry.
- Dampen areas of shirt then brush Bright Green and Azure Blue Dye-Na-Flow over the surface. Mist with water and scrub with water to soften. Repeat on second side of shirt. Allow shirt to dry completely.
- Rinse shirt under running water to remove all resist. On stubborn areas apply a small amount of detergent then rinse very well. When all resist has been removed hang shirt to dry. (Note from Jacquard - Since the paint has not been set, you may experience bleeding and paint washing out.)
- Iron shirt well to set paint and remove any wrinkles.
- Slip a piece of freezer paper inside shirt or place on a shirt board.
- Pour a puddle of Blue Neopaque onto a stack of paper towels to make a pad. Dab rubber stamps into Neopaque then press firmly onto shirt using project photograph as a guide for placement. Alternatively you may choose to use a foam roller to apply Neopaque to rubber stamps. Clean stamps in warm soapy water immediately after use. Allow paint to dry then press with iron.
- (Note from Jacquard - In the next steps the artist used a fabric foil. You could duplicate the effect by stamping with Lumiere)Stencil words and checkerboard pattern on the diagonal using Image Transfer for Fabric. Apply enough medium to show white on shirt surface. Set aside to dry until clear. Clean stencils and brush immediately. Place pearl foil over top portion of stenciling. Press with a medium high iron. Pull back foil to check progress. To add more foil repeat. If foil is not sticking at all increase iron temperature. Iron blue foil to bottom edges of stenciling. Any foil on fabric that is not on the medium will not stick and brush off easily.
- Tips:
- Make sure freezer paper adheres to entire shirt surface. Do not remove paper until done with batik process.
- Work from lightest color to darkest.
- Use full strength Dye-Na-Flow in one quick motion for sharpest lines.
- Add water and slightly scrub in Dye-Na-Flow for softer lines.
- Drop water or alcohol onto painted areas for interesting color variations.
- Remember that areas under resist will retain base color and shirt will appear different after resist is washed out.
- Practice stamping with Neopaque on a fabric scrap to see which application method works best for you.
- Use a hair dryer to speed drying processes.
- Paint plain trims and laces at the same time if desired.
- Make sure freezer paper adheres to entire shirt surface. Do not remove paper until done with batik process.