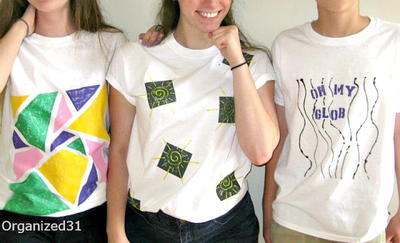
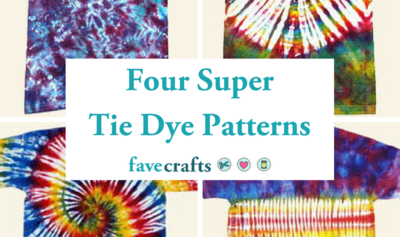
Four Super Tie Dye Patterns
Discover four of our favorite tie dye color combos with this article on tie dye shirt designs.

Create your new favorite shirt with these tie dye patterns from Jacquard Products. These free tie dye folding techniques will show you how to make super funky colorful clothing.
If you've never tie dyed clothes before, start here for a selection of four fantastic designs. Get inspired with techniques that range in difficulty and range in the number of colors used. You'll surely find a pattern for you right here.
Tie Dye Pattern 1:
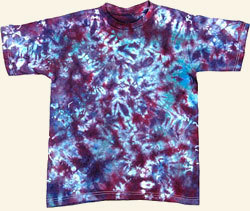
Scrunchy
Materials:
- 100% cotton T-shirt (pre-washed)
- Jacquard Procion MX dyes—Magenta, Bright Blue, Aqua Marine
- Soda Ash
- Plastic bags (I like gallon sized zip-locks)
- Three squirt bottles
- Measuring cups and spoons (use for dyeing only)
- Paper towels
- Kite string
- Dust mask
- Rubber gloves
Instructions:
- Prepare your work area by spreading plastic sheeting over your work table and secure it with some tape.
- Soda Ash Soak. Dissolve 1 cup of soda ash in 1 gallon of water. The soda ash dissolves easiest in hot water, allow the water to cool before soaking the shirt(s). Soak the shirt(s) for at least 20 minutes. (You can leave them in for longer—overnight won’t hurt anything). Remove shirt(s) and wring out. Save the soda ash solution, it can be used again, even after a month or more (actually it will keep indefinitely. You would probably get tired of storing it—the stuff just doesn’t go bad).
Tying
- Place a damp shirt flat on the table, front side up. Starting at the center of the shirt (or in an untied section if you are scrunching in combination with another fold) pinch small (1/2") folds in a random fashion.
- Keep scrunching until the whole shirt is a mass of folds (see how easy this is!)
- Keep them small and tight so that you’ll get the most interesting end result.
- Slide the kite string under the shirt and tie across the center, leaving an extra “tail” for tying off at the end. Rotate and tie across the center again at a 90° angle to the first (like tying a package).
- Continue tying the bundle by pulling the string across the top, placing it about 1" from the previous tie, sliding underneath the bundle and coming up the other side, pulling snug as you go. Tie off with the ‘tail’ left at the beginning. Don’t worry if your tying is a bit random, the most important thing is to catch up all the edges and to keep the scrunching held tightly in place, the cool little “spider webs” of color come from the dye creeping into the tight areas.
Dyeing
- Safety. Any powdered dye can cause a reaction if inhaled. Take the following precautions:
- Wear a mask
- Work in a well-ventilated but draft free area without fans or AC running.
- Wear rubber gloves and old clothes
- Measuring and mixing containers should be used for dyeing only. Do not use for food afterwards.
- Dye Recipe
- 1 cup water
- 2 teaspoons dye (double this amount for darker colors-especially black)
- I like to mix the dyes in a measuring cup. Place the powdered dye in the bottom and add a bit of water to make a paste. Add a drop or two of Synthrapol, if desired, to help disperse the dye (don’t be concerned if you haven’t any Synthrapol—it’s completely optional). Gradually add more water until the entire cup has been used. Pour into a squirt bottle. I like to label the bottle, many colors look similar in solution. Note: Hard water will affect the quality of color you can achieve. For brightest results, use distilled water.
- Applying the dye. This design looks best when you use just a few colors and really let them blend together. Generously apply all three colors randomly over the entire shirt, on both sides. Get the tip of your squirt bottle deep into all of the folds so that you get dye on all parts of the shirt (the fewer white spots the better). Place the dyed shirt in a zip-lock bag and let sit for 24-48 hours in a warm place (but not in direct sunlight).
- Rinse and launder. After 24-48 hours, remove shirt from the zip-lock bag and rinse in cool water. Carefully cut the strings and continue rinsing, gradually increasing the temperature of the water until it is hot. When the water is almost clear you can stop rinsing. Wash the shirt with liquid detergent in a washing machine set for hot wash/cold rinse. Hang or machine dry.
- Simple, yes?! Experiment with different color combinations or just one color—the results can be surprising!
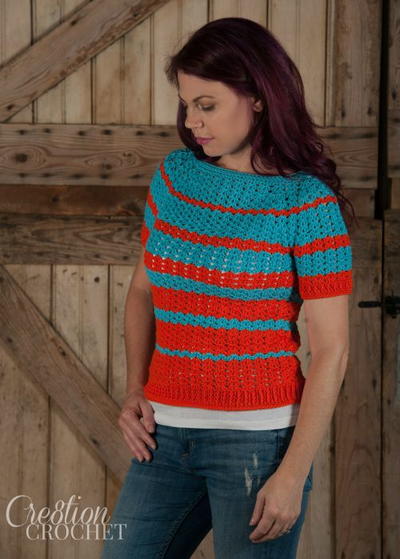
Tie Dye Pattern 2:
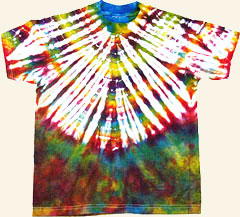
Rounded Yoke
Materials:
- Jacquard Procion MX dyes—Golden Yellow, Magenta, Bright Blue
- 100% cotton T-shirt (pre-washed)
- Soda Ash
- Kite string
- 3 squirt bottles
- Measuring cups and spoons (use for dyeing only)
- Rubber gloves
- Paper towels
- Plastic bags (I like gallon sized zip-locks)
- Dust mask
Instructions:
- Soda Ash Soak: Repeat Steps 1 and 2 as explained for Tie Dye Pattern 1.
Tying
- Lay a damp shirt flat on the table and fold in half lengthwise with the front outside, matching sleeves and shoulders. Smooth out wrinkles. Begin fold at the shoulder seam, between the neck and sleeve by pinching about 1/2" between your thumbs and forefingers.
- Continue pinching pleats, moving toward the center front fold, straightening the pleats as you go. (rounded yoke_pleating)Be sure that the pleats end in the neck and not in the center fold to ensure that the yoke is as round as possible. (You will notice in the photo that some of my pleats end in the center fold. Compare the multi colored shirt to the orange shirt at the end of these instructions. Notice that the orange shirt has a more rounded yoke.)
- Begin the tie by sliding one end of the kite string underneath the folds at the neck. Tie gently, then wrap the string around again (in the same place) and pull snug—the tighter you pull, the more dye will be resisted in that line. Move about 1" toward the sleeve to begin the next wrap, gently on the first round to get the string in place and then tighter. Continue in this fashion until the yoke is as big as you want it and tie off. You may stop at the top of the sleeve for a smaller yoke, or include the sleeves for a larger one. Leave the bottom of the shirt untied.
Dyeing
- Repeat the dyeing safety tips and dye preparation procedure as explained in Steps 8 and 9 in project 1.
- Applying the dye. Starting at the neck of the shirt, apply the dye in the following order, one color in each tied-off band, repeating until you run out of tied-off bands: Bright Blue, Golden Yellow, Magenta. As you apply the dye, work the tip of your squirt bottle well into the folds, the more dye you work into the folds the less white you will have on your finished shirt. Be generous with your dye application to get rich, blended colors. Use paper towels to blot up extra dye as you go, sometimes too many colors blending together will just make mud! When you have finished applying dye to this side, turn the shirt over and repeat the same process on the other side. For the bottom of the shirt, use all three colors squirted on at random and squeezed together to help blending. Place the dyed shirt in a zip-lock bag and let sit for 24-48 hours in a warm place (but not in direct sunlight).
- Rinse and Launder: Continue on with steps 12 and 13 of project 1.
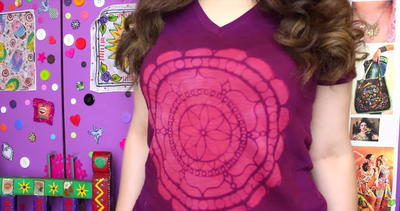
Tie Dye Pattern 3:
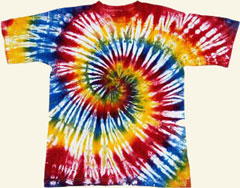
Spiral
Materials:
Same materials as used in tie dye projects 1 and 2.
Instructions:
- Soda Ash Soak: Repeat Steps 1 and 2 as explained for Tie Dye Pattern 1.
Tying
- Place a damp shirt flat on the table, front side up. Smooth out wrinkles, align seams at sides and shoulders. Decide where you want the spiral to begin. Here’s an opportunity to be creative. You could center the spiral on the front of the shirt, but what about starting at the shoulder, or off to one side? When your mind is made up there are two methods for making a spiral. I’ll go through them one at a time. First the hand method: pinch a bit of fabric between your fingers and give your wrist a twist. Lift your hand and pinch that bit again, giving it another turn.
- Continue in this fashion, straightening the folds as you go. The folds should be about 1/2" high, so if you have bigger ones, press a finger in the center of each fold to split into two.
- When your spiral gets larger it will tend to pile up in the middle. To prevent this, lay your hand flat on the shirt and continue turning, straightening and splitting folds.
- Another method begins the spiral by using a dowel (1/2" x 12" long). Place one end of the dowel where you want the center of the spiral. Press down firmly and turn the dowel. You will see the pleats begin to form. Continue turning, straightening, and splitting folds until you have a nice cinnamon bun shape at the end of the dowel. This design looks best when the folds are even and plentiful.
- Slide the kite string under the shirt and tie across the center, leaving an extra "tail" for tying off at the end. (If you have used a dowel for this fold, remove it before tying). Rotate and tie across the center again at a 90° angle to the first (like tying a package). The spiral is now divided into four parts by the string.
- Continue tying the bundle by pulling the string across the top, placing it about 1" from the previous tie, sliding underneath the bundle and coming up the other side, pulling snug as you go. Tie off with the “tail” left at the beginning.The finished bundle should be divided fairly evenly by the string.
- Repeat the dyeing safety tips and dye preparation procedure as explained in Steps 8 and 9 in project 1.
- Applying the dye. Just a couple of pointers for dye application; much of the beauty of tie dye comes from the blending of the different colors of dye. Consider this when applying the dyes. I only used three colors here and they will all blend well together; Bright Blue with Magenta will create purple, Bright Blue with Golden Yellow will make green, Golden Yellow with Magenta will make orange. Whatever order I apply these in I will get great colors. If you choose another combination of colors you may have some that won’t look great blended, Magenta with a green for example. If you are uncertain, test a bit on a scrap of fabric or an old t-shirt you don’t care about. Be bold in these experiments. Sometimes I’ve been pleasantly surprised by color combinations.
- For this shirt, imagine slices of pie, each slice will be a different color. Applying the dyes in these pie shapes make the colors spiral around the center. I used three colors so I imagined six slices, starting with Golden Yellow, then Bright Blue, then Magenta, and repeating that same order to complete the circle. Do not bring all of the colors to the very center or they will all blend together and you’ll have a brownish blob at the center of your spiral. As you apply the dye, work the tip of your squirt bottle well into the folds. Use paper towels to blot up extra dye as you go, otherwise it will be absorbed by the shirt and spoil your design. When you have finished applying dye to this side, turn the shirt over and repeat the same process on the other side. Place the dyed shirt in a zip-lock bag and let sit for 24-48 hours in a warm place (but not in direct sunlight).
- Squirt Bright Blue on the untied ends of the shirt close to the Golden Yellow tied section. Allow the blue to work on top of the yellow a bit, it’s what gives that nice green accent at the edges. Randomly squirt Bright Blue and Magenta over the top and bottom untied ends of the shirt. Apply a generous amount of dye so that these two colors blend to give a lovely purple. I also gave the ends of the shirt a little squeeze to help work the colors together.
- Turn the shirt over and apply the colors in the same way on the back.
- Place dyed shirt in a zip-lock bag and let sit for 24-48 hrs in a warm place (but not in direct sunlight).
- Rinse and Launder: Continue on with steps 12 and 13 of project 1.
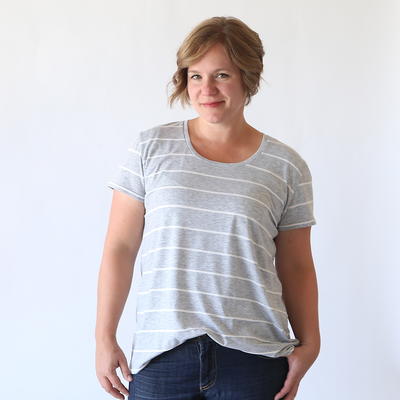
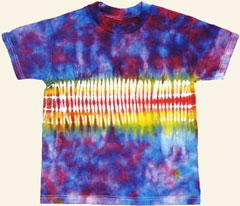
Tie Dye Pattern 4:
Horizontal Bands
Materials:
Same Materials as used in tie dye projects 1, 2 and 3.
Instructions:
- Soda Ash Soak: Repeat Steps 1 and 2 as explained for Tie Dye Pattern 1.
- Tying: Lay a damp shirt flat on the table, I usually have the front side up. Smooth out wrinkles and align seams at sides and shoulders. Begin fold under one sleeve by pinching about 1/2" between your thumbs and forefingers.
- Continue pinching folds across the shirt, straighten the pleats as you go by pulling at the ends as shown.
- When you have reached the opposite side, slide one end of the kite string under the folds, about 4" below the underarm, tie gently.
- Wrap string around folds in this same spot. Do this a couple of times, pulling a little more snugly each time. The tighter you tie, the more that spot will resist the dye. Move up(toward the armpit) about 1" to begin a new wrap, gently on the first go ‘round then tighter on the next two.
- Move up another 1" and wrap again. Move up an 1" one more time and wrap. What you have now is three tied off areas ready for you to apply color. Leave the top and bottom of the shirt untied.
- Repeat the dyeing safety tips and dye preparation procedure as explained in Steps 8 and 9 in project 1.
- Applying the dye. Be generous with your dye application to get rich blended colors. Keep paper towels handy to mop up extra dye as you go, otherwise your shirt will soak up the extra dye and you’ll end up with colors you weren’t expecting!
- Apply Magenta in the center section of the tied band. Apply Golden Yellow in each section on either side of the Magenta. Let the colors bleed into each other a bit to create bits of orange in the finished color band. Work the tip of the squirt bottle into the folds to get the dye inside--the more dye you get in there, the less white you will have in your finished piece. My example is tied rather tight and I didn’t work the tip of the bottle very deeply into the folds, so there is quite a bit of white showing.
- Squirt Bright Blue on the untied ends of the shirt close to the Golden Yellow tied section. Allow the blue to work on top of the yellow a bit, it’s what gives that nice green accent at the edges. Randomly squirt Bright Blue and Magenta over the top and bottom untied ends of the shirt. Apply a generous amount of dye so that these two colors blend to give a lovely purple. I also gave the ends of the shirt a little squeeze to help work the colors together.
- Turn the shirt over and apply the colors in the same way on the back.
- Place dyed shirt in a zip-lock bag and let sit for 24-48 hrs in a warm place (but not in direct sunlight).
- Rinse and Launder: Continue on with steps 12 and 13 of project 1.
- Wear your FABULOUS tie dye in peace and good health!! (Where IS that music festival?!)
Your Recently Viewed Projects
Thanks for your comment. Don't forget to share!
ginny4theredsox
May 24, 2016
FaveCraftsTieDye Great colors. Love the scrunchie, spiral and horizontal band t-shirts. These would be great for pillow cases, bead sheets and blankets for a nice bed set.
ladyredhawk
Apr 06, 2010
I love the way you did the shirts. I can't wait to try to make one myself. ty
Report Inappropriate Comment
Are you sure you would like to report this comment? It will be flagged for our moderators to take action.
Thank you for taking the time to improve the content on our site.