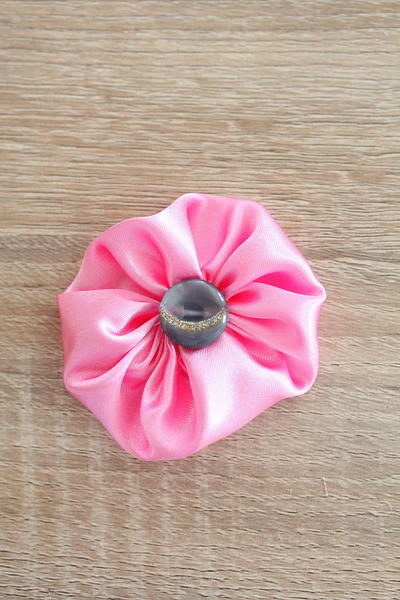
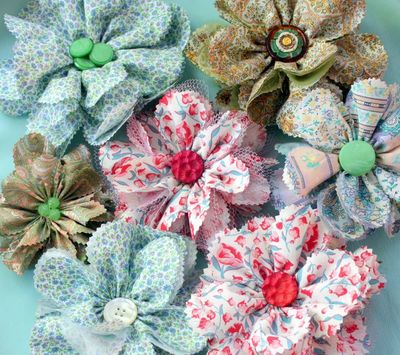
Totally Tulle DIY Fabric Flowers

Tulle and fabric work together to form one of the pretty DIY craft projects around. Make some Totally Tulle DIY Fabric Flowers, throw a pin on the back, and wear them with your favorite outfit for a truly fashionable look. This is a great excuse to use up fabric scraps and clean out your stash. You don't even need a sewing machine to complete this project - simply use a needle and thread to bring your flower to life. A fun embellishment can help your flowers stick out, so be sure to add some buttons to the center. Learn how to make fabric flowers and discover why it's such a popular craft project. You'll want to wear one with every outfit.
Primary TechniqueSewing

SeasonSpring
Sewn byHand
Materials:
- Cotton fabric
- Tulle or organza fabric
- Needle and thread (or sewing machine)
- Scissors
- Pinking shears
- Pins
- Felt
- Pinbacks
- Hot glue
Instructions:
- Prepare your cotton fabric by cutting two strips of equal length and height. If you want your flower to have large petals, you will need to cut longer strips of fabric so the proportion is pleasing. Smaller flowers will require less fabric. For example, a medium size flower like the example shown here was created with two strips of fabric, four inches tall and 48 inches long. Cut two strips of netting or tulle the same length and height as your cotton fabric.
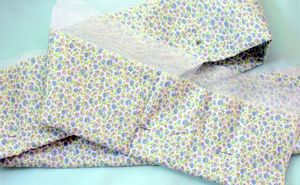
- Layer your fabric and tulle strips on top of each other and pin together at the bottom, right sides of the patterned fabric facing the same way. You can add the tulle in a variety of ways. You can double in up and sandwich the double tulle layer in between the two cotton fabric strips; you can layer the tulle beginning with a single tulle layer on the bottom; or layer the tulle and cotton fabric with the cotton fabric on the botton. Each will give a slightly different look.
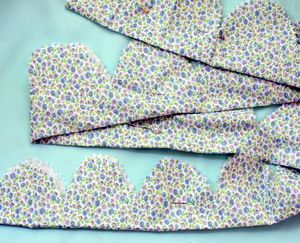
- With the pinking shears, cut petal shapes of slightly descending height in the fabric. I did this freehand, but you might want to draw them first with a pen. You can see below where the petals are smaller at one end of the fabric (the bottom) than the other.
- Next, knot your thread at one end and sew a running stitch across the bottom of the layered fabric, gathering as you go. This could be done on a sewing machine, using a basting stitch.
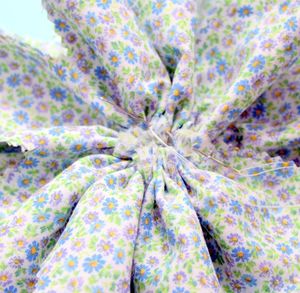
- At the end, knot your thread. Arrange the gathered fabric in a pleasing manner so the larger petals are beneath the smaller petals. Secure with the needle and thread once you are happy with the arrangement.

- Fluff up the petals by separating them.
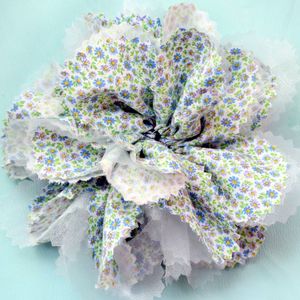
- Add buttons or beads to the center with your thread. If the beads move around too much, you can secure them with hot glue.

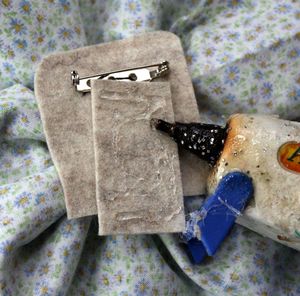
- To make a brooch, cut a piece of felt and sew a pinback two it. Use hot glue to attach it to the back of your flower.
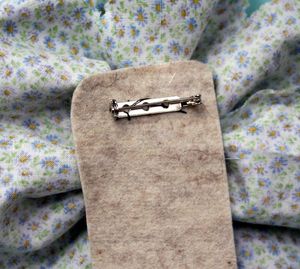
- I like to cover up the back of the pin with a strip of felt.
Read NextHomemade Jar Opener From Jeans
Your Recently Viewed Projects
Thanks for your comment. Don't forget to share!
Sigo
Feb 18, 2018
These flowers are so pretty and look like they are very easy to make. I am saving this project for the future. I like sewing totes and I could see such a flower adding a final decorative touch to one.
Weberme
Aug 03, 2016
These tulle and fabric flowers are so cute and a nice tutorial to show how to make them. These can be used for many different things hairbows,to use as an accent on a dress, scrapbooking or to decorate just about anything.I like that you can choose the size and fabric you want. No more trying to find just the right flower at shops just grab your leftover fabric and tulle or purchase and make your own. Anyone make one yet?
Report Inappropriate Comment
Are you sure you would like to report this comment? It will be flagged for our moderators to take action.
Thank you for taking the time to improve the content on our site.