Sewing Half Square Triangles Tutorial

Half square triangles are a gorgeous sewing pattern that you can use in a numerous amount of projects. This Sewing Half Square Triangles Tutorial will show you a full proof method that will have you making the perfect pattern in no time. Whether you are an avid sewer or a quilter, the half square triangle pattern can come in handy for a ton of different projects. This is a super easy sewing pattern that you can memorize like the back of your hand and make perfect every time with the help of this video tutorial.
Time to CompleteIn an evening
Primary TechniqueSewing

Project TypeLearn a Technique
Materials List
- Cut fabric
- Pins
- Rotary cutter
- Marking utensil
- Ruler
- Cutting matt
- Sewing machine
- Ironing board
- Iron
Sewing Half Square Triangles Tutorial
Half Square Triangle Pattern Instructions
-
Lay your two pieces of fabric on top of each other right sides together.
-
Using your ruler, makr a line from on corner to the next. Really focus on reall making that mark corner to corner.
Tip: For extra measure, you can place one pin on each side through your fabrics to help hold them together. Be sure to palce the pins far away from your line. -
Sew a scant quarter of an inch on either side of the line.
-
Sew on either side of the line you made a scant quareter of an inch. Pull your fabric out when you reach the end, rotate it, and repeat.
Pro Tip: take a piece of washi tape, and using a tape measure, measure exactly where a quarter of an inch is on your sewing machine. You can usi this as a guide as you run your fabric along the sewing machine. -
You can remove your pins now that you have finished sewing. You are going to want to use your ruler and your rotary cutter to cut down the line that you previously drew.
-
Set your seams by giving them a quick run over with your iron. You now want to press your seams to one side.
-
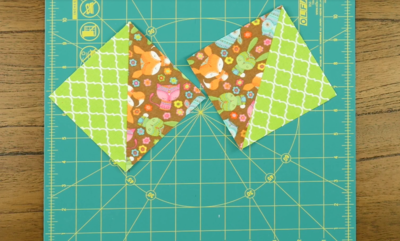
Line up your fabric and ruler so that they are both at a 45 degree mark. Then, using your rotary cutter trip the edges that are sticking out from your ruler.
-
Repeat step 7 with the other side of your square, and your other square.
-
Now you have a perfectly pointed half square triangle!
Read Next10 Minutes Sew Cat Bed
Your Recently Viewed Projects
Thanks for your comment. Don't forget to share!
Weberme
Feb 23, 2017
I am so glad I came across this video about making half squares. I am thinking about making a quilt and I like this look. I never realized the importance of making the half square perfect until I seen Chris Hammond explaining how to square it so it will match up to the others in block matching up. I do not use my rotary cutter because I have yet to get a cutting mat and I am glad I did not because I can see this one is the one I am getting and I love how she uses the second one to mark the perfect line and her suggestion about using the 2 pins to keep the fabric from turning is great. If you are new to this watch this video because it has so much great information.
Report Inappropriate Comment
Are you sure you would like to report this comment? It will be flagged for our moderators to take action.
Thank you for taking the time to improve the content on our site.