Money-Saving DIY Keychain
When you find that the school year is coming upon you, making a keychain is a great way to save money on those little school "essentials" that your kids beg for. This wonderful Money-Saving DIY Keychain will put a grin on everyone's face when they see your child's little four-legged friend follow him or her to school. No matter what time of year it is, this keychain is the perfect companion for a backpack. Learn how to make a keychain that you can share with all of the kids in the neighborhood.
Primary TechniqueSewing

Sewn byHand
Materials:
- Template sheet
- Cream felt, approx. 3” x 6” (5 ½ x 15 cm)
- Tan felt, approx. 7 ½” x 8 ½” (19 x 22cm)
- Small piece of dark brown felt
- Matching sewing thread or embroidery floss (thread)
- Stuffing
- 4” (10cm) piece of brown 5/8” (15mm) ribbon
- 1 small key ring of your choice
- Needles, pins and small sharp scissors. (Embroidery or scrapbooking scissors work great for cutting out small felt shapes.)
- Permanent markers, disappearing fabric pen or chalk to trace pattern (Optional. You can also pin pattern to felt or just hold it while you cut around it.)
Instructions:
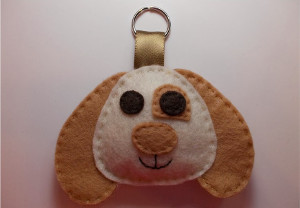
- Use template provided to cut out pieces. Cut two head shapes from cream, four tan ears, one tan nose and eye patch and two dark brown eyes.
- Sew one of the eyes onto the eye patch with a running stitch in matching thread.

- Sew nose, eye patch and other eye in position with a running stitch in matching thread.
- Embroider mouth under nose with a backstitch in dark thread.

- Sandwich two of the ear pieces together, then stitch together with a running stitch in matching thread. Repeat with other two ear pieces. If you need to, trim around edges to make sure they have a clean edge and match up well.

- Loop ribbon through key ring. You can use a small piece of tape to hold the ribbon ends together if needed.
- Sandwich the two head pieces together and place the end of the ribbon between them. Leave approx. 1” (2.5cm) of ribbon sticking out. Pin in place. Now slip ears between the head pieces and pin in place. Sew ¾ of the way around, through all thicknesses, with a running stitch in color to match head. Remove pins as you go.

- Stuff head and sew the remainder of head together. Now add keys or attach to your favorite child’s backpack.

Notes:
- You can also make it in any color you want.
Read NextFabric Necklace From Scraps
Your Recently Viewed Projects
Thanks for your comment. Don't forget to share!
JustinWallen79 237 2088
Aug 28, 2014
It says, "...attach to your favorite child's backpack." Lol! How do I determine which of my children is the favorite? Teasing.... Super cute! :)
FaveCrafts Editor JL
Aug 29, 2014
Ha! Thanks for pointing this out - we will edit the instructions. - Julia from FaveCrafts
Report Inappropriate Comment
Are you sure you would like to report this comment? It will be flagged for our moderators to take action.
Thank you for taking the time to improve the content on our site.