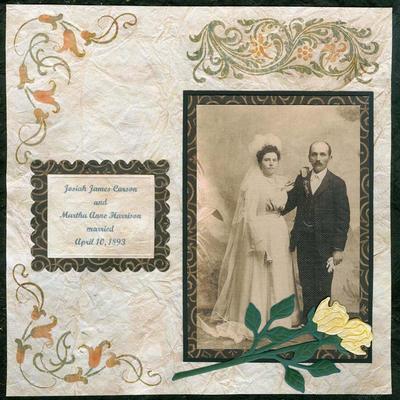
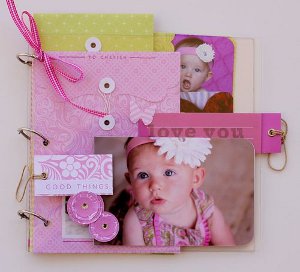
Love You, Baby Girl
Celebrate a new addition to the family with this Love You, Baby Girl scrapbooking layout from Hampton Art. This same design could easily be adapted for a new baby boy, or even a new dog! Remember this monumental day in your life with this easy layout design.
Materials:
Ditto Supplies
- DT0028 Solid Tags
- DT0029 Floral Tags
- DT0041 Pink/Orange Felt with Buttons
- DT0019 5" x 7" Bracket Envelopes & Pockets
- DT0018 4 1/2" x 9" Scalloped Straight Envelopes
- DT0021 4" x 6" Photo Pockets
Stackable Inkers
- DT0051 Yellow/Green
- DT0050 Pink/Orange
- Scallop Straight Envelopes
- Envelopes and Pockets
- Felt with Buttons
- Mix and Match stamps and inkers
Instructions:
- For the covers of the albums I used 8x8 clear covers. Start by lining up all of your products how you would like it inside the album and then punch your holes. Make sure everything is not lined up perfectly, you want to be able to see lots of layers.
- Next I added a 4x6 photo to the front and then matched one on the back, so that they hid the adhesive used on the backsides.
- For the two flowers I just punched circles out of one of the envelopes and cut each layer a bit smaller than the last. Use as many layers as you would like. For the center I used a gem.
- And last on the cover I added a tag and just trimmed about 2' from the end. I adhered the cut piece to the back side again to cover the adhesive.
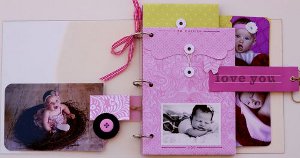
- To finish off the inside of the album cover I just added a felted button.
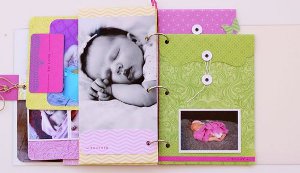
- For the first page I used an envelope and adhered a wallet size photo
- I adhered a tag, and punched a butterfly to adhere to the tag.
- To finish the look I stamped on the bottom of the photo, onto the tag, and just at the top of the envelope. I used a matching pink ink from the inkers, just a bit darker than the envelope.

- On the backside I added a 4x6 photo to the center of the envelope, and corner rounded all of the edges.
- I trimmed 2' off of a lime tag and adhered to the backside of the pink tag.
- And then I stamped on the top and bottom of the photo.
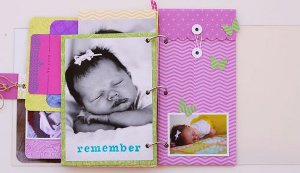
- Here I used the scallop straight envelope. I kept it very simple by adding a wallet photo to the bottom, I punched a butterfly out of another envelope and then stamped on the bottom edge of the photo this time in a turquoise inker.
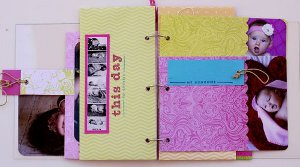
- This is a trick that I love to use!!! When I print my photos at COSTCO I get little images of what I have printed, they are a little bigger when you print 5x7's. SO here I cut them out and mounted 7 onto cardstock and adhered to the envelope. STamp a large and a small image vertical along the photos edge.
- For these next two I used photo pockets. I made sure to place them top and bottom so that you can see a bit of each when the pages are turned.
- A 4x6 photo fits perfectly edge to edge. Adhere to the inside flap of the pocket and flush to the right side.
- I added a tag to fit and then stamped on the tag.
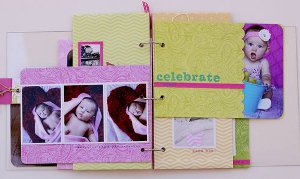
- Here I used 3 wallet photos and stamped along the bottom of the photos
- I simply stamped an image and then added a strip of cardstock underneath that image
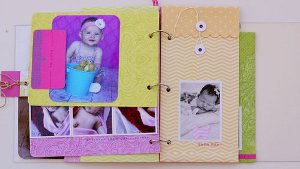
- I trimmed a photo to fit the backside and rounded the edges.
- Then stamp an image onto cardstock and cut the image out, Adhere layering over your photo.
- A simple envelope here with a wallet photo and a stamped image on the bottom.
- I used a 5x7 photo here and trimmed flush edge to edge. I added some of the pink envelope (that I have been punching the butterflies out of) to the bottom and stamped an image.
- Simply an envelope with a wallet photo and a strip of cardstock. Are you seeing how quick and easy this project can come together. And you have so many envelopes to store things, more photos, letters, journaling, there is no end as to what you can put inside.
- A 5x7 and this time the image is stamped onto the photo itself. Just make sure it dries before you put it into the album.
- Again just an envelope with a wallet photo. This time I added a few butterflies to have a whimsical feel.
Read NextFamily Scrapbook Layout