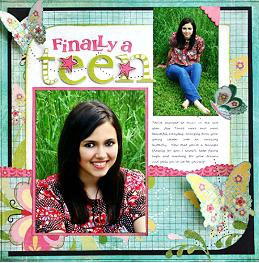
"Finally a Teen" Scrapbook Page
Commemorate that special coming-of-age with this pretty scrapbook layout. It's quick and easy to create and will keep your memory safe!
Materials:
- 2 Sheets BasicGrey Urban Prairie Monarch
- BasicGrey Urban Prairie Petticoat
- BasicGrey Urban Prairie Morning Glory
- BasicGrey Urban Prairie Milk
- BasicGrey Urban Prairie Bluebird
- BasicGrey Urban Prairie Kettle
- BasicGrey Urban Prairie Alpha stickers
- BasicGrey Urban Prairie Chip sticker Alphas
- Photos
- Black Pen
- Glue
- Craft Knife
- Scissors
- White Pen
- Cutting Mat
Instructions:
- Trim barcode strip off of the Bluebird paper.
- Cut Kettle Paper down to 11”x11”.
- Cut one sheet of the Monarch paper to 11 1/4” x 8” round the top left hand corner.
- Take the bottom half of the Monarch paper and cut to 3”x 11 1/2” and round the bottom right had corner.
- Cut Milk sheet to 7”x 9 1/4” .
- Cut Morning Glory paper to 5 1/4” x 6 3/4”.
- Cut Petticoat into thin strip about 11 1/2”x1”.
- Take second sheet of the Monarch paper, using a cutting mat and craft knife with a sharp blade. Carefully cut out the yellow, pink, and blue butterfly with a small edge.
- Apply the Kettle paper on top of the Bluebird paper leaving about a 1/2” edge.
- Adhere the 11 1/4" sheet of Monarch paper to the top portion of the black sheet.
- Adhere the 7” sheet of the Milk paper 1” inside the Monarch paper.
- With scalloped scissors, cut Petticoat paper in a wave. Apply to the bottom portion of the Milk paper.
- Adhere the 3” Monarch paper to the bottom portion on the bottom half of the Petticoat paper.
- Adhere you 5 x 6 1/2” photo on to the Morning Glory paper.
- Place in the bottom left portion of the page.
- Adhere the other photo to the upper right hand corner.
- Add the chip alpha’s above the large picture.
- Add the stars on top of two of the letters. Use a white pen to add detail to the T and the N.
- Add the alpha stickers just above the chip alphas.
- Take the cut out butterflies and fold the two whole butterflies in half. Add adhesive to the middle center and adhere to the top of the identical yellow butterfly.
- Adhere the other butterflies where you desire.
- Use a black pen to dot the page with lines.
Read NextLove You Forever Layout