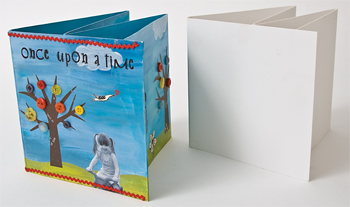
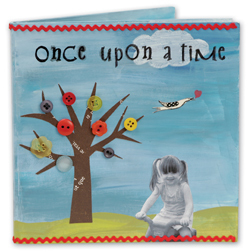
Homemade Story Book for Kids
With a little paint, small buttons and photos of your child, make your own story book with him or her as the main character. You can paint and embellish the pages of this adventure book together. Your child will love it! Project from C&T Publishing.

Materials:
Embellishments
- Buttons in various colors: red, yellow, grey, blue
- Red rickrack
Acrylic paints
- Medium blue
- White
- Teal
- Medium/dark blue
- Matte finish clear gloss
Paper
- Brown for the tree
- Black and white paper with birds, flowers, and other nature images (Optional: draw your own images with ink on white paper to photocopy and cut out)
Other
- Pens
- Black fine or medium-point Sharpie
- White medium or wide-tip gel pen
- Glitter gel pen
- Black and white photos of your child
- Paint brushes or sponge applicators
- Ready-to-Go!® Blank Board Book 6″ x 6″ Accordion, available at papercraft stores or www.createandtreasure.com
- Zip Dry adhesive
Instructions:
- Paint the blank board book on all sides with a brush or sponge applicator, using blues and whites for the sky and greens for the land. Paint the sky first, layering the colors in this order:
- Teal
- Medium/light blue
- White and dark blue.
- Use a horizontal motion when you paint to blend the colors and create a variegated effect.
- When the “sky” has dried, use the green paints to paint the “land.”
- Apply a coat of clear gloss over the whole surface.
- Draw in the clouds with the white gel pen. When dry, embellish their top edges with sparkle gel pen.
- Cut out and adhere paper shapes to the painted background:
- Black-and-white photos of your child
- Brown paper tree (Optional: use a die-cut tree)
- Black-and-white nature shapes: birds, flowers, butterflies, and any other shapes you’d like to add
- Glue buttons on the tree to resemble leaves or fruit.
- Use a black Sharpie to write “Once Upon a Time” on the front cover. Continue your story on the inside, using words that will be meaningful to your child.
- Adhere red rickrack to the top and bottom edges of the front and back of the book.
Read NextDIY Colored Pencils
Your Recently Viewed Projects
Thanks for your comment. Don't forget to share!
snuggles61268
Apr 14, 2011
What a good idea! This would make a unique gift idea that would be a special gift from grandma and grandpa, thanks so much for the idea.
Report Inappropriate Comment
Are you sure you would like to report this comment? It will be flagged for our moderators to take action.
Thank you for taking the time to improve the content on our site.