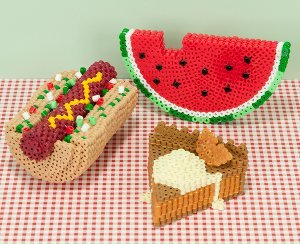
3D Beaded Picnic Favorites
There won't be any bugs trying to take these picnic favorites! Perler beads projects, like this 3D Beaded Picnic Favorites idea from Perler, are great for kids and adults. They're fun and easy to make and are great projects for the whole family to do together.

Materials:
# Beads Needed for the Hot Dog:
- Red - 8
- Cranapple - 544
- Yellow - 21
- Tan - 1778
- Pastel Green - 8
- Dark Green - 30
- White - 8
# Beads Needed for the Watermelon:
- Red - 558
- Pastel Green - 76
- Dark Green - 96
- Black - 26
- White - 160
# Beads Needed for the Pie a la Mode:
- Gold - 617
- Light Brown - 362
- Creme - 143
NOTE: You will 2 bags of tan beads, and 1 bag of the other colors.
Instructions:
- Download the 3-D Picnic Faves Project Pattern. Use the small circle, large circle, and large hexagon pegboards for your project. If you’re using a clear pegboard, slide the actual-size pattern underneath it. Place all the beads for the design.
- Ask an adult to fuse your designs. Place your pegboard on a flat, heat-safe surface. Set a household iron to the medium setting. Place ironing paper over the pegboard. In a circular motion, begin to iron the project. When ironed properly, the beads will still have an open center. Let the design cool.
-
Remove the paper and bead design from the pegboard. Flip the design over to expose the non-fused side. Repeat step two. Let cool completely. Note: Beads need heat for about 10-20 seconds per side to fuse evenly. Depending on the size of the project, additional heating time may be required. Since you are working on a 3-D project, DO NOT OVER-IRON the beads as it will make the centers of the beads close and can make assembly more challenging.
- Once the design is cool, peel off the ironing paper. Lift your design from the pegboard; flip the design over and repeat step #2. Your pegboards and ironing paper are reusable.
- Assembly: Hot Dog: Align then glue the Bun #1 layers together. Aligning the top rows, add a #2 piece on each end, then a #3 piece.
- Glue the Hotdog #1 layers together in a similar manner, rotating the layers a half bead to create a zigzag of ”mustard” with the yellow bead. Add four #2 pieces on each end, then a #3 piece.
- Glue the hotdog onto the bun, then glue loose beads of white, red, pastel green, and dark green to look like onions and relish.
- Watermelon: Aligning the “bite”, glue the two #1 pieces together, then glue a #2 piece on each side.
- Pie a la Mode: Glue the filling layers onto the base. Glue the top crust onto the pie slice, then the crust edge in place. Standing the trim piece on its side, glue it to the crust edge.
- Stack and glue the ice cream pieces from large to small, then glue to the top of the pie. Glue the fruit slice in place.
Read Next10 Rainy Day Crafts for Grey Skies
Your Recently Viewed Projects
Thanks for your comment. Don't forget to share!
Delphine Bryant
Jul 13, 2018
Are these not the cuties beaded projects that you have ever seen? I like the perler beads projects that laid flat but this takes it to the next level. I have no practical need for any of these, but that does not matter. I plan to make them anyway. Fun stuff here.
Morehouse17
Jun 30, 2018
I love, love this project. I can remember making some of these with my boys when they were young. I still have a Christmas ornament that we made. They would have loved the 3-d versions.
Report Inappropriate Comment
Are you sure you would like to report this comment? It will be flagged for our moderators to take action.
Thank you for taking the time to improve the content on our site.