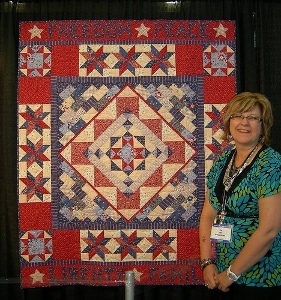
Valor Quilt
The valor quilt from Pat Sloan is a patriotic pattern perfect for the 4th of July. Use these printable quilt patterns to make your own quilt with the words "freedom," "peace," "liberty," and "family" stitched on it.

Materials:
*all fabrics from P&B Textiles Tribute line by Pat Sloan
- Main floral-navy 3/8 yd (TRIB 670 B)
- Main floral-cream 1/8 yd (TRIB 670 E)
- Main floral-lt. blue 3/8 yd (TRIB 670 LB)
- Paisley-navy 1/4 yd (TRIB 672 N)
- Paisley-red 5/8 yd (TRIB 672 R)
- Dots-cream 1/8 yd (TRIB 673 E)
- Dots-blue 1/8 yd (TRIB 673 LB)
- Stripe-cream 1/4 yd (TRIB 674 E)
- Stripe-navy 1/2 yd (TRIB 674 N)
- Shooting stars-cream 5/8 yd (TRIB 675 E)
- Shooting stars-navy 2 yds (TRIB 675 N)
- Plaid 1/3 yd (TRIB 676 E)
- Small stars-cream 3/4 yd (TRIB 677 E)
- Small stars-red 15/8 yd (TRIB 677 R)
- BACKING (any Tribute fabric) 4 yds
- FUSIBLE WEB 1 3/4 yds
- Basic sewing and quilting supplies
- Batting
- Patterns
Size: 54" x 66"
Instructions:
Cutting - Center Medallion
- Main floral-lt. blue, cut: (1) 4 1/2" square
- Dots-blue, cut: (6) 3" squares
- Small stars-cream, cut:
- (8) 2 1/2" squares
- (8) 3" squares
- (5) 5" squares
- Small stars-red, cut:
- (4) 3" squares
- (2) 1" x 24 1/2" strips
- (2) 1" x 25 1/2" strips
- Shooting stars-navy, cut: (10) 3" squares
- Stripe-cream, cut: (4) 2 1/2" x 12 1/2" strips
- Shooting stars-cream, cut: (5) 5" squares
- Paisley-red, cut: (10) 5" squares
Assembly - Center Medallion
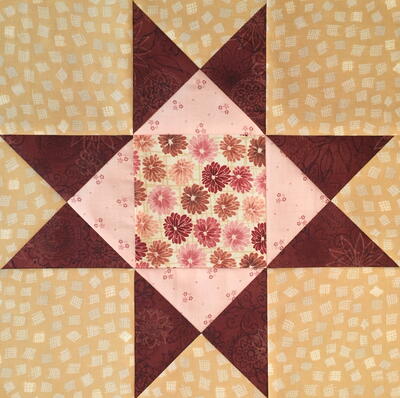
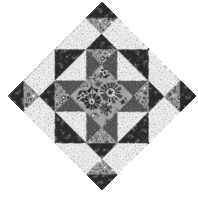
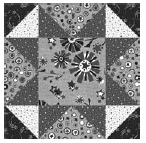
Refer to the diagram and the quilt photo as needed for placement guidance.
- To make half-square-triangle (HST) units, pair a Small star-red square and a Small star-cream 3" square, right sides together, and draw a line from corner to corner on the wrong side of the cream square. Sew 1/4" from each side of the marked line. Cut the squares apart to make two HST units and press the seam allowances toward the red squares. Make a total of 8 units and trim them to 2 1/2" square.
- Repeat step 1 to make the following HST units. Pair Shooting stars-navy and Dots-blue 3" squares to make 12 units; trim to 2 1/2" square. Pair Shooting stars-navy and Small stars-cream 3" squares to make 8 units; trim to 2 1/2" square. Pair Paisley-red and Small star-cream 5" squares; and Paisley-red and Shooting star-cream 5" squares to make 10 units each (20 total pairs): trim to 4 1/2" square.
- Join 4 navy/blue HST units, 8 red star/cream HST units, and 1 lt. blue floral square to make the center
star block.
- Join 2 navy/cream HST units and 2 Small starscream 2 1/2" squares to make a side unit. Make 4 units. Join a side unit to opposite sides of the center star block. Sew a navy/blue HST unit to the ends of the two remaining side units and then sew the units to the center block.
- Sew a Stripe-cream strip to opposite sides of the block. Sew a navy/blue HST unit to the ends of the two remaining Stripe-cream strips and then sew them to the center block.
- Join 4 Paisley-red/cream HST units as shown in the photo to make a row. Make 4 rows. Sew a row to opposite sides of the block. Sew a paisley HST unit to the ends of the two remaining rows and then sew them to the center block.
- Using the Small stars-red strips, sew the shorter strips to opposite sides of the center unit and then sew the longer strips to the two remaining sides.
Cutting - Bricks Section
- Shooting stars-navy, cut:
- (1) 7” square; cut twice diagonally to make 4 corner triangles
- (20) 3 1/2" squares; cut each once diagonally to make 40 setting triangles
- Stripe-navy, cut:
- (4) 2 1/2" x 4 1/2" rectangles
- (2) 2" x 36 1/2" strips
- (2) 2" x 39 1/2" strips
- Dots-blue, cut: (4) 2 1/2" x 4 1/2" rectangles
- Main floral-navy, cut: (8) 2 1/2" x 4 1/2" rectangles
- Main floral-cream, cut: (4) 2 1/2" x 4 1/2" rectangles
- Stripe-cream, cut: (4) 2 1/2" x 4 1/2" rectangles
- Paisley-navy, cut: (8) 2 1/2" x 4 1/2" rectangles
- Plaid, cut: (8) 2 1/2" x 4 1/2" rectangles
- Small stars-cream, cut: (8) 2 1/2" x 4 1/2" rectangles
- Dots-cream, cut: (4) 2 1/2" x 4 1/2" rectangles
- Main floral-lt. blue, cut: (8) 2 1/2" x 4 1/2" rectangles
Assembly - Bricks Section
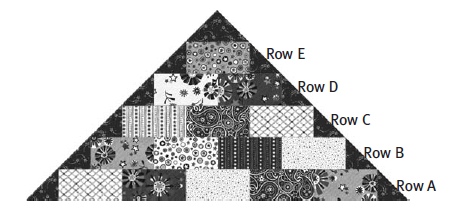
- Join 5 rectangles as shown in the quilt photo. Sew a navy setting triangle to each end to complete the row A.
- Join 4 rectangles and 2 navy triangles to make row B. Join 3 rectangles and 2 navy triangles to make row C. Join 2 rectangles and 2 navy triangles to make row D. Sew navy triangles to the ends of 1 rectangle to make row E.
- Centering a rectangle with the seam line on the adjacent row, join the rows starting with rows A and B, and then adding rows C, D, and E. Sew a navy corner triangle to row E to complete the bricks unit.
- Repeat steps 8, 9, and 10 to make a total of 4 bricks units.
- Mark the center on each side of the center medallion. Mark the center of the long side of each bricks unit. Sew a bricks unit to opposite sides of the center medallion matching the center marks. Center and sew bricks units to the remaining two sides of the center medallion. Trim and square up the piece to measure 36 1/2" square.
- Using the Stripe-navy strips, sew the shorter strips to opposite sides of the piece and then sew the longer strips to the two remaining sides. Trim the piece to measure 38 1/2" square.
Cutting - Lemoyne Stars
- Small stars-cream and Shooting stars-cream, cut:
- (24) 2 1/2" squares of each
- (24) 3" squares of each
- Shooting stars-navy, Paisley-red, Main floral-navy and Small stars-red, cut: (24) 3" squares of each
Assembly - Lemoyne Stars
- Repeat step 1 to make the following HST units. Pair Shooting star-navy and Small star-cream squares; Shooting star-cream and Paisley-red squares; Main floral-navy and Shooting star-cream squares; and Small star-red and Small star-cream squares to make 24 units each (96 pairs total): trim each to 2 1/2" square. Pair Shooting star-navy and Small star-red squares; and Main floral-navy floral and Paisley-red squares to make 48 units each (96 total pairs): trim each to 2 1/2" square.
- Lay out out the HST units in four rows of four units each as shown. Join the units in rows and then join the rows to make the Lemoyne Star block. Make 12 blocks.
Cutting - Corner Stars
- Main floral-lt. blue, cut:
- (4) 4 1/2" squares
- (16) 3" squares
- Shooting stars-navy and Small stars-cream, cut: (8) 3" squares of each
- Small stars-red, cut: (16) 3" squares
Assembly - CORNER STARS
- Repeat step 1 using the 3" squares to make 16 Shooting star-navy and Small star-cream HST units and 32 Main floral-lt. blue and Small star-red HST units.
- Join 4 navy/cream HST units, 8 red star/lt. blue HST units, and 1 lt. blue floral 4 1/2" square to make a corner star block. Repeat to make a total of 4 blocks.
Cutting - Borders, Appliqué, and Binding
- Small stars-red, cut:
- (8) 7 1/2" x 8 1/2" rectangles
- (3) 5 1/2" x 42” strips; join the strips end to end and cut (2) 5 1/2" x 54 1/2" strips
- Stripe-navy, cut: (3) 1 1/2" x 42" strips; join the strips end to end and cut (2) 1 1/2" x 54 1/2" strips
- Shooting stars-navy, cut:
- (7) 2 1/4" x 42" binding strips
- Use templates to cut letters for appliqué
- Plaid: Use template to cut 6 stars
Assembly - CENTER SECTION
- Join 3 Lemoyne Star blocks and then sew a Small stars-red rectangle to each end to make a border strip. Make 4 strips.
- Sew a border strip to the opposite sides of the quilt top. Sew a corner star block to the ends of the two remaining border strips and then sew the strips to the top and bottom of the quilt top.
- Sew the Stripe-navy strips to the top and bottom of the quilt top.
- Following the manufacturer’s instructions, use the templates to trace the shapes onto the paper side of the fusible web. Roughly cut out each shape about an 1/8" outside the drawn lines.
- Refer to the cutting instructions and press each fusible template onto the wrong side of the fabrics as listed. Cut out each shape on the drawn lines.
- Fuse the words and stars to the Small star-red strips. Finish the raw edges of the appliqués with a decorative stitch.
- Sew the appliquéd strips to the top and bottom of the quilt top.
- Layer, quilt and bind as desired.
Read NextJapanese Afternoon Quilt