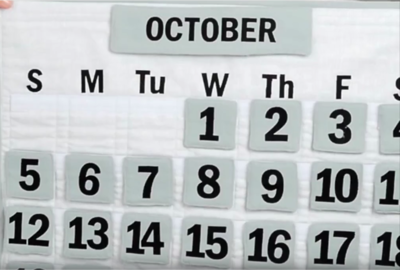
Easy Reusable Quilted DIY Calendar

You can't go wrong with this Easy Reusable Quilted DIY Calendar. Not only is there a super helpful and easy-to-follow video tutorial to go along with this project, but it can also save you money on buying calendar! Plus, this handmade calendar makes a really cute and special gift for someone to share in their home or office. You will love how you can personalize this DIY calendar by decorating certain dates for holidays, birthdays, or other different events that may come up.
Estimated Cost$11-$20
Time to CompleteIn an evening
Primary TechniqueSewing

Project TypeMake a Project
Materials List
- Velcro, the sew on kind
- Rotary cutter
- Ruler
- Basting spray
- Heavyweight fusible, or fusible letters
- Fabric
- Cutting machine, or iron on numbers and letters
- Batting infusable fleece
- Water soluble pen
- Dowl for hanging
How to Create a DIY Calendar
Instructions for Quilted Wall Calendar
-
Cut two 17.5 X 19 inch pieces, one 21.5 X 23 inch piece, and two 3 X 3 inch squares.
-
Choose one of your 17.5 X 19 inch pieces to be the pocket on the back of your calendar and press it in half. You can also press the 3 X 3 inch squares into triangles.
-
Using your water soluble pen, mark the top of your calendar, the other 17.5 X 19 inch piece, with lines.
Starting horizontally, mark a line 3/4 of an inch from the top. The next line is 1.5 inches below that, then a line two inches lower, make four more lines with two inch gaps between each.
Vertically make a line 3/4 of an inch over, then a two inch gap, half an inch gap, two inch gap, half an inch gap, for the rest of your lines. -
Once you finish your lines, you are going to put the batting inside. Put your backing down face up, your batting in-between, and your top will go on top. Use basting spray to baste it.
-
Stitch the Velcro on top. Use the soft fuzzy part of your Velcro and line up with each of your lines.
-
Cut the Velcro to fit the lines.
-
Go all the way back off the top of the quilt and start stitching. Hold your Velcro as you come up to sew it.
If the Velcro tries to move simply raise your walking foot, put it on top of the Velcro, lower it, and continue to stitch. Stitch all the way to the end and off the edge of your top.
-
Add a second line of stitch below that to keep your Velcro securely in place.
-
Repeat with all your Velcro pieces.
-
Trim off all the edges by lining up your ruler and cutting of the excess with your rotary cuter.
-
Add the pocket to the back of your calendar. Turn your quilt over, and match up the pocket with all of your raw edges. Base about 1/8 of an inch away from the edge, and base all the way around. Then, bind it with whatever method you like.
-
You can use a plain fabric to make your squares that the numbers on your calendar will go over. Or, for special occasions, you can use decorative fabric.
Cut your fabric into 2.5 inch strips, and your fusible fleece into 2 inch strips. Then, sub-cut your fabric into 2.5 inch squares of fabric and 2 inch squares of fusible fleece. -
Use the hook part of your Velcro, and cut that into two inch segments.
-
Find the fusible side of your fusible fleece and attach it to the wrong side of your fabric. Leave your 1/4 inch margin all the way around bare when you fuse it down.
-
Take the hook portion of your Velcro and sew it onto the back of your fabric, measuring 1/2 of inch down.
-
Place a plain piece of fabric right side down on top of the Velcro. Sew that piece of fabric onto the Velcro and stitch all the way around with 1/4 inch for each side. However, leave a small hole on one of the ends.
-
Using that hole you left when you were sewing turn this piece right side out. Grab a dull-ended object and poke out your corners.
-
To close up that hole, place it under your presser foot, and edge stitch all the way around. When you get to an end, put your needle down, presser foot up, turn 90 degrees, and continue to stitch.
-
Place the number on top of the square and iron the number onto the square.
-
Repeat this process for all of your numbers. When repeating this process for your months use a long rectangle to fit the name of the month on it, instead of the small square.
Read NextNo Binding Hot Pads