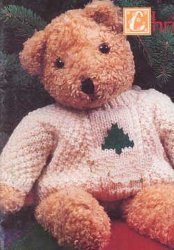
Teddy Christmas Sweater
Dress Teddy for the holidays too! This free knit sweater pattern from Patons is a way great to adorn a teddy bear to give as a gift for Christmas.

MATERIALS
- Patons® Decor (100 g/3.5 oz)
Patons® Canadiana (100 g/3.5 oz) - Size S M
- 1 1 ball
- Small quantity of green yarn for embroidery.
- Sizes 3.75 mm (U.S. 5) and 4.5 mm (U.S. 7) knitting needles or size needed to obtain tension.
SIZES
Chest measurement
Small 13½ ins [ 34.5 cm ]
Medium 17 ins [ 43 cm ]
Finished chest
Small 15 ins [ 38 cm ]
Medium 19 ins [ 48 cm ]
TENSION
20 sts and 26 rows = 4 ins (10 cm) with larger needles in stocking st.
ABBREVIATIONS
Tw2L = knit into back of 2nd st on left hand needle, then knit into front of first st, slipping both sts off needle tog.
Tw2R = knit into front of 2nd st on left hand needle, then knit into front of first st, slipping both sts off needle tog.
INSTRUCTIONS
The instructions are written for smaller size. If changes are
necessary for larger size the instructions will be written thus ( ).
BACK
With smaller needles cast on 39 (47) sts.
1st row: (RS). K1. *P1. K1. Rep from * to end of row.
2nd row: P1. *K1. P1. Rep from * to end of row.
Rep these 2 rows (K1. P1) ribbing once more inc 2 sts evenly across last row. 41 (49) sts.
Change to larger needles and proceed in pat as follows.
1st row: (RS). (K1. P1) 6 (8) times. P1. Tw2R. P1. K9. P1. Tw2L. P1. (P1. K1) 6 (8) times.
2nd row: (P1. K1) 6 (8) times. K1. P2. K1. P9. K1. P2. K1. (K1. P1) 6 (8) times.
3rd row: (P1. K1) 6 (8) times. P1. Tw2R. P1. K9. P1. Tw2L. P1. (K1. P1) 6 (8) times.
4th row: (K1. P1) 6 (8) times. K1. P2. K1. P9. K1. P2. K1. (P1. K1) 6 (8) times.
These 4 rows form pat.
Cont in pat until work from beg measures 3 (3½) ins [7.5 (9) cm], ending with RS facing for next row.
Armhole shaping: Cast off 4 sts beg next 2 rows: 33 (41) sts.
Cont in pat until work from beg measures 6 (7) ins [15 (18) cm] ending with RS facing for next row.
Shoulder shaping: Cast off 6 (8) sts beg next 2 rows.
Leave rem 21 (25) sts on a st holder.
FRONT
Work as given for Back until 10 rows less have been worked before beg of shoulder shaping, ending with RS facing for next row.
Neck shaping: Next row: Pat across 10 (13) sts (neck edge). Turn. Leave rem sts on a spare needle.
Keeping cont of pat, dec 1 st at neck edge on next 4 (5) rows. 6 (8) sts.
Work 5 (4) rows even in pat, thus ending with RS facing for next row. Cast off.
With RS of work facing slip next 13 (15) sts from spare needle onto a st holder. Join yarn to rem sts and pat to end of row. Work to correspond to other side reversing shaping.
SLEEVES
With smaller needles cast on 25 (29) sts. Work 4 rows in (K1. P1) ribbing as given for Back inc 4 sts evenly across last row. 29 (33) sts.
Change to larger needles and proceed in pat as follows:
1st row: (RS). K1. *P1. K1. Rep from * to end of row.
2nd row: P1. *K1. P1. Rep from * to end of row.
3rd row: P1. *K1. P1. Rep from * to end of row.
4th row: K1. *P1. K1. Rep from * to end of row.
These 4 rows form moss st pat.
Cont even in pat until sleeve from beg measures 3 (3½) ins [7.5 (9) cm] ending with right side facing for next row. Cast off.
FINISHING
Pin pieces to measurements, cover with a damp cloth and allow to dry.
Neckband: Sew right shoulder seam. With right side of work facing and smaller needles, pick up and knit 7 sts down left front neck edge. Knit across 13 (15) sts from front st holder. Pick up and knit 7 sts up right front neck edge. Knit across 21 (25) sts from back st holder dec 3 sts evenly across. 45 (51) sts.
Beg on a 2nd row, work 3 rows in (K1. P1) ribbing as given for Back. Cast off in ribbing.
Sew left shoulder seam, leaving 1½ ins [4 cm] open from top of neckband. Make 2 button loops, evenly spaced along front of shoulder opening. Sew buttons onto back of shoulder opening to correspond with button loops. Place markers on front and back side edges 2¾ (3½) ins
[7 (9) cm] down from shoulder seams. Sew in sleeves between markers. Sew side and sleeve seams. Duplicate st motif on Front as illustrated following Chart.

Read NextQuick Hostess Gift