Christmas Tree Pendant and Earrings
Step-by-step photos help you to create a swirly plastic necklace pendant with matching earrings from AMACO, perfect for the holidays. The Christmas tree pendant and earrings are festive, yet stylish. Give friendly plastic a try!

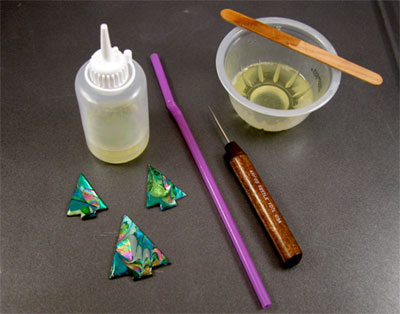
Materials:
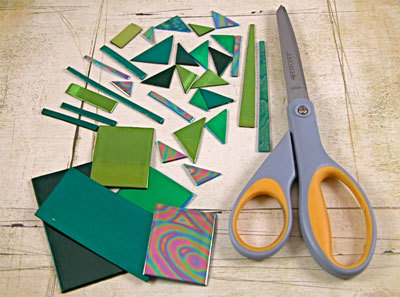
- Friendly Plastic® 7" sticks - Green, Avocado, Dark Teal, Print Green, Swirl and Black
- Craft knife
- Scissors
- Needle tool
- Small dish of cold water with a few drops of olive oil
- Griddle set at 200-300 degrees
- Non-stick baking sheet that fits flat on griddle surface
- Stylus
- Heat tool
- Sealer - Envirotex Lite or similar high gloss acrylic sealer
- Disposable mixing container and stir stick
- Straw
- Non-stick cookie sheet
- Round nose and needle nose jewelry pliers
- Wire cutters
- E 6000 glue
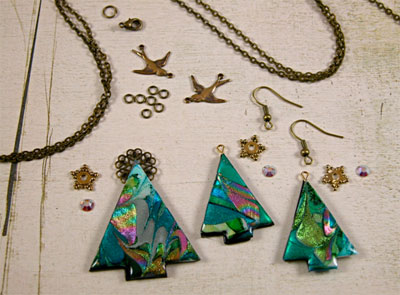
- Jewelry findings - antiqued brass, round filigree, 2 sparrows, circle link, 3 star shaped spacer beads, eye pins, chain, clasp, ear wires, jump rings
- Three flat backed Swarovski crystals
Steps:
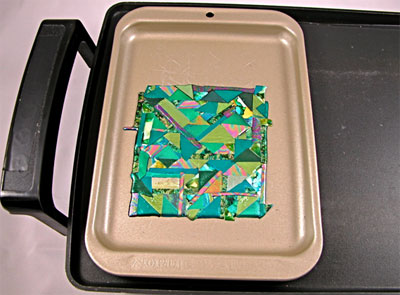
- Using scissors, cut the plastic sticks into random sized strips and triangles. This is a perfect project for using any scrap pieces of plastic left from previous projects.

- Pre heat the griddle. Place the baking sheet onto the griddle. One at a time, begin to arrange the triangles and strips in a patchwork pattern. Make sure each piece is stuck in place before adding the next. Try to press each piece tightly against the one before to prevent any gaps. Continue until all of the pieces have been added. Allow the plastic to soften and seal together. If any gaps do appear, simply tap over them with your finger pressing the softened plastic together.
- When all the plastic has softened and sealed together, place the teeth of the marbling comb against the baking sheet and draw the comb through the plastic in a wavy "S" pattern.
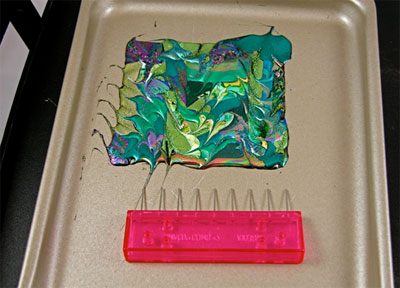
NOTE: It is very important that you keep the teeth of the comb against the pan while cutting through the plastic. If you only rake over the top, you split the metallic finish and take the chance of exposing too much of the base plastic.
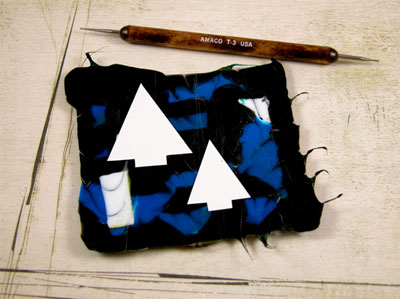
- Remove the pan from the griddle. Allow the plastic to cool. You may place the pan under cold running water to speed the cooling process along. Use the needle tool to press under the edges of the cooled plastic and remove it from the pan. On the reverse side of the plastic, using a stylus, trace one large and two small tree templates. Do the same of the reverse side of a stick of black plastic. Following the indented lines created by the stylus, cut out the trees using scissors.
- Apply the envirotex lite sealer following the manufacturer's instructions.
Note: I like to place my pieces on a non stick cookie sheet. This way if there is any run off, it will be easy to remove later. Once I have the envirotex mixed, I like to pour it into a small squeeze bottle. The application will be more precise and much easier. Blow softly through a straw to pop any air bubbles that remain. Allow to dry at least 12 hours if there has been any run off. Remove the piece from the pan by pressing the needle tool under it and lifting. The resin is still soft enough that you can cut the excess off with a scissors. Envirotex cures completely in 24 hours.
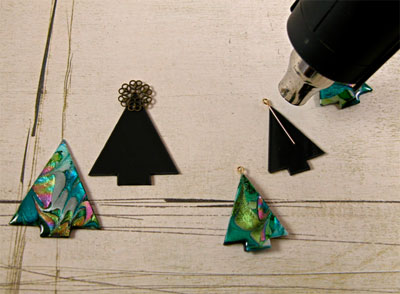
- To create the earring components, heat and soften the back of the small black tree using the heat tool. You don't want to soften the whole piece, just the surface, enough to press the eye pin into place. Be careful not to touch the softened plastic with your fingers. Once the eye pin is in place, align the marbled tree on top and gently press the two together. Moisten your fingers with water and lightly rub around the edges of the component to smooth and secure the bond. Allow the components to cool completely. Repeat this step for the second earring component.
To create the large tree pendant, heat and soften the back of the large black tree using the heat tool. Once again, you don't want to soften the whole piece, just the surface, enough to press the filigree finding into place. Be careful not to touch the softened plastic with your fingers. Once the filigree piece is in place, align the marbled tree on top and gently press the two together.
- Gather the jewelry components to being assembly. Glue the stars onto the top of each tree, then glue a crystal into the center of each star. Allow glue to dry.
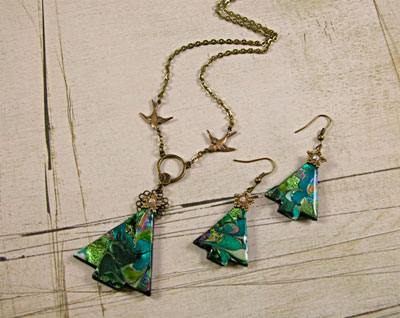
- Assemble the necklace and earrings according to the photo or as desired.
Read NextCross Stitchmas Mug Cozy


Thanks for your comment. Don't forget to share!
partinlawtontanya 2390966
Jan 08, 2011
I'm dowloading the earrings and necklace. They look like abalone even though they are not. But they are gorgeous.
Report Inappropriate Comment
Are you sure you would like to report this comment? It will be flagged for our moderators to take action.
Thank you for taking the time to improve the content on our site.