Quick Plastic Canvas Easter Bunny
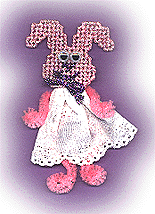
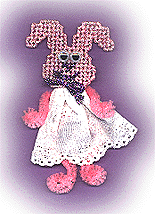
Make an Easter bunny with plastic canvas, white ruffle and pink chenille stem. This easy plastic canvas Easter project would be great for girl scout trips or craft afternoons with the kids.
Materials:
- one reel of Kreinik 1/8” Ribbon™ in each color: 012HL Purple Hi Lustre and 092 Star Pink
- 10-count plastic canvas (model was completed using Quick-Count™ clear)
- one 12-inch pink chenille stem
- three inches of two-inch wide white eyelet ruffle
- two 7mm wiggly eyes
- scissors, plastic canvas needle, craft glue
Download the stitch chart here. (pdf)
Instructions:
- Cut bunny’s head from 10-count plastic canvas according to graph, 20 by 15 holes.
- Stitch bunny’s head using 1/8” ribbon in continental stitches according to color key. Overcast edges with Star Pink 092. TIP: When beginning to stitch, leave a small tail of ribbon at the back of the canvas, and work stitches overthe tail to secure. When completed, run the needle under several stitches at the back of the canvas and trim.
- Glue wiggly eyes to head above bunny’s nose at places indicated by black circles.
- Using the rest of the 012HL Purple Hi Lustre 1/8” Ribbon, bring the needle through the top of the white ruffle on the seam. Leave a 6-inch tail on the right side of the ruffle and run a gathering stitch along the top of the ruffle (leaving 1/4” between stitches). Finish by leaving another 6-inch tail on the front of the ruffle. Bring 6-inch tails through the bottom of bunny’s head at () and tie a small bow.
- Cut the 12-inch chenille stem into a 4-inch piece and 8-inch piece. Fold each piece in half, and then twist pieces together at folds to hold. Longer ends are legs, shorter ends are arms. Place twisted center behind ruffle and glue. Bend arms over ruffle at front for arms, curving ends for hands in a circle on each end. Bend legs at knees and then curve ends in a circle for feet.
- Finishing ideas: attach a pin back to make it a wearable design, or attach a magnet for a refrigerator decoration. Or use clear fishing line as an ornament hanger

