Thumbprint Clay Pendants
Use your thumbprints to make personalized jewelry from clay! These thumbprint charms make great gifts--use your own prints, your husband or wife's, or your children's, and you can wear them around your neck or wrist at all times.
Materials:
- Oven-bake clay (silver Sculpey III)
- Skewer or needle
- Cookie cutter or small bottle
- Jump rings
- Permanent ink pad
- Wax paper
- Notecard
- Oven & pan
Video:
Instructions:
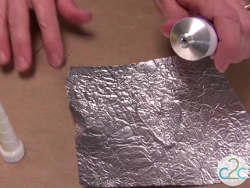
- Today I’m working with silver Sculpey brand clay. It costs around $2 per brick. Fimo is another good brand to use, if you can find it in the color you want. Break off a grape-sized amount and condition it by kneading it between your fingers. The clay will feel soft and warm when it’s ready to work with.
- Roll out the clay on a piece of waxed paper. Don’t roll it out directly on a wood surface or countertop. Don’t use any of your kitchen utensils when working with polymer clay, as oven-bake clays are not food safe. I’m using a disposable bottle to flatten the clay. I’m rolling it pretty thin, about 1/8 of an inch.
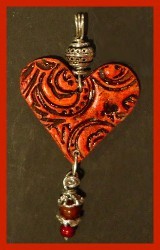
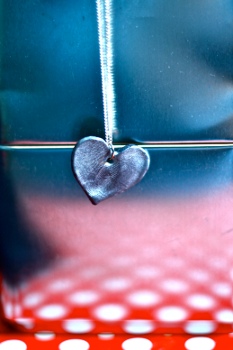
- To create this fingerprint heart pendant, I’m having my husband’s print on the left side and mine on the right. Press firmly and hold your finger in place for a moment, allowing the clay to absorb the impression of your fingerprint.
- When you’re ready to cut out your pendant, look around your house for interesting shapes you can use to cut your clay. I found a heart shape on these dollar-store party favors. Check your kids’ play-dough tools. Consider using a bottle cap for a scallop shape, or the lid of a bottle for a circle.
- Once your shape is cut, gently remove it from the wax paper and place it on a notecard or a piece of parchment paper. Use a skewer or needle to poke a hole in each piece. If you’d like, you can engrave the pendant with initials. Rubber stamps can work for this, or you simply scratch them in the clay with your skewer.
- Place the notecard or parchment paper in a baking pan or oven-safe dish. Do not bake the clay directly on the surface of the pan– again, the clay is not food-safe, plus this can create shiny spots on your clay. Bake according to the directions on the package; the temperature can vary across brands. Don’t worry, the temperature is low enough that it won’t burn the paper.
- Once your clay is baked and hardened, you can enhance the visibility of the fingerprints by lightly brushing them with a permanent stamping ink, such as Staz On. Read the back of the stamp pads you own, other brands are permanent when heat-set, so you can simply re-bake your clay after adding the color.
- I find it works best to use your fingertip to rub the ink onto the pendant. Don’t forget to brush color on the sides as well.
- Finally, add a jump ring through the hole of your pendant, and you can thread it onto a necklace. When opening the jump rings, twist sideways rather than pulling the ring apart. (Pulling will weaken the ring.)
Read NextVintage Spoon Pendants
Your Recently Viewed Projects

Thanks for your comment. Don't forget to share!
mulberrygalprinces s
Jun 13, 2016
I think this is a marvelous idea. What a great way to keep a memory. I want to make it for my daughter in law. She just had a baby and I can make it in pink with the babies finger print. Then if she as a boy some day I can make it in blue. Make sort of a charm for each baby.
Report Inappropriate Comment
Are you sure you would like to report this comment? It will be flagged for our moderators to take action.
Thank you for taking the time to improve the content on our site.