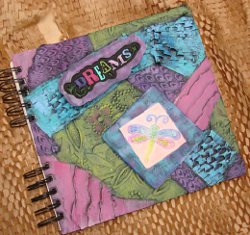
Dragonfly Dream Notebook
Record your dream with help from this cool paper craft idea! Use scraps of paper and old packaging materials to create a Dragonfly Dream Notebook from Heidi Borchers. This is a cool, easy way to learn more about your self conscious.
Materials:
- Cool2Cast
- Measuring cup
- Water
- Plastic container with lid
- Recycled blister package (for mold)
- Journal by 7Gypsies
- Dream Clear Stamp by
- Inkadinkadoo
- Mod Podge by Plaid
- Dragonfly Soap Stamp by Life of the Party
- Non-stick Craft Sheet byRanger
- Aleene’s Super Thick Tacky Glue
- Acrylic paint—black, white, lavender, purple, lt. pink, medium pink, lt. blue, aqua, green, yellow
- Craft chalks
- Textured paper
- Honeycomb packaging paper
- Paint brushes—1/2” shader, fine liner, hard bristle (for chalks)
- Craft knife
- Waxed paper
Instructions:
- For dragonfly, place soap stamp FACE UP in mold. Position so that the edges of the stamp do not touch any edges of the mold. For Dreams, place clear stamp FACE UP on non-stick surface. Following package instructions, mix Cool2Cast. Pour into mold (covering soap stamp). Pour over clear stamp. When plaster is solid to the touch, carefully turn mold over to release plaster. Lift rubber from mold with finger or use pin to catch hold of edge and pull up to remove. Clean up edges where needed with craft knife. Pop plaster design from non-stick surface and gently remove clear stamp. You should have a perfect impression! Let air dry.
- Paint DREAMS plaster design piece with black paint. Paint the outside edge of dragonfly tile with black. Paint inside area of dragonfly with white. Let dry. With fine liner brush, detail the lettering and vine. Set aside to dry. On dragonfly tile, drybrush over black with aqua, lt. blue and lavender being careful not to get any paint on the dragonfly area. Let dry. Using hard bristle brush, color dragonfly with chalks. Set plaster pieces aside.
- Place waxed paper between journal cover and first page. This will help to protect inside pages. Tear textured papers into desired sizes. Working one area at a time, brush on coat of Mod Podge to journal cover. Lay paper into Mod Podge and apply coat over paper. Repeat to cover entire journal cover. Let dry.
- Paint entire journal cover black. Let dry. Dry brush sections of paper with acrylic paint, varying section colors. Let dry. Glue plaster pieces on journal. Let dry.


![DIY Paper Pinwheels for Parties [Two Ways]](http://irepo.primecp.com/2017/08/345078/DIY-Paper-Pinwheels-for-Parties-Two-Ways_Category-CategoryPageDefault_ID-2404467.jpg?v=2404467)


