Spiral Afghan Crochet Pattern
Learn how to crochet spiral flat panel with this free blanket pattern.

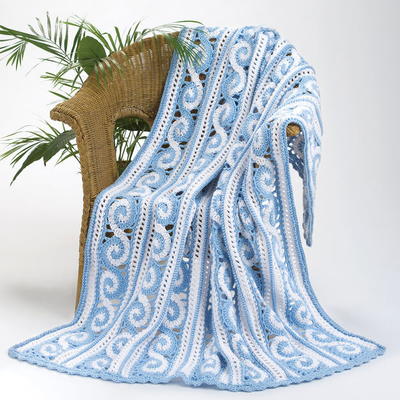
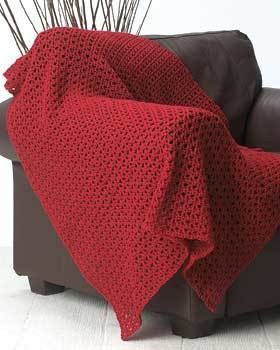
The intermediate Spiral Afghan Crochet Pattern features a unique spiral design with open-weave features. Done in blue and white, these crochet spiral flat panels are reminiscent of calming waves. Take a little mental break and enjoy the comfort of the ocean when you snuggle up with this crochet spiral blanket. Not only is this afghan unique and textured, but it is also sure to complement almost any home decor style.

Crochet HookJ/10 or 6 mm hook, K/10.5 or 6.5 mm hook
Yarn Weight(4) Medium Weight/Worsted Weight and Aran (16-20 stitches to 4 inches)
Crochet GaugeGauge is not critical for this project; spiral motif measures 4", using larger hook.
Finished SizeAfghan measures approximately 62"/158 cm wide by 68"/173 cm long
Materials List
- 2 skeins Caron International Natura One Pound yarn in White (A)
- 2 skeins Caron International Natura One Pound yarn in Sky Blue (B)
- US J/10 and K/10.5 (6 and 6.5 mm) crochet hooks
- Yarn needle
- Removable stitch marker
- Waste yarn (WY) or knitters safety pins (holders)
Instructions for the Spiral Afghan Crochet Pattern:
TWO-COLOR SPIRAL (Make 98)
Note: Two-color Spirals are worked individually, then sewn together into panels. Edging is worked around each panel, along sides of each panel, then panels are joined and final edging is worked.
-
Using larger hook and A, wrap yarn around finger to form a ring.
-
Round 1 (RS): Cont with A, * ch 1, work [sc, hdc, 2 dc] in ring *, remove hook, place last st on holder; join B with a slip st in ring; repeat * to * using B—4 sts in each color, beg in ring.
-
Round 2: Cont with B, working into sts of A-section, * work [2 dc in sc, 2 dc in hdc, and 2 dc in each dc]—8 sts worked into previous color section *, remove hook, place st on holder; return to A-st on holder, cont with A, working into sts of B-section, repeat * to *.
-
Round 3: Cont with A, working into 8-dc of B-section, * work 2 dc in each st—16 sts work into previous color section *, remove hook, place st on holder; return to B-st on holder, cont with B, repeat * to *.
-
Round 4: Cont with B, working into dc of A-section, * work 2 dc in each of next 3 dc *, fasten off B; return to A-st on holder, cont with A, working into B-section, repeat * to *. Fasten off A.
AFGHAN
-
Work 98 Two-Color Spirals.
-
Sew Spirals together into 7 panels of 14 spirals each, matching colors (see photo); tack down beg and end of Spirals on each panel.
Panel Edging:
Note: Because of the scalloped edge, the number of sts may vary on some scallops; use your judgment to space evenly. Short ends are 'squared-off' by working two corners at each end (dc, ch 3, dc in one st); each Spiral has (dc, [ch-2, sc] 3 times, ch 2, dc along the scallop) and panel ends have (dc [ch-2, sc] twice, ch 2, dc) between corners, with corner dc counting as first or last dc in these counts, as appropriate.
-
(RS) With RS facing, using larger hook, join B with a slip st in corner of end spiral (approx 2 sts from join), ready to work along long side.
-
Round 1: First Spiral –Ch 6 (counts as dc, ch 3), dc in same space—first corner completed, ** [ch 2, skip 2, sc in next st] 3 times (approx 4 sts rem before join between first and second Spirals), ch 2, skip 2 sts, dc in next st—first Spiral side completed (2 sts rem unworked before join); cont along long side, * ch 2, skip first 2 sts of next Spiral, dc in next st (4 sts unworked at join), [ch 2, skip 2, sc in next st] 3 times, ch 2, skip 2, dc in next st; rep from * for each Spiral to end of panel; work [ch 3, dc] in same space as last dc for corner; working across end, [ch 2, skip 2, sc in next st] twice, ch 2, + work corner (dc, ch 3, dc in next st); rep from ** for opposite side, end at +, join with a slip st to third ch of beg ch 6, slip st in corner space.
-
Round 2: * In corner space, work [3 sc, place a marker (pm), 3 sc]; work 3 sc in each ch-space to next corner; rep from * around, join with a slip st to first st—213 sts each side, 15 sts each end. Fasten off B.
Side Edging:
-
With RS facing, cont with larger hook, join A at corner marker, ready to work along long side only.
-
Row 1: Ch 1, sc in same space as joining; * sc, ch 1, skip 1; rep from * to next marker, end sc in marked space, turn.
-
Row 2: Ch 2 (counts as dc), work [dc, ch 1] in each ch-1 space across, end dc in last sc, turn.
-
Row 3: Ch 1, sc in first dc, * ch 1, sc in next ch-space; rep from * across, end last rep sc in top of beg ch.
-
Fasten off. Work Edging on opposite side of panel. Repeat Side-Edging on rem panels.
Assemble Panels:
Place 2 panels tog, with WS's facing. Matching sts along one long side, using larger hook and B, work 1 row Rev sc through both panels, joining them. Fasten off. Repeat for rem panels.
FINISHING
-
Weave in ends.
-
Side Edging: With RS facing, using smaller hook and B, join yarn with a slip st at corner, ready to work along side.
-
Row 1: Ch 1, sc in each st to corner, do NOT turn.
-
Row 2: Ch 1, working through the front loops only, work Rev sc across.
-
Row 3: Ch 1, working through back loops only, work sc across.
-
Fasten off. Repeat for opposite side edge.
-
Top and Bottom Edging: With RS facing, using smaller hook and B, join yarn with a slip st at corner, ready to work across end.
-
Row 1: Ch 1, work sc evenly across. Note: Across Spirals, work [2 sc, dc] or [2 sc, skip 1], as needed to keep piece flat, turn.
-
Row 2: Ch 1, * sc, ch 3, skip 2; rep from *, end sc in last st, turn.
-
Row 3: Ch 1, sc in first st, in each ch-3 space work [sc, hdc, dc, hdc, sc], end sc in last st.
-
Fasten off. Repeat for opposite end.
-
Blocking: Lay piece on flat surface; spray with water (add a little fabric softener for a softer fabric) and allow to dry.
Abbreviations
- ch
- Chain
- dc
- Double crochet
- hdc
- Half double crochet
- Rev sc
- Reverse single crochet
- sc
- Single Crochet


Thanks for your comment. Don't forget to share!
shamradawn
Feb 19, 2018
I could really use some guidance! I thought the spirals would be the most difficult. But I completed the spirals probably 5 years ago! I have read through the pattern countless times and have had someone read the pattern to me while doing the sides and the ends. That's not quite accurate though what has happened is I get so far down and then do not understand the connection and I have had someone who teaches crochet read through the pattern with me. So when I see other crocheters saying how easy this is I feel very stupid. Are there any hints or tips or a visual video from YouTube or something that has been made since this pattern has been out for public usage? Otherwise I'm going to have strips of spiral esses as I called them with no connection between them.
mandyferreira 1033 151
Jan 23, 2014
Fantastic pattern. Must say I took it on before reading the comments, but it has proved to be simple yet challenging enough to keep my interest engaged. The working of the spirals is especially charming. Great way to keep your hands occupied whilst watching TV :)
Kaylee
Feb 29, 2016
We're glad you enjoyed crocheting this pattern. We'd love to see a picture of your final project! -Kaylee, Editor of FaveCrafts.com
mandyferreira 1033 151
Jul 29, 2013
I think the main thing that is needed to achieve the spirals is to not end each round with a slip stitch as would be done in other patterns. also what has not been mentioned is after the first round the ring needs to be pulled tight. Otherwise I love this pattern. Fast and easy
agreen3angels 1124 266
Jan 22, 2012
I'm disappointed so far. Just started trying this pattern for a friend who has a beach house, but am having a hard time just getting started. I'm fairly experienced in crochet and have been crocheting for years but this one has me stumped so far. Maybe I'm just missing something very obvious. I use American style crochet so if anyone has any pointers in what I'm missing I would appreciate your help.
jillannbarrett 818 8219
Mar 04, 2011
I have just finished making this throw, although I enlarged it somewhat to turn it into a double bedspread and added fringing around the edges. I was doubtful about attempting it due to previous comments but found no problems at all, bearing in mind also that the instructions are American so had to transpose them to English....i.e:- a single crochet U.S.=a double crochet U.K etc etc.
Nibia
Jul 01, 2010
What a beautiful pattern. I would love to work on this. If the previous comments or any indication of the instructions, I think not.
MegaMouse
May 23, 2010
Beautiful pattern shame about the instructions, so far I have half a dozen spirals made and no matter which way I lay them there is not way they are going to go together as shown in the photo, looking at the spirals I have and the image the only way I'm going to get the spirals to go together is to crochet further around the spiral which makes me wonder if half the instructions are missing, maybe if as the other reader suggested you give us some diagrams to go with the pattern we could figure it out until then this pattern is useless which is a shame . . . Mitch
Member 2136393
Feb 29, 2016
The way I got around this is after making the spirals I then turned each spiral into a granny square, then assembled the squares together to make the blanket. Not exactly the same look, but you can make the granny squares "lacy" and get almost the same look. This made this project MUCH easier. Hope this helps. )
Sthrnbell
Apr 06, 2010
I crocheted the spirals as directed and I can't get them to look like the spirals in the picture. I wish that the person that did this pattern would make a diagram of the spirals before they are put together so we can see how they are suppose to look. If anyone should have a diagram of the spirals before they are put together,Thank you T in VA.
Report Inappropriate Comment
Are you sure you would like to report this comment? It will be flagged for our moderators to take action.
Thank you for taking the time to improve the content on our site.


![19 Temperature Blanket Ideas and Alternatives [FREE Patterns]](http://irepo.primecp.com/2022/11/540664/Temperature-Blanket-Ideas_Large400_ID-4977917.png?v=4977917)