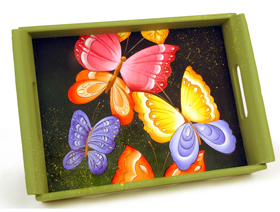
Painted Butterfly Tray
Using the lovely colors of spring, this butterfly tray from Delta Creative is a quick and easy painting project. Add it to your spring kitchen decor or give it as a gift to a friend to celebrate the season.
Materials:
- Delta Creative Ceramcoat® All-Purpose Sealer 7005
- Delta Creative Ceramcoat® Satin Varnish 7003
- Wooden Tray available at Michaels
- Delta Creative Ceramcoat® Acrylic Paint:
- White 2505
- Light Foliage Green 2437
- Crocus Yellow 2459
- Black Green 2116
- Barn Red 2490
- Pop Pink 2646
- Bahama Purple 2518
- Rhythm N Blue 2551
- Terra Cotta 2071
- OJ 2649
- Hydrangea Pink 2449
- Poppy Orange 2554
- Burnt Umber2025
- Black 2506
- Loew-Cornell La-Corneille Golden Taklon Brushes:
- Series 7300 Shader #6, 10 and 12
- Series 7050 Script Liner #1
- Series 7350 1” Wash Brush
- Stylus
- Transfer paper white
- Tracing paper
- Palette paper
- Water container
- Scissors
- Paper Towel
- Sand paper 250-300 grit
Click here for larger images and printable instructions.
Steps:
Wood Preparation
- Always sand with the grain of the wood.
- Using fine grit sand paper, sand off burrs and rough edges from all pieces. Remove dust.
- Apply one even coat of All-Purpose Sealer to the barrel stave using 1”wash brush. Allow to dry thoroughly.
- Sand with fine grit sandpaper (250-300 grit). Wipe dust.
Background Instructions
- Using the 1” wash brush and a wet in wet technique apply Light Foliage Green in the lower left corner, apply Black Green in the upper right corner and blend the two colors in the center.
Transferring Pattern
- Lay tracing paper over pattern and trace all lines except those used to denote shadows. The shadow lines are generally short straight lines and several of them. Main lines are where there are color changes. Detail lines are facial features, patterns on fabric, and etc. Lay tracing on surface and tape at top and on one side. Slide graphite paper between tracing and surface with the dark side down; draw over the main lines only. Do not add the detail lines these will be applied after the basecoating is done.
- Apply pattern using white transfer.
Orange Wing Sections Painting Instructions
- Basecoat the OJ sections of all wings using the 1” wash brush.
- Float the highlight in next to the body in White plus a touch of OJ using the 1” wash brush. Tip: to float load brush first in floating medium or water, pat off excess on paper towel. Tip one corner of brush in color, blend color through bristles using short back and forth motion on palette. Color should graduate from heavy color on one corner to no color on opposite corner. If when you begin to paint, you have color showing from both sides of brush, it is improperly loaded. Rinse and start again.
- Float the shadows along the outside edge of each section in Poppy Orange using the same brush.
- Using the #12 shader float all of the accents in White plus a touch of OJ.
Pink Wing Sections Painting Instructions
- Basecoat the Pop Pink sections using the 1” wash brush.
- Float the highlights in next to the body with Hydrangea Pink using the 1” wash brush.
- Float the shadows starting at the outer edge and pulling in towards the body to form the scallops in Barn Red using the 1” wash brush.
- Float the accents on these sections with Hydrangea Pink using the #12 shader.
Yellow Wing Sections Painting Instructions
- Basecoat the Crocus Yellow sections using the 1” wash brush.
- Float the highlights in next to the body with White plus a touch of Crocus Yellow using the 1” wash brush.
- Float the shadows starting at the outer edge and pulling in towards the body to form the scallops in Terra Cotta using the 1” wash brush.
- Float the accents on these sections with the highlight mix using the #12 shader.
Blue Wing Sections Painting Instructions
- Basecoat the blue section on the large butterfly in a mix of equal parts Bahama Blue and White using the 1” wash brush.
- Float the shadows starting at the outer edge and working in towards the body to form the scallops in Bahama Blue plus a touch of Rhythm n Blue using the 1” wash brush.
- Float the accents on these sections with White plus a touch of Bahama Blue using the #12 shader.
Small Butterfly Painting Instructions
- Basecoat the small butterfly in Bahama Blue using the #10 shader.
- Float the shadows with Rhythm N Blue using the same brush.
- Float the highlights with White plus a touch of Bahama Blue using the #6 shader.
Bodies Painting Instructions
- Using the #6 shader basecoat the bodies in Terra Cotta.
- Float the shadows along the bottom of the body in Burnt Umber using the same brush.
- On all sections of the wings reinforce the highlights here and there with a White float.
To Finish
- Thin Black with water to the consistency of heavy cream, this will make the paint flow easier and do all black lines.
- Basecoat the sides of the tray in Light Foliage Green.
- Spatter using an old toothbrush in Crocus Yellow heavier in the lower left and upper right corners. Tip: to spatter thin color to consistency of heavy cream using clean water. Dip a stiff brush in color (fan brush, old toothbrush or commercial spattering brush). Drag sharp object through bristles starting from front and pulling back creating specks. Often called flyspecking.
- Apply as many coats of Satin Exterior/Interior Varnish as desired using the 1” wash brush.
Read NextDiy Tea Towels
Your Recently Viewed Projects

Thanks for your comment. Don't forget to share!
mulberrygalprinces s
May 28, 2018
This is so pretty. It would be easy to make and you can use it in many different ways. As a tray, what about a magazine holder on the coffee table. Or on your desser to hold perfume bottles? I love it. And you can use a picture frame instead of a tray.
Report Inappropriate Comment
Are you sure you would like to report this comment? It will be flagged for our moderators to take action.
Thank you for taking the time to improve the content on our site.