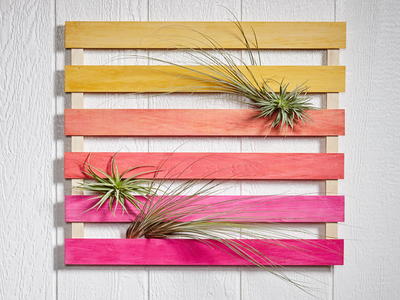
Mini Pallet with Plants

"In this project, easy to blend TintIT. colors create an ombre color grid for a unique wall planter by Gretchen Sell for Design Master."
Primary TechniquePainting

SeasonSummer
Materials List
-
Design Master 533 Sunflower and 530 Pinkolicious
-
6 Basswood slats x 3 x 24
4 Basswood strips 1/4 x 1 x 24
- Fine grade sandpaper
- Latex gloves
- Paper towels
- 54 small nails/braids
- Hammer
- Picture hanging kit
Instructions
-
Sand the wood slats to smooth the surface. Wipe away the dust.
-
Prepare a protected surface to spray the wood slats. Wear latex gloves.
-
Closely spray TintIT. Sunflower on a slat. Let the spray puddle and wet the wood surface. Be sure to color the edges as well. Immediately, while the color is still wet, wipe the TintIT into the wood with a paper towel. If an area is missed closely apply some more TintIT and wipe again. Let dry. This application enhances the wood grain. Color 4 of the 6 slats in this method.
-
Color the remaining 2 unfinished wood slats in the same manner using TintIT Pinkolicious.
-
Set aside 1 of the yellow stained wood slats. To a 2nd yellow slat, mist with Sunflower at a distance of about 15. Even out the wood color by misting areas that might look lighter. Then to deepen the yellow, evenly mist the whole slat. These 2 slats will be the top 2 rungs on the palette.
-
To the remaining 2 lightly stained yellow slats, lightly mist with Pinkolicious TintIT from approximately 15 away. The colors will blend to make a light coral hue. Keep one of these slats light in value to use as the 3rd rung on the palette. Then on the other slat mist another coat of Pinkolicious to deepen the color. If desired, also mist with Sunflower to balance the coral color. This will be used for the 4th rung on the palette.
-
To the light pink stained slats, select one to set aside for the 5th rung of the palette. To the 2nd pink slat, mist with Pinkolicious at a distance of about 15. Even out the wood color by misting areas that might look lighter. Then to deepen the pink, evenly mist the whole slat. This slat will be the last rung on the palette.
-
After slats have dried, sand the wood with the scrap paper. This will remove impurities caught in the spray, but not the color.
-
Assemble the palette. Nail 2 of the 1 wide strips together to make thicker. Align the strips 1/2 in from the edge of the slats and nail the rungs to the wood strip.
-
Attached a picture hanging kit to backside. Keep the wire tight to hide behind a slat. Attach to wall; arrange air plants between rungs and Enjoy!
Why You'll Love This Gardening Craft
Here at our arts & crafts website, we are excited to share with you the top 3 reasons why you should try making the Mini Pallet with Plants craft project:
1. Unique Wall Decor: This project allows you to create a one-of-a-kind wall planter using an ombre color grid technique with TintIT. colors. The end result is a stunning piece of decor that will add a pop of color and personality to any room in your home.
2. Easy and Fun: With easy-to-follow instructions by Gretchen Sell for Design Master, this project is perfect for crafters of all levels. The TintIT. colors make it simple to achieve a beautiful ombre effect, and working with plants adds a fun and natural element to the project.
3. Personalized Gift Idea: This Mini Pallet with Plants project makes for a thoughtful and unique gift idea for friends and family. You can customize the color scheme to match their personal style and choose plants that suit their taste. It's a handmade gift that shows you care and will surely be appreciated.
Overall, the Mini Pallet with Plants craft project is a creative and rewarding DIY endeavor that offers endless possibilities for customization and enjoyment. Give it a try and watch as your crafting skills flourish!
Your Recently Viewed Projects

Thanks for your comment. Don't forget to share!
Hannah
Aug 30, 2017
We are starting our renovation and I am thinking of what to put in my pearl white painted room. I am eyeing this mini pallet to place in my accent wall. But instead of putting plants , I'm thinking of pinning my photos on it.
Elizabeth J
Jul 07, 2017
I can't believe how gorgeous this is and how easy it would be to make! I think this would make a great addition to a summer home to really bring some color and light into the living room. Such a cool ombre idea.
princess6860504
May 29, 2017
OH my gosh, this is so pretty! What a great idea to brighten up the dark and boring or shady and dark side of your house- with a beautifully painted pallet in bright and sunny colors. In areas of your yard where nothing will grow, just pluck one or two of these in the ground leaning up against a tree or that plain side of your house. The air plants will grow anywhere, too!
Report Inappropriate Comment
Are you sure you would like to report this comment? It will be flagged for our moderators to take action.
Thank you for taking the time to improve the content on our site.