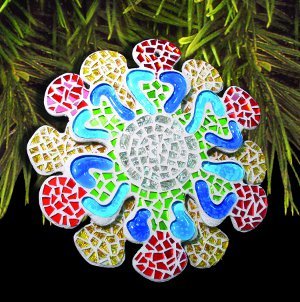
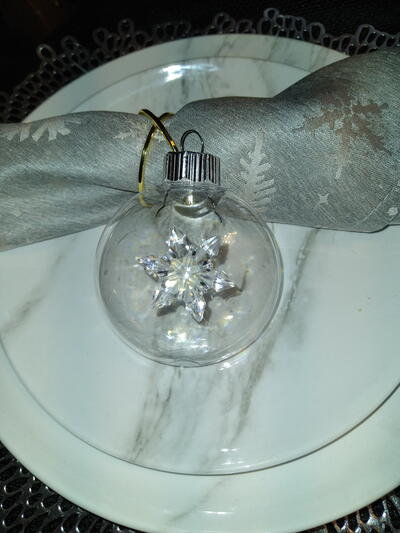
Swizzle Snowflake Mosaic Ornament
Help the light glisten off your Christmas tree with this Swizzle Snowflake Mosaic Ornament from Diamond Tech. This colorful homemade Christmas decoration is a great way to add some color to your tree or liven up a packaged gift. You could even attach a photo to the center of the snowflake to make a lovely hanging frame for grandma or grandpa. The best thing about snowflakes is that they can be out on display for all to enjoy throughout the winter!

Materials:
- 2 Wooden Snowflake Ornaments (Purchased at Local Craft Store)
- 1 pkg. Jennifer’s Mosaics™ Glass Mirror Red
- 1 pkg. Jennifer’s Mosaics™ Glass Mirror Green
- 1 pkg. Jennifer’s Mosaics™ Glass Mirror Gold Tapestry
- 1 pkg. Jennifer’s Mosaics™ Glass Mirror Silver or Silver Tapestry
- 1 Variety pkg. Jennifer’s Mosaics™ Glass Wiggles
- Jennifer’s Mosaics™ White Grout
- Jennifer’s Mosaics™ Wheeled Glass Nippers
- E-6000® or any other mosaic adhesive
- Hot glue gun & glue stick
- 1 Sheet Foam Core
- Bowl
- Mixing Spoon or Small Plastic Spatula
- Soft Cloth
- 2 Cup Measure
Instructions:
-
To protect work area, cover with newspaper.
-
Collect all supplies needed for the project and place them on your work surface.
-
Place both snowflake panels on top of each other so that the branches of the snowflake are not overlapping.
-
Use a pencil and mark on the back panel all junctions were the snowflake branches meet the body. The area above the marks will be filled with mosaic pieces; the area below will not.
-
Work on one panel at a time. Start with the top facing panel. Place glass wiggles on the surface, arrange using the photo or to your desired liking. Glue into place using a small amount of adhesive.
-
Next, using a wheeled glass nipper, nip red, green and silver tapestry (or silver) mirror into small pieces.
-
Mosaic a small section at a time by applying adhesive to the back of the mirror and positioning it on the surface. Leave 1/8” space between each piece and from the edge of the snowflake. Use the image for placement and position mirror around wiggles to cover the surface of the top panel. Set aside and allow drying.
-
Working on the back snowflake panel, begin nipping the gold tapestry mirror into small pieces.
-
Work above the pencil marks on the back snowflake panel. Apply a small amount of adhesive to each piece of mirror and glue into place leaving 1/8” between mirror pieces and from the snowflake edge.
-
PLEASE NOTE: Leave center of the back panel free of any glass.
-
Allow both snowflake panels to dry, following the drying times recommended by the adhesive manufacturer.
-
When dry, pour 10 oz. of white grout into a mixing bowl. Adding a small amount of water at a time, mix with a plastic spoon or spatula until the grout reaches a thick “fudge” consistency. It is best to add small amounts of water at a time as you can always add more water, but you can’t take it out! If grout becomes too watery, add more dry grout, a small amount at a time until the consistency is corrected.
-
Spread the grout into all of the spaces between the mirror and glass pieces, smoothing all inner and outer edges. Wait about 15 minutes for grout to set.
-
PLEASE NOTE: For the back panel, be sure to leave the center grout free to make room for the joint attachment.
-
Begin to wipe away the excess grout using a moist sponge. It is very important to remove any grout on the glass before grout is completely dry. Allow to set for 10 minutes.
-
Using the soft cloth, buff the glass on both panels to a shine. Allow 24 hours for the panels to dry thoroughly.
-
To create the center joint attachment, use foam core and cut two 2” circles. Glue together using a hot glue gun. If the ornament does not have a hole for hanging, insert a long ornament hook, wire or paper clip in between the two circles before gluing, for hanging purposes. Take the foam attachment and glue it to the center of the rear snowflake panel, allow drying.
-
Apply hot glue to the front of the 2” disk and press the top snowflake panel onto the disk. Make sure the branches of the snowflake offset to the branches of the rear snowflake panel. Allow to dry.
- Hang to add sparkle and glitz to your holiday gatherings.
Read NextChristmas Carol Ornament