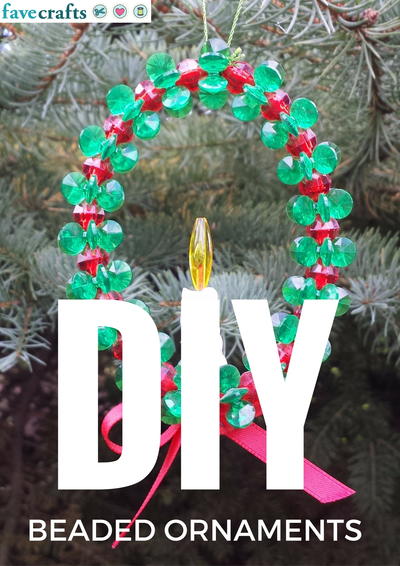
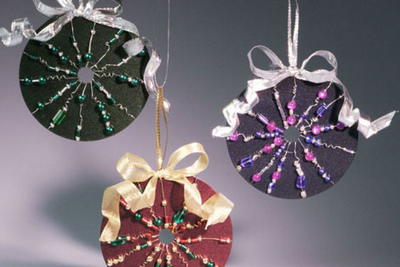
Beaded CD Ornaments
Add a unique touch to your tree this year with these CD Christmas ornaments.

If you're looking for Christmas ornament ideas, you can't go wrong with these Beaded CD Ornaments. With a little paint, wire and beads, you can add a new look to your tree this holiday season. This eco-friendly craft is perfect for all ages, so gather up the kids and encourage them to get creative. Homemade ornament ideas are so much better than anything you can find on a shelf. Have kids show off their crafty side and include details to show off their personalities. Cover your tree and then save this project for years to come.
Time to CompleteIn an evening
Main MaterialPaint
MaterialsBeads, Paint, Recycled Materials
Primary TechniquePainting

HolidayChristmas
Materials List
- Krylon Indoor/Outdoor Paint - Hunter Green (#53502), Tomato (#53532), Purple (#51913)
- Krylon Glitter Spray - Glistening Gold (#401), Shimmering Silver (#402)
- 3 Compact Discs
- 24 gauge Non-Tarnishing wire: (1) 2 yard length Gold and (2) 2 yard lengths Silver.
- 10” length 1/8” wide Gold wire edge ribbon
- (2) 10” lengths 1/8” wide Silver wire edge ribbon
- 2/3 yard lengths 3/8” wide Gold wire edge ribbon
- (2) 2/3 yard lengths 3/8” wide Silver wire edge ribbon
- Assorted sizes and shapes of beads (silver, green, dark red, gold, blue & purple)
- (3) 4” lengths cloth covered floral wire
- (3) 8” lengths 20 gauge wire
- Nail large enough to make a 1/8" diameter hole
- Flat nose pliers
- Cardboard boxes for spray booth and drying ornaments.
- Dowel rod to fit across box for drying ornaments
- Wire cutters
- Ruler
- Scissors
Instructions:
-
To make a hole for hanging, use flat nose pliers to heat nail and push through CD about 1/8" from edge. Cool.
-
Twist one end of 20 gauge wire thru hanging hole and form hook on opposite end. This will serve as a handle while painting and drying.
-
Following manufacturer’s instructions, paint each CD a different color: Hunter Green, Purple, Tomato. Hang ornaments on dowel rods across box to dry completely. Remove wire when dry.
-
Adding beads: Refer to photograph. Anchor one end of the 24 gauge length of wire in the 1/8" hole. String beads in front of ornament only. Green and silver beads for green ornament; green, dark red and gold for red ornament; blue, purple and silver for purple ornament. Make 13 evenly spaced rows of beads around CD. Twist end of wire to back side of first wire. Trim excess wire.
-
Hanger and bow: Tie hanger ribbon thru 1/8" hole. Tie 2 loop bow. Slip floral wire thru knot in bow on back side. Wire to ornament thru 1/8" hole. Twist bow tails around fingers to shape and trim as desired.
Got more CDs?
Read NextPrintable Christmas Tree Ornaments


Thanks for your comment. Don't forget to share!
mulberrygalprinces s
Sep 29, 2016
I made something like this last year with my grand daughter. She had a ball. I had a white cd that was too messed up to lay so she took it and painted red and green dots on it and we glued a ribbon on top to hang it with. I wrote on the bavk, her name and date. I know she will be looking for it on this years tree.
Kefra
Oct 17, 2013
You could also make 2 then wire or glue them together and have a 2 sided ornament! It will use up your CDs faster but if you are like me, you have plenty :) These would look nice hanging on trees in the yard too. Be sure to spray with a sealer first tho to help them handle the weather better. I totally agree with you Deni OQuinn, this site is the BEST!! Happy Crafting!!
hal2308 1334077
Sep 27, 2012
Loved the recycled CDs (have rather a few that are no longer of anyother worth) and again all 6 of my grandchildren, aged 3 to 10, will be able to do this (the younger ones with help for certain areas) Thanks for such a great 'neat' looking idea
Brenda30
Sep 27, 2011
I'm thinking my 6 yr old granddaughter would love to do something real similar. Instead of beads she loves to work with her glitter glue! or we could glue beads on instead of working with the wire. Thanks for the idea of the CD and we can follow your beautiful pattern or come up with some of our own
Deni OQuinn
Sep 30, 2010
This is by far the BEST site for crafters!! There are so many ideas and the materials are always inexpensive and the instructions so easy to apply!! Thanks!! I have sent this to friends, grandchildren and family and they all love it.
Bowegian
Jul 11, 2010
There is no mention of using the glitter spray. At what step should it be used? My guess it before adding beads.
nin58
Jun 08, 2010
These are so pretty . It makes good use for those scratched CD's that we have. Can you say "recycle"?
wild and wacky gra ndma
Jan 04, 2010
i have been doing this for years. not only the way you have done yours but i have cut them , made jewlery from them, you name it and i have just about done them. one of my fun ones was makeing a clown face. it turned out real neat. i just love makeing things from stuff that most people throw away . bottle caps, soda bottles etc. have a good day
weslen1
Jan 02, 2010
You could print a holiday label on sticker sheet for the label side of the cd, leave the reflective side unpainted and uncovered and just use the beads on that side. You would have the reflection of all the lights in it as well as it's own shine. Or paint the label side only and decorate both sides with the beads. Several of each idea. What a pretty tree that would be.
WireMySoul
Dec 02, 2009
Another idea If you use regular craft acrylics, you can try scratching designs into it once dry, to reveal the cd's reflective rainbow colours. Seal it all before wrapping it with the wire beads. Or, consider protecting the surface in designs before painting to leave behind rainbow-y bits. -Jan
joyceblank47yahooc om
Nov 30, 2009
I had another thought. Instead of painting the CD why not use up your scrap yarn,and rap the CD instead. What do you think Joyce Blank
Report Inappropriate Comment
Are you sure you would like to report this comment? It will be flagged for our moderators to take action.
Thank you for taking the time to improve the content on our site.