Winter Stars Part 2 of 3
With Winter Stars Part 2 of 3 from Nuts About Needlepoint you will continue to learn how to complete your lovely needlepoint project. Follow the given patterns and you'll be closer to finishing your masterpiece!

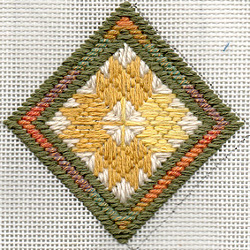
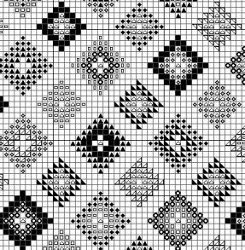
This segment of Winter Stars has the first two borders. These borders all leave out the corners. Next month’s segment will have the final borders and the corners.
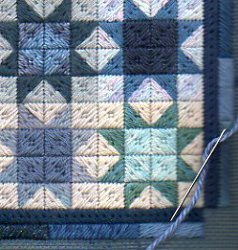
All borders begin and end at the edges of the stars. For the inside border you will need a matte thread in your dominant color. Vineyard Silk or Silk & Ivory is excellent for this. If you do not have enough of one thread, you may do each segment of the border in a different thread, but do not change colors in the middle of any side of the inside border.
I used a matte cotton from my stash for two borders and a Dinky Dyes silk for the other two.
The next border uses more threads from your stash.

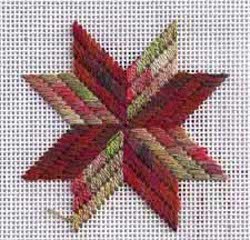
The first border is stitched in Cosmopolitan Stitch, a variation of Cocktail Stitch. In it long Diagonal Gobelins over four threads alternate with a row of two shorter Diagonal Gobelins over two threads each. This breaks up the solid mass of Diagonal Gobelin and creates a pretty pattern.
![]()
The next border uses Random Elongated Cashmere, with each Cashmere Stitch in a different color. The Cashmere Stitches can be any length you like and should vary in length (the diagram has the Cashmeres the same length though). All are the same width, over four threads. Take a thread from your stash and make a Cashmere Stitch ending it when you run out of thread or when you feel like it.
Blocks next to each other should not be the same length. This border adds to the scrappy look of the piece.
Your Recently Viewed Projects
Thanks for your comment. Don't forget to share!
JessiCAN
Jul 18, 2011
@camikula 0451010: Unfortunately, a picture of the finished project is unavailable. We apologize for any inconvenience. -- Editor of FaveCrafts
camikula 0451010
Jul 15, 2011
Hi,br This looks beautiful! I haven't done bargello in years and this pattern makes me want to take it up again!br The only thing that is stopping me is the fact there is no picture of the finished project. I don't want to go to the expense of puchasing the supplies and then putting the time into the project only to find I'm not going to like the finished project.br Is there a picture of the finished project? If so, then please display it. If not, is it possible to get a picture of the finished project and post it?br Many thanks for all your help and for keeping such a great website available to all of us. Cathy
Report Inappropriate Comment
Are you sure you would like to report this comment? It will be flagged for our moderators to take action.
Thank you for taking the time to improve the content on our site.