Scrap Bag Diamonds
Get rid of your boring old scrap bag - make Scrap Bag Diamonds! This needlepoint pattern from Nuts About Needlepoint looks great and is perfect for everyone!

Materials:
- Background color
- Accent color
- Stash
Instructions:

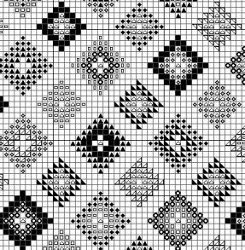
- The chart uses one symbol for each stitch. This makes the chart very versatile.
- For a small project, stitch each symbol as a single Tent or Cross Stitch. For the slightly larger project, stitch each symbol as a Mosaic Stitch.
- The symbols could also be stitched as any other square stitch the same size as a Mosaic Stitch; for example, you could create a pattern in Smyrna Crosses.
- For the wallet (which is the largest accessory) stitch each stitch as a Scotch Stitch, going over three threads. In this way, you can make a set of accessories, which will be coordinated, but with patterns in a scale to match the stitching area. You could also use bigger Scotch Stitches to make a tote bag insert, creating a matched set of accessories.
- The accent color in the pattern, brown in the model, should be a medium to dark neutral color. If you use a neutral color, any scrap bag thread will work in the motifs.
- The background color is less important and can be an off-white, like the pale pink pictured, or a stronger color. You must be careful to select a color which contrasts sharply with the accent color.
- Choose a background or accent color that is a solid color or that has only a little variation in shade. Both colors should appear as a solid color because they tie the design together, creating a consistent design element throughout.
- Measure out the area to be stitched and mark it with a permanent marker.
- Find the center and begin stitching one of the motifs in the centering it.
- Park the ends of background and accent thread in the margins of the canvas so that they can be used again without ending the thread.
- Once the first motif is stitched, follow the chart below to place additional motifs. One good way to do this is to stitch enough background to place the next motif and then stitch that motif.
- The remainder of the background can be stitched later.