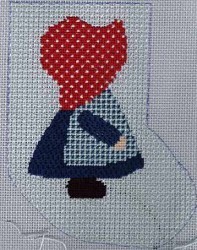
Sunbonnet Sue Needlepoint Mini Sock
This needlepoint project from Nuts About Needlepoint will put a smile on everyone's face. You can make this adorable Sunbonnet Sue Needlepoint Mini-Sock and give it as a gift for a loved one. The special project would also make for a wonderful holiday stocking.

Materials:
- 18 mesh mono canvas 8 x 10 inches
- 1 skein each Anchor floss in:
Flesh
White (for gingham and dots)
Color family A (dark, medium and light tones)
Accent color B (for bonnet)
Black - 1 ball #8 pearl cotton in color to match canvas


Instructions:
- Begin by tracing the outline of the stocking onto your canvas from the linked image. Center the linked drawing of Sunbonnet Sue under the canvas and trace it onto the canvas. Use a non-xylene permanent marker like ZIG Fabric markers, SCA-UF markers or FabricMate Fabric markers.
- Use four strands of floss throughout for stitching.
- Start by stitching her hand using four strands of floss and Basketweave. Now stitch her boot with four strands of the black floss.
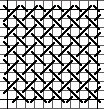
- Next stitch her apron using the medium, light values of color family A and white. This is a tent stitch pattern which mimics real woven gingham. It is easiest to stitch all the stitches in the light color first. These will be every other stitch in each row, forming a checkerboard pattern.
- Now fill in with white skipping every other row. Once you have stitched the white, then fill in the remaining stitches with the medium floss.

- Move on to stitching the dress and sleeve. These are stitched using Nobuko is the darkest shade of color family A.

- Once you have finished stitching her dress, move onto the bonnet. The main color of the bonnet will be your accent color. Stitch this in Basketweave but skip every other stitch in every fourth row. Once you have completed the main color of the bonnet, fill in the skipped stitches with cross stitches done in white. This stitch is called Dotted Swiss.
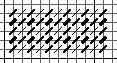
- The background is done in a simple criss-cross pattern with horizontal and vertical stitches going over two threads, called Woven Plait. I find this easiest to stitch in horizontal or vertical rows, switching the direction of each stitch. It can also be stitched in diagonal rows. All work just fine, but pick one direction and stitch the entire background this way.