Rose E'er Blooming Necklace
Add a touch of winter splendor to your wardrobe with this Rose E'er Blooming Necklace. Perfect for a classy Christmas party or a winter wedding, this necklace sparkles and shines with hues of red and green. You could even make matching earrings to go with the necklace...simply create 2 more flowers and glue studs to the back of them to create a lovely jewelry set that would make a great gift idea for the holidays. A fun and rewarding challenge for polymer clay fans, this Rose E'er Blooming Necklace is the perfect way to add a little touch of sparkle to your holiday wardrobe.
Primary TechniqueClay

SeasonWinter
Materials:
- Souffle - Cherry Pie, Cowboy, Sea Glass
- Sculpey Clay Conditioning Machine
- Premo geometric mini cutters - Flower, Oval, Diamond
- Flower cutter
- Sculpey Super blade
- Sculpey Etch ‘n Pearl
- Foils- red, bronze
- Brown micro glitter
- 1 package bronze chain
- Bronze lobster claw clasp
- Bronze small jump rings
- Bronze eye pins
- Seed beads- Teal Green
Notes:
- Polymer clay may stain. CLAY MAY DAMAGE UNPROTECTED FURNITURE OR FINISHED SURFACES. DO NOT USE polymer clay on unprotected surfaces. We recommend working on the Sculpey clay mat, wax paper, metal baking sheet, or disposable foil. Start with clean hands and work surface area. Knead clay until soft and smooth. For best results, clean your hands in between colors. Shape clay, pressing pieces together firmly. Bake on oven-proof glass or metal surface at 275°F (130 °C) for 30 minutes per ¼" (6 mm) thickness. For best baking results, use an oven thermometer. DO NOT USE MICROWAVE OVEN. DO NOT EXCEED THE ABOVE TEMPERATURE OR RECOMMENDED BAKING TIME. Wash hands after use. Baking should be completed by an adult.
- Begin by preheating oven to 275 °F (130 °C). Test temperature with oven thermometer for perfectly cured clay. For best results, condition all clay by running it through the Clay Conditioning Machine for several passes on the widest setting. Fold the clay in half after each pass and insert the fold side into the rollers first.
Instructions:
- Condition all the clay colors using the Clay Conditioning Machine. Roll out sheets of all the colors on the #1 setting.

- Add the Red Foil to the Cherry Pie clay. Run it through the clay conditioning machine on the #1 setting. This will add a crackle effect.

- Add the Bronze Foil to the Sea Glass clay. Run it through the clay conditioning machine on the #1 setting.

- Add a generous amount of the Brown Glitter to the Cowboy clay. Use your fingers to spread it around, evenly. To imbed the glitter into the clay, run it through the clay conditioning machine on the #1 setting, once or twice as needed.

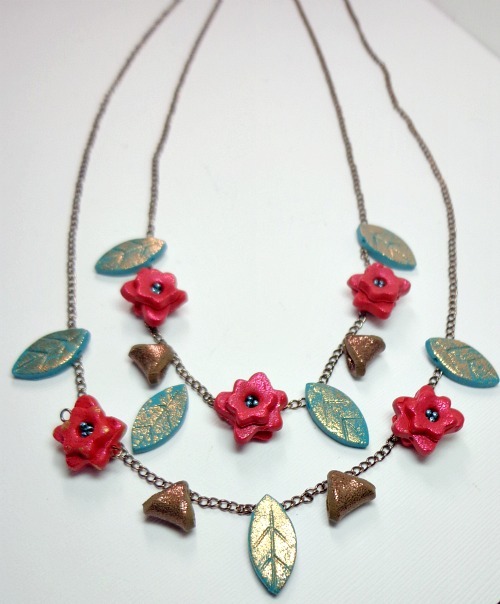
- Use the medium and small flower cutters. Cut 5 of the medium size flowers from the Cherry Pie clay. Cut 10 of the small flowers, also from the Cherry Pie clay.

- Lay the smaller flower on top of the medium flower, then use the large end of the Etch n Pearl rod to make a center in the flower, by gently pressing down about 2mm.

- Add the eye pin through the flower. Add 3 seed beads to the center of the flower.

- Cut 7 ovals from the Sea Glass clay. Add some veining detail using the pointy end of the smallest Etch n Pearl rod. Make a bead hole through the top section of the leaf, as shown.

- Using the small diamond shaped cutter, cut 6 diamonds from the Cowboy clay. Gently, press the ends together to form a bead. Run a beading pin through the opening.

- Bake all pieces according to the directions above.
- Cut 2 graduated lengths of chain, approximately one 24" and one at 27". Lay them out, and add a jump ring to both sides to attach them. Add the lobster claw clasp.
- Add the eye pins to each bead. Attach jump rings to each side of the bead. Lay out your design idea first, to decide where you will want the beads placed. Then add them to the necklace as shown.

 You can find this project-and many more-in our new free eBook, 11 DIY Christmas Decorations and Ideas.
Read NextRed Drop Necklace