Woodpecker Climbing

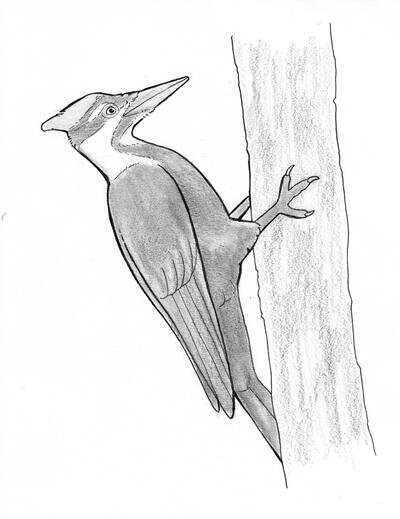
While some woodpeckers are colorful, for this tutorial we will draw a pileated woodpecker, which is mostly black and white. The males and females are similar but do differ in the red feathers on their heads. This could be either a male or a female pileated woodpecker. Furthermore, you could actually use this same tutorial to draw a whole host of different woodpecker species.
Tip:
The markings on this pileated woodpecker’s head are pretty complex. The tutorial details just how to draw them, but do take your time. These shapes don't need to be perfect to capture the essence of your woodpecker illustration.
INSTRUCTIONS
-
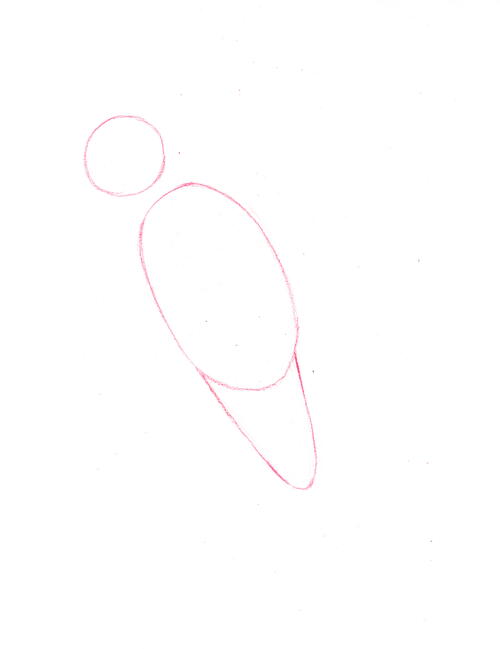
Step 1: Draw the head, body and base of the tail.
Draw a circle for the head in the upper left section of the page, three-quarters of the way up. Make this circle 1 inch (2.5 cm) in diameter to help with proportions for the rest of the bird.
Draw the body by adding a large oval shape to the bottom right of the head circle. The oval should be tilted slightly with the top edge pointing towards the head circle in an eleven o’clock direction, while the bottom of the oval should point down in a five o'clock direction. Make the body oval one and one-half times as wide as the head oval and two and one-half times as tall. Therefore, the oval should be 1½ inches (4 cm) wide and 2½ inches (6.5 cm) tall.
Add the base of the tail by drawing a “U” on the bottom end of the main body oval. Draw the left edge of the “U” part way along the left edge of the main body oval, creating one straight line from the left edge of the oval down to the bottom of the “U” shape. The right edge of the “U” should attach just shy of the right edge of the main body oval. The base of the tail “U” should point also in the five o’clock direction. Make the left edge of the oval twice the length of the head diameter, so 2 inches (5 cm). -
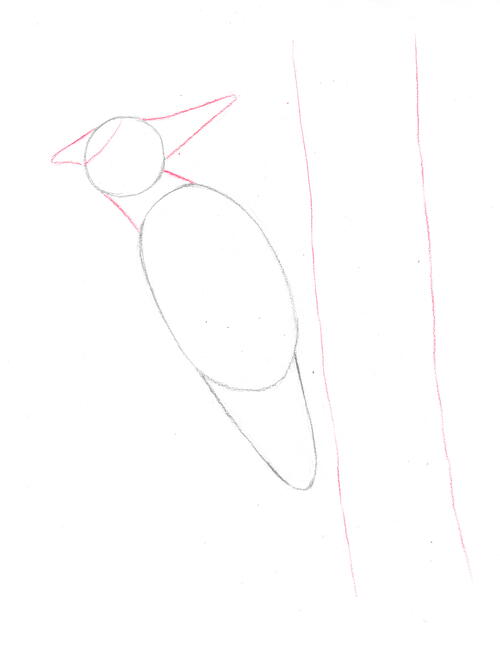
Step 2: Draw the beak, crest, neck and tree.
Draw the beak shape by adding a sideways “V” shape starting from the top right of the head circle at the one o’clock mark. The bottom edge of the beak should attach at the three o’clock mark. The point of the “V” should be in the two o’clock direction. Make the tip of the beak the same distance from the edge of the head circle as the diameter of the head circle, so 1 inch (2.5 cm) long.
Draw the crest, starting with a “V” shape from the left edge of the head circle. The top of the crest “V” should leave the head circle halfway between the ten o’clock and eleven o’clock marks and point downwards in an eight o’clock direction. The bottom line of the crest should leave the head circle at the nine o’clock mark and be roughly horizontal. The distance between the tip of the crest “V” and the head circle should be one-third of the diameter of the head shape. Finish the head crest by drawing a curved line inside the head circle from the nine o’clock mark of the head and circling up to the twelve o’clock mark.
Draw the neck lines, starting with the right line for the throat. Draw a line from the four o’clock mark on the head circle down towards the main body oval in a four o'clock direction until it meets the body. Draw the left neck line by drawing in a five o'clock direction from the seven o’clock mark of the head circle until the line meets the main body oval.
Draw the trunk of the tree to the right of the woodpecker. The wonderful thing about the trunk is that it can be drawn however you like. The only important thing is making sure it’s not too far away from the woodpecker’s body. For a guide, draw two vertical lines that run parallel, the same distance apart as the thickness of the main body of the woodpecker. These lines don’t need to be straight as they’ll help represent the bark of the tree. The left line should run parallel to the bottom of the woodpecker, leaving a gap of one-quarter the width of the top of the tail “U.” -
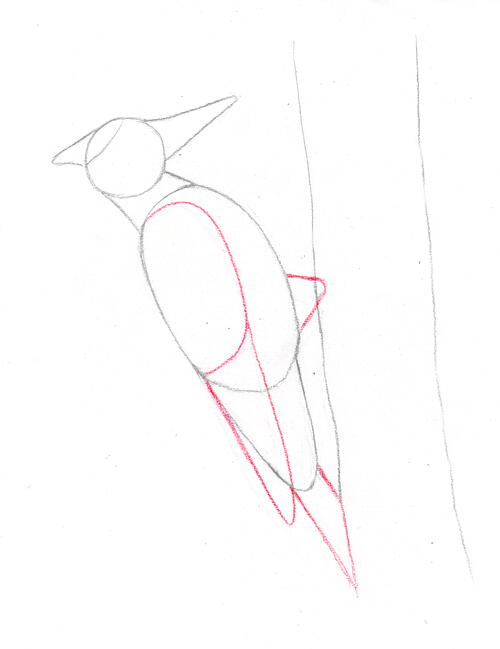
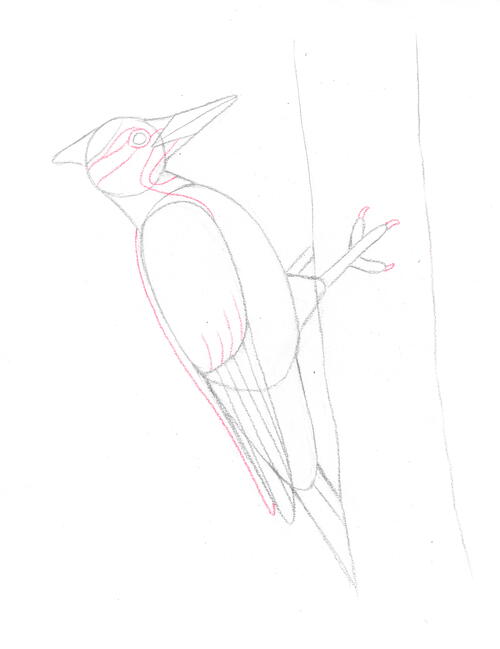
Step 3: Draw the wing, base of the leg and tail feather shape.
Draw the wing by adding a backward “C” shape within the main body oval. Draw the top of the “C” from the point where the back neck line meets the main body oval. Draw in the two o’clock direction initially until level with the bottom of the throat line, and then draw downwards, just shy of vertical. Once the line is two-thirds of the way down the body length, curve towards the eight o’clock direction and draw until the line meets the point where the left of the base of the tail “U” meets the main body oval.
Add the tip of the wing by drawing a tall “V” shape at the bottom of the backward “C” we just drew. Attach the left edge of the wing “V” to the point where the “C” meets the main body oval and draw downward between the five o’clock and six o'clock direction. Attach the right edge of the wing “V” to the right of the backward “C” shape, creating one long continuous line. Connect the bottom of the right end of the wing “V” to the bottom of the left end. The tip of the wing “V” should stop a little lower than the tip of the base of the tail “U” and be the same length as the backward “C.”
Draw the base of the leg by adding a sideways “V” shape to the right edge of the body oval. The top of the “V” should attach just below the middle and stick out to the right almost horizontally. The bottom edge of the leg “V” should leave the body one-fifth up from the bottom and point between the one o’clock and two o’clock direction. The point of the leg “V” should sit half the distance away from the main body as the width of the upper wing “C” shape.
Draw the tail shape by adding two parallel lines from the end of the base of the tail “U” shape. Both lines should point in a five o'clock direction. The bottom line should start at the point where the right edge of the wing “V” intersects with the bottom of the base of the tail “U.” Draw this line until it meets the tree trunk. Then draw the top line from the right edge of the base of the tail “U.” The two lines should be one-third of the distance apart as the width of the upper wing “C” shape. -
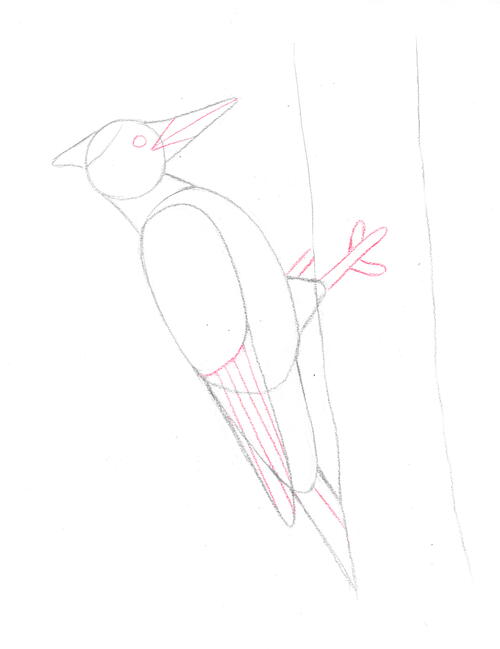
Step 4: Draw the mouth, eye, feet and individual wing and tail feathers.
Starting with the mouth and the beak, draw a sideways “V” opposite to the initial break “V” that’s half the size and pointing downwards in an eight o’clock direction. The top of the smaller “V” should meet the top of the initial beak “V,” one-quarter away from the head circle. The bottom of the smaller “V” should meet the bottom of the initial break “V” one-third of the way along from the head circle. Now draw the mouth by adding a line that runs between the two “V” points.
Draw the eye by adding a small oval shape just up and to the left of the point of the smaller mouth and beak “V.” This oval should be a little over one-eighth of the diameter of the head circle.
Draw the legs and feet to help the woodpecker attach to the trunk, starting with the far-side leg. Draw two parallel lines that leave the top edge of the leg “V” added in step 3. The lines should point up between the one o’clock and two o'clock directions. The left line should start where the leg “V” meets the main body. The distance between the two lines should be one-third of the distance between the tip of the leg “V” and the main body.
For the near-side leg, draw a long sausage shape that starts at the tip of the leg “V.” Point it between the one o’clock and two o'clock directions. The width of this shape should be the same as the far-side leg’s. Make the length of this shape the same as the width of the upper wing created by the backward “C” from step 3. The sausage shape will be part leg and part toe. Draw the first toe by adding a small inverted “U” that’s the same width but one-quarter the length of the initial sausage shape. The left of the first toe should attach at the middle of the top edge of the initial sausage, and the “U” should be pointing just shy of twelve o'clock. Now add the third toe, which will be a “U” of the same width and one-third the length of the initial sausage shape. Set it centrally on the bottom edge of the initial sausage shape and point it just below the three o’clock direction.
Draw the individual feathers within the wing “V” shape. Create five distinct feathers by adding four equally spaced lines that all run parallel from the bottom edge of the upper “C” shape to the bottom of the “V” shape.
Add a line within the tail shape to create a distinct feather shape. Draw a diagonal line from the bottom of the base of the tail “U” to the trunk of the tree, parallel to the two lines drawn in step 3. It should create two smaller shapes, the bottom of which is almost twice the width as the top. -
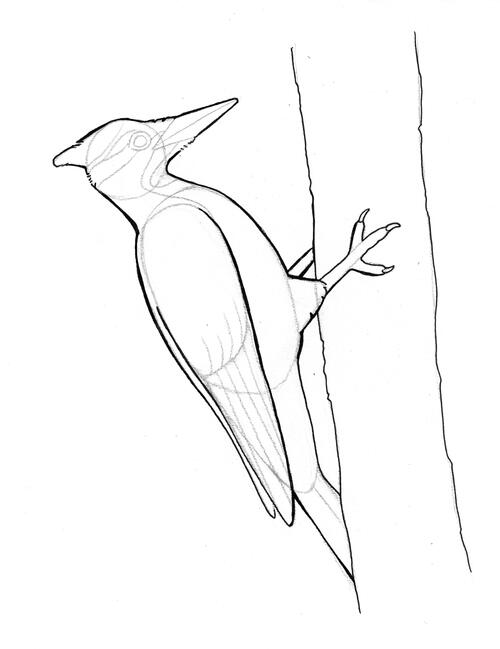
Step 5: Draw the far-side wing, upper wing feathers, claws and facial markings.
Draw the far-side wing by creating a sliver of a shape running all the way along the left edge of the woodpecker. Start the line just at the base of the neck shape, above where the left neck line meets the main body shape. Run the line parallel to the left edge of the main body shape and down the left edge of the wing “V” shape. Make sure the far-side wing shape is very narrow.
Draw the upper wing feathers on the near-side wing along the bottom edge of the backwards “C” drawn for the wing. Add four equally spaced “J” shapes along the bottom edge. The tall end of the “J” should be one-quarter the length of the upper wing shape.
Draw the claws by adding a “V” to the end of each of the toes on the near-side leg. The “V”s should be narrower than the toes.
Draw the facial markings. This step creates quite a few complex shapes, so take your time with this. Draw a ring over the eye shape to create the eyelids. From the three o'clock mark of the outer ring of the eye, draw a short line in the two o’clock direction to the center of the top line of the smaller mouth and beak “V” from step 4. Draw two parallel lines from the bottom left of the outer eye ring to the back of the head. These lines should be slightly wavy. The top line should connect between the nine o'clock of the eye ring to the nine o’clock of the head circle. The bottom line should run from the seven o’clock of the eye ring to the eight o’clock of the head circle. Then, add a willow leaf-like shape above the two parallel lines by drawing a curved line from the twelve o’clock mark of the eye ring to just left of the middle of the top wavy line.
Finally, draw two lines to create a band of dark feathers from the bottom of the beak to the chest. From the middle of the bottom line of the small “V” of the mouth and beak, draw from the eight o’clock direction, and curve your line down to connect with the four o’clock mark of the head circle before curving back and meeting the middle of the throat line. Then draw an “S” shape from the tip of the smaller beak “V” that starts parallel to the previous line. Curve down to the five o’clock mark of the head circle, and then run it down in a four o’clock direction until it meets one-quarter of the way down the wing “C” shape. -
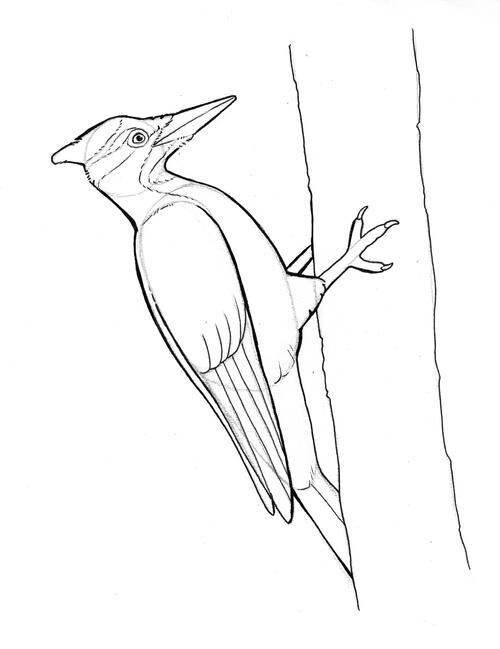
Step 6: Draw the outline.
With a thicker pen, draw along the initial beak “V” shape with a solid line until it meets the points of the smaller beak “V.” Between the top end of the smaller beak “V” and the top of the head circle, draw a zigzag for feathers. Then draw over the top of the head to the crest, adding a few ticks and a gap in the line for the parting in the crest feathers. Draw around the back of the crest “V,” down the back of the head, and make sure there are a few apostrophe marks just below the crest for feathers.
Draw down along the neck, over the far-side wing, and partially over the left edge of the near-side wing. Draw along the right edge of the near-side wing shape. Leave the top edge of the wing shape down to the middle of the left edge free of pen. Draw over the outside of the tail shape, along the right of the base of the tail “U” and over the leg “V.” On the lower edge of the leg “V,” add a few notches for feathers.
Draw over the woodpecker’s feet and claws. Then draw along the top right of the body shape, along the throat and up to the feathers below the beak.
Draw along the trunk of the tree, keeping the lines sort of jagged for the tree’s bark. -
Step 7: Add the details.
With a thinner pen, draw along the mouthline. Draw ticks and apostrophes for the feathers along both edges of the smaller beak “V.” Draw over the eye shape and the ring around the eye. Add a pupil by drawing a small circle within the eye shape, leaving the top right blank for the eye shine.
Draw over the markings guidelines from step 5, but make sure the pen lines are broken. Drawing a series of ticks, dashes and apostrophes along the marking lines creates the appearance of feathers. Do the same for the bottom curved line of the crest. Also add dashed lines on the top edge of the near-side wing “C,” a couple of dashes from the left tip of the near-side wing outline, and a few ticks along the guide of where the main body meets the tail “U” shape. Also, draw a few ticks at the bottom end of the “U” where it meets the tail feathers.
Draw over the bottom edge of the wing “C” shape, but instead of drawing one single line, use the “J” shapes from step 5 as a guide. Essentially, draw four “J” shapes side by side, and a short-curved line from the bottom of the right “J” to the right edge of the wing. Then draw over all the individual wing tip feathers within the wing “V” shape and along the diagonal line drawn for the individual feathers in the tail shape.
Erase your pencil lines. -
Step 8: Shade your woodpecker drawing (optional).
With your lighter pencil, fill in the entire tree trunk and woodpecker. Some of the marking shapes added in step 5 will be left white. These shapes are on the throat below the beak, the large section that runs from the back of the head to the beak and the small willow leaf shape above the eye.
With your darker pencil, add the darker feathers. Pileated woodpeckers are almost black, except for the head crest. Leave the crest shape lighter, as well as the beak. Go over the facial markings that are not being left white, and then shade the rest of the bird in a darker pencil. Leave a few patches a little lighter to account for the shine on the feathers. For example, the top of the leg “V,” the inside sections of the feathers and the top right of the main body where the chest is are good places to leave a little lighter.
Add some texture to the tree with a darker pencil. This can be as you please, but add patches that are wonky and darker, leaving some sections lighter. If your paper is textured, this can be a great way to add some roughness to the tree. Try to sketch in the same direction and parallel to the trunk lines.
Soften the shading on the woodpecker by blending the pencil with your finger or a tissue.
Credit:
Reprinted with permission from The Animal Drawing Primer by Jennifer Rae Phillips. Page Street Publishing Co. 2023. Artwork by Jennifer Rae Phillips.
Read Next3d Paper Flowers in a Vase