This project was submitted by one of our readers, just like you.
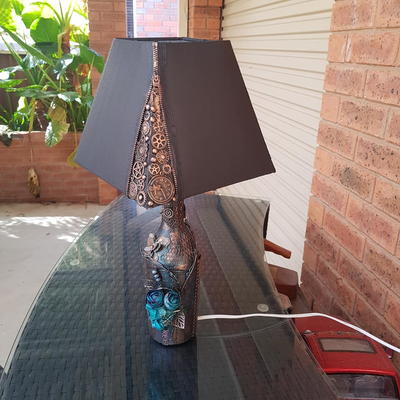
Wine Bottle Lamp

Wine Bottle Lamp
"I saw these mixed media bottles on Pinterest and I loved them straight away. I had never done anything like this before but I am always willing to try new projects. I decorated the bottle and found it was not that difficult to do. It was as simple as glueing different textures and layers to the bottle. Any shaped bottle can be used to do these the most common is the wine bottle, just drink the wine first."
Primary TechniqueMixed Media

Instructions
-
If the labels come off easily you can remove them. Add a coat of black gesso primer to the bottle. You can speed up the drying time using a hairdryer.
-
Wrap a stencil around the bottle and use a spatula to add a layer of texture paste on top of the stencil. You don't need to add the texture paste perfectly the imperfections are what give the bottle character. Remove the stencil straight away and wash the excess texture paste off. Once dry it will not wash off the stencil. I used multiple stencils I made using a Cricut and added different textures all around the bottle. I like to paint everything as I go along because I find it hard getting into all the nooks and crannies once everything is glued on top. I use the black gesso to do this, acrylic paint will work fine.
-
I got myself a box and went around the house looking for anything that I could use. As a crafter, I had charms at home from a previous project which worked great. I use broken jewellery, a mesh of an onion sack, zipper off some broken jeans, broaches, artificial flowers and twig off my grapevine just to name a few.
-
The idea is to add lots of different textures and layers to the bottle that will be highlighted later. Some more ideas for adding textures check out these Halloween bottles. I used E6000 glue as well as Bostick multi bond to glue everything to the bottle.
-
You can use any artificial flower, some I cut off arrangements I already had at home. The flowers were sprayed with shimmer spray and highlighted with coloured wax paste. If you did not paint the bottle as you went along you can paint it all now with the black gesso. Then apply the coloured wax pastes to the surface area using your finger.
-
It was an afterthought to turn this bottle into a lamp. So it would be ideal to do this step before you start decorating the bottle. I used a 1 cm diamond tip hole cutter. Unlike other glass cutters, they do not have a drill bit to start the hole and keep the drill bit from slipping across the surface. To keep the drill bit in place while cutting the glass I used a scrap of wood. A 1 cm hole was drilled into the wood which is positioned and clamped to the bottle. The diamond drill bit is them positioned into the hole and you drill the hole in the glass. You will need to add water while drilling. This method took less than 30 seconds to do and I had a nice clean hole.
-
Push the wire through the hole and up through the top. A threaded tube with a washer attached was added below the lid and the fitting was screwed onto the top end. I wired up the lamp and attached the lampshade.
-
To decorate the lampshade. I glue a zipper to the corner of the lampshade and glue the steampunk charms inside like a did with the bottle. To fill in the gaps I glued dried split peas. I painted them all with the black gesso and highlighted the surface with the bronze wax paste. And the was my lamp done.

Read NextWoodpecker Climbing