Green and Groovy DIY Wall Art
 Visit Rita at Rita Barakat.
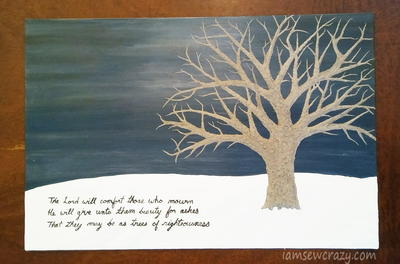
This Green and Groovy DIY Wall Art is sure to stick in your mind even when you're out of the house. This beautiful piece of DIY wall decor features a soothing blend of green and blue paints that relaxes you as you admire the canvas. This step-by-step tutorial shows you how to incorporate various types of media, from ribbons and decoupage to paint and markers, to create this artwork. This makes a heartfelt gift for any friend who has space on her wall for a reminder to live life to the fullest.
You can find this project, as well as many other fabulous blogger projects, in our new eBook, The Best Blogger Craft Ideas 2014: Decoupage, Sewing, Jewelry Making, and More free eBook. Download your own free copy today!

Materials:
- 12x12 canvas
- Coats & Clark Phoomph for fabric
- Coats & Clark Free Spirit Fabric
- Darice Spectrum Noir pens in pale hues
- Darice hemp cord
- Darice embossing folder
- Plaid Podgeable Papers
- Plaid Matte & Sparkle Mod Podge
- Plaid Podgeable Shapes
- Plaid painting stencil
- Fiskars shears
- FrogTape Shape Tape in chevron
- Scrap paper
- Roc Lon drop cloth
- Faber-Castell gesso
- Faber-Castell PITT Artist Pens
- Faber-Castell gelatos
- Elmer's paint pen in gold
- Therm O Web iCraft Dots
- Scor-Tape
Instructions:
- Brush a layer of gesso on the entire canvas.
- Dry emboss scraps of paper and glue to canvas.
- Use gelatos to draw on canvas. Once finished, spray canvas with water and spread color with wet paint brush. Dry with heat gun.
- Add another layer of color with gelatos, using Shape Tape and the stencil as guides. Blend colors with dry sponge.
- Use iron-ons and PITT pens to add phrase to the canvas.
- Draw or trace a girl onto the drop cloth. Fill in features with pens and gelatos. Add highlights with Sparkle Mod Podge.
- Cut out small phrases for necklace and cover with Matte Mod Podge. Adhere phrases to acrylic shapes and let dry.
- Spray phrases with water and rub off paper so that only translucent words remain.
- Use paint pen to draw on edges. String with hemp.
- Cut a rectangle out of the fabric. Use Scor-Tape on the dress to attach rectangular piece of fabric, tucking edges and necklace under dress.
- Cut long 1" strip of fabric and roll it up lengthwise. Start from the inside of adhesive dot and wrap fabric around until the adhesive has been covered.
- Trim the edge and tuck under. Peel the backing and attach to the headband.
- Use Phoomph adhesive to attach girl to canvas.
Read NextRecycled Book Page Bud Vase